background image

24

25

Important Safety Precautions

•  Do not disassemble the product; do not use alcohol, solvent or benzene to clean the surface of the 

product. Please contact us if you experience any problems. 

•  This product should be charged for more than 12 hours when charging it the first three times.

•  Do not store the product in high temperature, humidity or dust; do not put the product in a vehicle 

with closed windows especially not during summer.

•  Avoid dropping or strong impact to the product, do not shake it violently, otherwise it may cause 

damage to the touch screen or display.

•  Please select the appropriate volume; the volume should not be too high when using headphones; 

if you feel signs of tinnitus, please turn down the volume or stop using the product.

•  Please charge the product when:

  a. The battery icon shows low power.

  b.  The system is automatically shut down. (The system will shut down automatically when the  

battery is low.)

  c. There is no response when clicking buttons.


Note:  

Please only use the adapter delivered with the product to charge the MID. No other chargers 

can be used – risk of fire!

•  Please do not disconnect the machine when it is formatting or uploading/downloading, otherwise a 

program error may occur.

•  When improperly being shut down, the machine will scan and repair the disk on reboot. This 


process may take a few minutes.

•  The company is not responsible for memory loss caused by damaging or repairing the product or 

other reasons stated. Please follow the instructions of this manual when using the MID. 

•  Do not use the product in places where the use of electronic devices is prohibited; e.g. an aircraft

•  Please do not use the product when driving or walking. It may cause an accident.

•  USB is for data transmission only, do not use it for charging the product.

•  This machine is not water resistant.

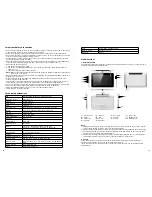
Technical Specifications                                                 

CPU

Rockchip 3066 Cortex A9 1.5 GHz, Dual Core 

Operating system

Android 4.1.1

Browser

Google Browser

Flash memory

16 GB (internal)

RAM

1 GB DDR 3

Expansion slot

Micro SD/SDHC (TF) card slot, up to 32 GB (optional)

Screen

10,1" G+G capacitiv 5-point touch-screen, LCD

Camera

Front: 0.3 MP

Resolution

1024 x 600 Pixels

Built-in speakers

2x1 W, 8 ohm

Earphone

3,5 mm

USB interface

Micro USB

HDMI interface

Mini HDMI

Battery

Li-Polymer rechargeable battery 10.400 mAh  

(Tablet PC: 2x 2600 mAh, keyboard: 2x 2600 mAh)

Size Tablet PC

ca. 268 × 171 × 11 mm

Size keyboard

ca. 270.5 x 185 x 14 mm

Voltage

DC 12 V/2 A

Working temperature

-10 °C - +55 °C

Music formats

APE, MP, FLAC, AAC, WAV, WMA, MP3, AC3

Video formats

supports 1080p, 720p, AVI, MKV (H.264hp), FLV, RM/RMVB, 

MOV

Picture formats

JPEG, BMP, PNG, GIF

E-Mail

Email, Gmail (optional)

Maps

Google Maps, Navigation map

Network access

Wi-Fi 802.11 b/g/n

Bluetooth

Built-in

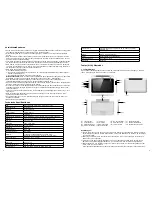
MID Overview

1. MID Introduction

This chapter describes the appearance of the MID, including its buttons and ports; it will guide you to 

understand the features and accessories.

Note:


1)  Clicking and dragging are performed using the LCD touch screen. Please do not use pens, pencils 

or other sharp objects to click on the screen to avoid scratching.

2)  Please keep the speakers clean to avoid them being blocked by dirt and affecting the sound quality. 

3)  The antenna and the type label are located at the back of the MID. Please do not cover the back 

with metal objects to avoid poor signal strength.

4)  Please note! The keyboard has its own battery to be charged separately, see (10) DC connection.


The supplied charging cable can be used for both the tablet and the keyboard.

2. TF Card 

Follow the instructions of the icon displayed on the MID when inserting a TF card. Please pay  

attention to the direction in which the TF card has to be inserted.

(Press the card with your thumb and then release it to remove the card. The card will be ejected 

automatically.)

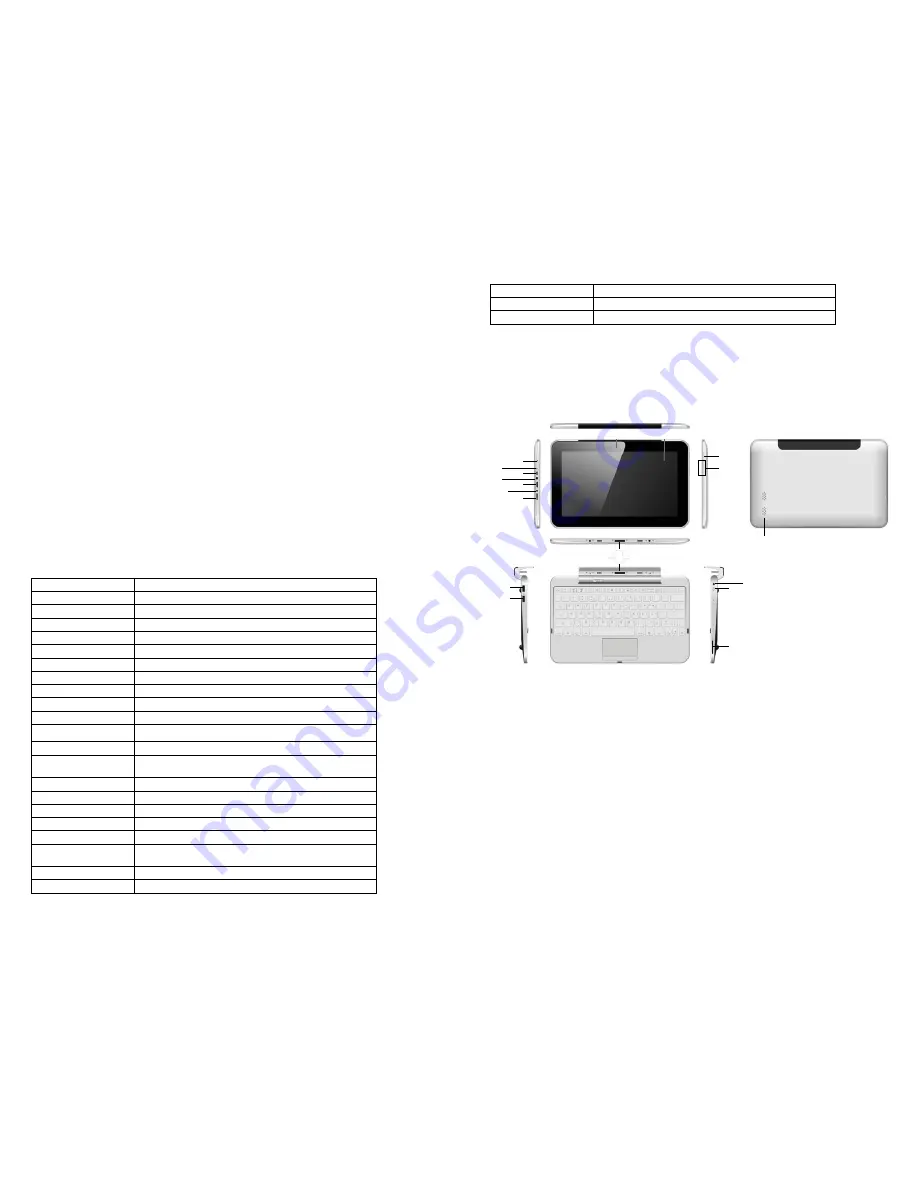
(1)  Touch screen 

(2)  Camera 

(3)  On/off key 

(4)  Volume key

(5)  Reset 

(6)  MIC  

(7)  USB slot 

(8)  Earphone slot

(9)  HDMI slot 

(10)  DC slot 

(11) TF card 

(12) Docking port 


(13) SD card 

(14)  Speakers

(2)

(4)

(10)

(3)

(13)

(1)

(3)

(5)

(6)

(7)

(7)
(7)

(8)

(9)

(11)

(10)

(14)

(12)

Summary of Contents for TP10.1

Page 1: ...leitung Quick Start Guide 25000 Chips and More GmbH Gewerbestr 7 D 79112 Freiburg Tel Nr Tablet Support 49 800 8 08 25 80 E Mail support tablet i onik de www i onik de Kostenfrei aus allen deutschen N...

Page 2: ...t und detaillierte Informationen gegeben Zudem erhalten Sie Tipps und Tricks um die techni sche Leistungsf higkeit zu verstehen Die beigelegte Garantiekarte erkl rt Ihnen unsere zus tzlichen Servicele...

Page 3: ...tieren Sie uns bitte wenn Sie Probleme haben Dieses Ger t sollte bei den ersten drei Ladevorg ngen mindestens 12 Stunden lang aufgeladen werden Bitte bewahren Sie das Produkt nicht an feuchten oder st...

Page 4: ...r cken und halten Sie die Taste mehr als 3 Sekunden Wenn nicht ausdr cklich erw hnt sind alle Bedienungen in dieser Anleitung mittels kurzem Dr cken auszuf hren 360 Grad Rotation Rotieren Sie das MID...

Page 5: ...dem Hauptbildschirm um das Application Programm Men zu ffnen Dr cken Sie die Widget Option und der Widget Bildschirm wird ge ffnet Dr cken und Halten des Symbols ffnet den Widget hinzuf gen Bildschir...

Page 6: ...Sie im Anwendungsmen um zum Einstellungsmen zu gelangen APPS Sie k nnen alle installierten APPS auf dem APPS Einstellungsbildschirm aufrufen Wenn Sie eine APP ffnen k nnen Sie die Informationen zu die...

Page 7: ...irm um zum Explorer zu gelangen Sie k nnen Programme die auf dem Ger t oder einer TF Karte gespeichert sind browsen kopieren l schen verschieben bearbeiten und umbenennen Klicken Sie auf ein drahtlose...

Page 8: ...um ein Video abzuspielen 2 2 Klicken Sie Installieren Der Fortschritt der Installation wird vom Ger t angezeigt Nach erfolgreicher Installation erhalten Sie die Meldung Anwendung erfolgreich installi...

Page 9: ...pk Installer Klicken Sie Apk Installer und w hlen Sie Install Klicken Sie dann Internal Memory um die neue Software zu installieren Klicken Sie auf Manage um zu starten exportieren deinstallieren oder...

Page 10: ...you to the basic characteristics of this product so you can get the best out of your experience using the MID Mobile Internet Device The product s features are described and detailed information is gi...

Page 11: ...r charging the product This machine is not water resistant Technical specifications CPU Rockchip 3066 Cortex A9 Dual Core 1 5 GHz Operating system Android 4 1 1 Browser Google Browser Flash memory 16...

Page 12: ...g Key action definition 1 Short press press less than 1 2 seconds 2 Long press press and hold for more than 3 seconds All operations in this manual are performed by a short press unless stated otherwi...

Page 13: ...the main interface to open the Application Program menu Press the WID GETS option This will open the widget interface Pressing and holding the icon will open the add widget interface Move the icon to...

Page 14: ...e Application Program menu to enter the settings menu APPS In the apps settings interface users can see all installed applications If you open one application the relevant information is displayed If...

Page 15: ...plorer You can browse copy delete move edit and rename programs saved on the MID or a TF card Click on a wireless network and the MID will open the message screen Click space to open the keyboard ente...

Page 16: ...F card 2 2 Select to open a picture 2 3 Select to play a video 2 2 Click Install The MID will show the progress After installation it will display Application installed successfully 2 3 Click Finish t...

Page 17: ...ive email messages 5 Apk Installer Click Apk Installer select Install Then click Internal Memory to install new software Click Manage to launch export uninstall or cancel 4 Camera and Video Click in t...

Page 18: ...g Quick Start Guide 25001 Chips and More GmbH Gewerbestr 7 D 79112 Freiburg Tel Nr Tablet Support 49 800 8 08 25 80 E Mail support tablet i onik de www i onik de Kostenfrei aus allen deutschen Netzen...

Page 19: ...t und detaillierte Informationen gegeben Zudem erhalten Sie Tipps und Tricks um die techni sche Leistungsf higkeit zu verstehen Die beigelegte Garantiekarte erkl rt Ihnen unsere zus tzlichen Servicele...

Page 20: ...1 3 5 6 7 7 7 8 9 11 10 14 12 Vorsichtsma nahmen Bauen Sie das Ger t nicht auseinander reinigen Sie die Oberfl che nicht mit Alkohol L sungsmittel oder Benzol Kontaktieren Sie uns bitte wenn Sie Prob...

Page 21: ...r cken und halten Sie die Taste mehr als 3 Sekunden Wenn nicht ausdr cklich erw hnt sind alle Bedienungen in dieser Anleitung mittels kurzem Dr cken auszuf hren 360 Grad Rotation Rotieren Sie das MID...

Page 22: ...dem Hauptbildschirm um das Application Programm Men zu ffnen Dr cken Sie die Widget Option und der Widget Bildschirm wird ge ffnet Dr cken und Halten des Symbols ffnet den Widget hinzuf gen Bildschir...

Page 23: ...Sie im Anwendungsmen um zum Einstellungsmen zu gelangen APPS Sie k nnen alle installierten APPS auf dem APPS Einstellungsbildschirm aufrufen Wenn Sie eine APP ffnen k nnen Sie die Informationen zu die...

Page 24: ...irm um zum Explorer zu gelangen Sie k nnen Programme die auf dem Ger t oder einer TF Karte gespeichert sind browsen kopieren l schen verschieben bearbeiten und umbenennen Klicken Sie auf ein drahtlose...

Page 25: ...um ein Video abzuspielen 2 2 Klicken Sie Installieren Der Fortschritt der Installation wird vom Ger t angezeigt Nach erfolgreicher Installation erhalten Sie die Meldung Anwendung erfolgreich installi...

Page 26: ...exportieren deinstallieren oder abzubrechen 4 Kamera und Videoaufnahmen Klicken Sie im Application Programm Men um die Kamera manuell zu ffnen Foto Vorschau Vordere hintere Kamera Einstellungsmen Fot...

Page 27: ...you to the basic characteristics of this product so you can get the best out of your experience using the MID Mobile Internet Device The product s features are described and detailed information is gi...

Page 28: ...ng system Android 4 1 1 Browser Google Browser Flash memory 16 GB internal RAM 1 GB DDR 3 Expansion slot Micro SD SDHC TF card slot up to 32 GB optional Screen 10 1 G G capacitiv 5 point touch screen...

Page 29: ...g Key action definition 1 Short press press less than 1 2 seconds 2 Long press press and hold for more than 3 seconds All operations in this manual are performed by a short press unless stated otherwi...

Page 30: ...the main interface to open the Application Program menu Press the WID GETS option This will open the widget interface Pressing and holding the icon will open the add widget interface Move the icon to...

Page 31: ...e Application Program menu to enter the settings menu APPS In the apps settings interface users can see all installed applications If you open one application the relevant information is displayed If...

Page 32: ...plorer You can browse copy delete move edit and rename programs saved on the MID or a TF card Click on a wireless network and the MID will open the message screen Click space to open the keyboard ente...

Page 33: ...F card 2 2 Select to open a picture 2 3 Select to play a video 2 2 Click Install The MID will show the progress After installation it will display Application installed successfully 2 3 Click Finish t...

Page 34: ...ings menu Photo Video Photo Video recording MID and Keyboard 1 MID and Keyboard Assembly Installation Pulling the red arrow position switch to the left then align the tablet PC and keyboard slot press...

Page 35: ...ll SerienNr Vom Service vergeben RMA Nr Kaufdatum Name Adresse Tel Fax E Mail Die Garantie ist nur g ltig wenn die Karte vollst ndig ausgef llt und die Originalrechnung bzw der Kaufbeleg beigef gt ist...

Page 36: ...9 800 8082580 Mo Fr von 8 00 18 00 Uhr Mail support tablet i onik de Internet www i onik de Bitte verpacken Sie das Produkt sorgf ltig und vergessen Sie die R cksendeadresse sowie die vom Service verg...

Reviews: