8
9
Note:
The 4x AA alkaline batteries serve as backup power only when AC power failed. You should not rely
on battery power and make sure the proper AC power is supplied to the dialler at all times.
• Low battery indication: If the batteries need to be replaced, the
icon flashes.
3.2 Mounting the Auto Dialler/Distress Alarm
• Mount the transmitter on a fixed surface such as a wall, close to a telephone connection, using the
screw and wall plug provided.
3.3 Connecting the Auto Dialler to your home telephone
• A phone line must be connected to the dialler in order for the Auto Dialler to work.
• Open the battery compartment to reveal 2 sockets for telephone cables.
• Connect the ‘Line’ socket to your wall telephone jack.
• Connect the ‘Phone’ socket to your telephone, which then will share the phone line with the Auto
Dialler. Normal telephone functions are interrupted only during an emergency, when the Auto
Dialler takes control of the phone line.
3.4 Troubleshooting
• If the LCD screen shows ‘FAIL’ this means that the telephone line is not properly attached or phone
connections are invalid. Please check the connection.
• If the recording quality is low. Please record again in a quiet environment with your mouth close to
the microphone. (2-6 inches).
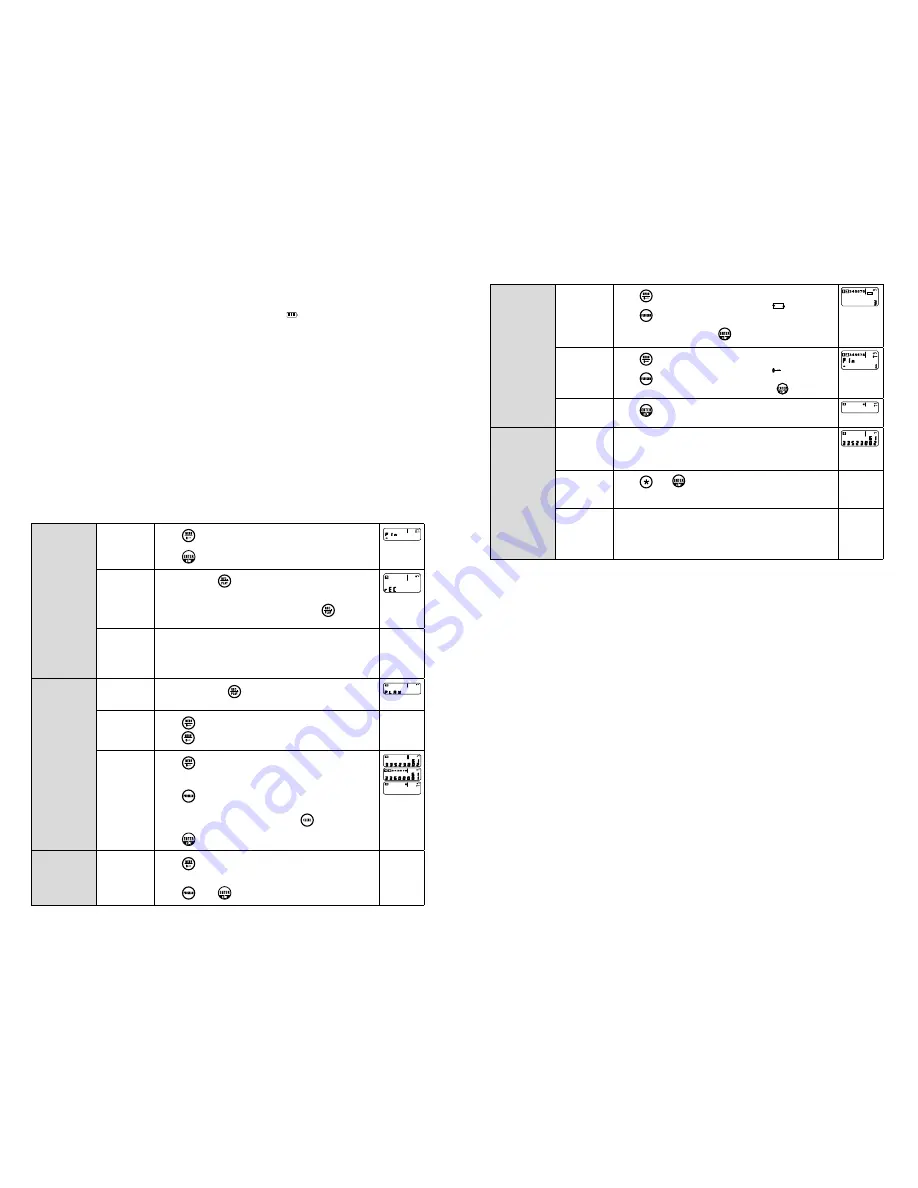
4. Quick Start Guide
Step 1:
Enter SETUP
mode for
prior to any
program-
ming
To ENTER
SETUP mode
Press
to activate the keyboard Enter the 4-DIGIT
PIN (Default PIN is ‘1234’).
Press
to go into SETUP mode.
To RECORD
a message
Press and hold
key for 2 seconds until REC shows
on the screen to start the recording.
Speak clearly into the microphone to record the mes-
sage Recording will finish when you press
again or
after 20 seconds of recording.
Example message:
This is a security alert from [your name] at [your
address]. After listening to this message, please press
the hash key (#) and press ‘1’ to listen in to this
address or ‘3’ to speak.
Step 2:
Under SETUP
mode
To PLAYBACK
your message
Press and release
to playback the recorded message.
To CHECK
PHONE
NUMBERS
Press
(Display will show ‘1’ for the first number).
Press
again for checking subsequent phone numbers.
To ENTER/
STORE
PHONE
NUMBERS
Press
(Display will show ‘1’ for the first number)
Repeat this step to choose which phone number you
wish to program (1-8).
Press
and enter the phone number digits (maxi-
mum 15 digits).
If number entered incorrectly, press
to clear the
number and re-enter the phone number digits
Press
to finish.
To ERASE
a stored
phone
number
Press
(Display will show ‘1’ for the first number).
Repeat this step to choose which phone number you
wish to erase (1-8).
Press
then
to confirm erasing.
To program
the number
of DIALLING
CYCLES
Press
(Display will show ‘1’ for the first number)
Repeat this step until the display shows
.
Press
then enter the number of cycles you wish the
Auto Dialler to run through (select 1 to 9 cycles, default
cyle is 3 times) and press
to confirm.
To CHANGE
the 4-DIGIT
PIN
Press
(Display will show ‘1’ for the first number)
Repeat this step until the display shows
.
Press
and enter a new 4-DIGIT PIN.
Re-enter the new 4-DIGIT PIN and press
to confirm.
To ENTER
ALERT MODE
Press
to enter ALERT mode.
Step 3:
Under ALERT
mode
To activate
EMERGENCY
DIALLING
When triggered by an external sensor, the i.onik
®
Auto
Dialler immediately starts dialling through the stored
telephone numbers according to the number of dialling
cycles you have programmed.
To activate
PANIC
DIALLING
Press
and
simultaneously or press the PANIC
button on the KEYFOB remote.
To CANCEL
EMERGENCY
or PANIC
DIALLING
If the EMERGENCY or PANIC DIALLING has been
activated in error, the dialling can only be cancelled by
disconnecting the mains power to the Auto Dialler and
disconnecting the battery backup.
5. Instructions for the Recipient
Note:
There are several things that your call recipients should know in order to successfully receive
and terminate an emergency call from your Auto Dialler. Therefore make sure your Auto Dialler
recipients understand what to do when they receive your emergency call by passing them a copy
of these instructions.
5.1 To START speakerphone conversation
• After having full listened to the recorded message, press the hash key (#), to confirm that the
message is NOT merely delivered to a voice mail.
• Activate the ‘Listening-in’ function by pressing ‘1’ and ‘Speaking-in’ function by pressing ‘3’. These
can only be used when the call recipient presses the Hash key (#).
• Time out period is 60 seconds and recipients can extend either the listening time or speaking time
by pressing ‘1’ or ‘3’ accordingly. With each pressing, a further 60 seconds will be allowed by the
Auto Dialler. The conversation will be disconnected if the Auto Dialler receives no instruction.
5.2 To STOP the Emergency Message of the Existing Call AND all the Remaining Calls.
• The Auto Dialler will continue dialling the numbers until the call is answered.
• The recipient can stop the Auto Dialler by waiting until the message has finished, and pressing (#).
This will stop the Auto Dialler from calling this and all remaining phone numbers.
• As this termination stops the Auto Dialler from calling any more phone numbers, the recipient must
know the exact situation before terminating it.
5.3 To DISCONNECT all Calls after Conversation
• Once the speakerphone conversation is over, the recipient should disconnect the call by pressing (#)
instead of just hanging up the phone. This will terminate the connection for all existing calls and
the remaining calls.
6. CANCELLING the Auto Dialler
• If the Auto Dialler is activated in error it can only be cancelled by:
- The recipient following the instructions in 5.2.
- Cutting off the main power supply to the Auto Dialler AND disconnecting the back-up battery.


