background image


CABLINE-CAF Assembly Manual


Document No. 

ASM-18005


10

  / 

10


Confidential C                                                                   

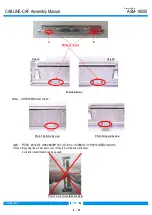
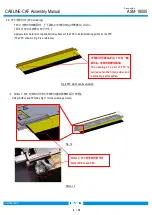
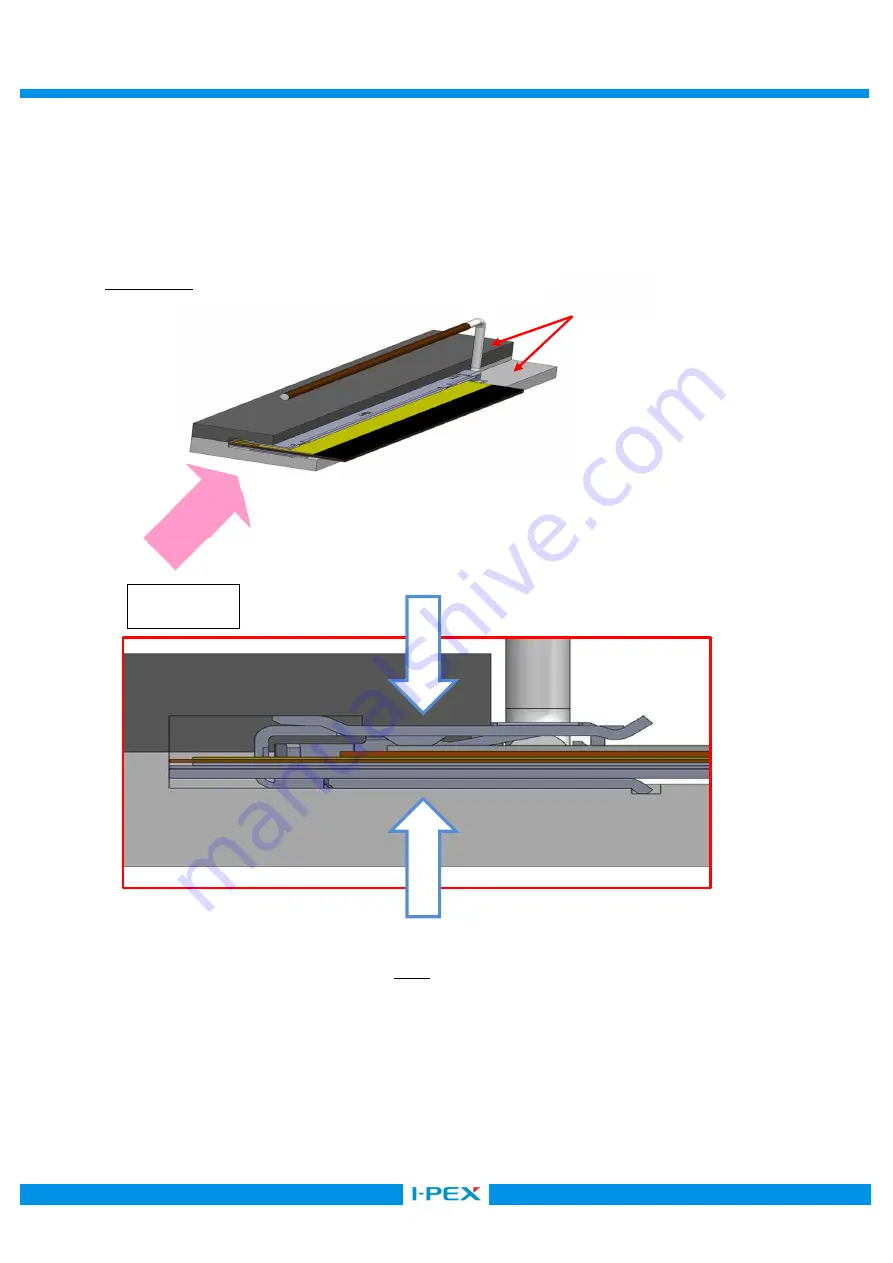
        ※半田付け時の注意事項  (Cautions for soldering) 
              FPC 挿入時に SHELL の上下が撓むことがあります。 
          半田付けを実施する際は、SHELL の上下面を押えて半田付けを行ってください。(図 13) 

When FPC is inserted, the upper and lower sides of SHELL may be deflected.


Hold top and bottom surfaces of the shell with a jig before soldering or mating failure may occur. 

 
                  例/Example 


View-B 

View-B 

JIG 

HOLD SHELL TOP 

HOLD SHELL BOTTOM 

Fig.13 

Summary of Contents for 20858-060T-01

Page 1: ... DFFDE09 04 REV 8 CABLINE CAF Part No 3437 0 1 SHELL Only 20858 0 T 01 SHELL ASS Y Assembly Manual 1 S19186 March 28 2019 K Hara T Masunaga Y Shimada 0 S19118 February 25 2019 S Yamaguchi T masunaga Y Shimada Rev ECN Date Prepared by Checked by Approved by ...

Page 2: ...0 T 01 SHELL Without LOCK BAR 3437 0 1 Fig 1 SHELLASS Y With LOCK BAR Fig 2 SHELL Without LOCK BAR FPC assembly state FPC assembly state 3 作業手順 Work procedures 3 1 コネクタ納品状態及び取り扱い注意事項 Connector delivery state and cautions in treating connector SHELLASS Y は図 3 のようにトレーに梱包された状態にて納品されます キャリアカット等は不要です SHELLASS Y is delivered to the tray in the packed state like fig 3 Carrier cut is unnecessary Fig 3 SHE...

Page 3: ...picture green line by a scissors for metal SHELL の中心部を持ち 45 の範囲で 1 往復させてノッチ部から切り離す もし 切り離れない場合は この往復動作を繰り返して切り離す 切り離し後はノッチ折り取り部にバリ発生なきことを確認してください 写真 3 Hold the center of Shell and cut it off from Notch by 45 deg of reciprocating work When it does not be cut try again this reciprocating work After separated check there is no burr around the cut part Photo 3 SHELL LOCK BAR 無し の場合 For the connector S...

Page 4: ...h 注意 下写真 赤矢印 の様に無理やり引っ張ったりして切り離すとバリや変形の原因になります Caution By pulling like a lower photo to cut off by force Red arrow direction burrs and transformation can be caused Photo 5 Bottom side view Photo 6 Upper side view Photo 7 Cut by force Bad example Photo 4 After cut Detail B Without burrs A B Detail A ...

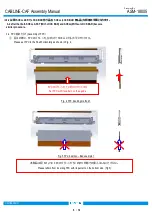
Page 5: ...K BAR become similar procedure 3 2 FPC 組み付け Assembly of FPC 図 4 の様に FPC のパターンを上に向けて SHELL に対し水平にセットする Please set FPC to the Shell horizontally as shown in Fig 4 Fig 4 FPC inserting method 1 Fig 5 FPC insertion Bad example 1 本製品は図 5 のように FPC のパターンを下に向けた状態での挿入はしないでください Please refrain from inserting FPC with its pattern on the bottom side Fig 5 FPC のパターンを上に向けてセットする Set FPC with its pattern on the ups...

Page 6: ...Fig 6 Fig 6 FPC inserting method 2 注 1 Caution 1 FPC を水平になる様に押して 挿入して下さい 図 7 の様に 斜めの状態で押すと FPC の破損の原因になります Please insert FPC horizontally If FPC is slanted as fig 7 there is possibility of breakage of the FPC Fig 7 FPC insertion Bad example 2 FPC 両端耳部が CHECK POINT にあるように SHELL に仮挿入さ れたことを確認し 水平に挿入する At the pre insertion satge please confirm both ear tip of the FPC is into shell as below picrure ch...

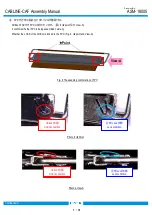
Page 7: ...It confirms whether FPC is being assembled normally Whether the LOCK of the SHELL is locked to the FPC Fig 8 point and View A Fig 8 The assembly confirmation of FPC Photo 8 Point Photo 9 View A Point View A Unlock 状態 Unlock condition 正常 Lock 状態 Lock condition 正常 Lock 状態 Lock condition Unlock 状態 Unlock condition Unlock 状態 Unlock condition ...

Page 8: ...ces of the FPC to install soldering portion on the FPC The FPC shown in Fig 9 is a reference Fig 9 FPC which can be soldered SHELL と FPC を半田付けする 半田付け量の詳細は図 11 参照 Solder SHELL and FPC See Fig 11 for the soldering amount 半田付け可能なように FPC を一部 開口し 半田付け部を追加 The opening of a part of FPC is carried out so that it can solder and a soldering part is added SHELL と FPC を半田付けする Solder SHELL and FPC Fig 10 Photo...

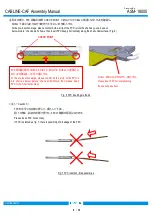
Page 9: ...o 11 soldering of SHELL and FPC 半田付け SOLDERING 半田付け SOLDERING 直上の SHELL 赤線部 への半田付けを確実に行って下さい Make sure the SHELL just above the FPC soldering area red line part is soldered enough OK 推奨半田量 Sufficient solder NG 半田量不足 Insufficient solder Fig 11 SECT X X Fig 12 SECT X X 0 10MAX ...

Page 10: ...C 挿入時に SHELL の上下が撓むことがあります 半田付けを実施する際は SHELL の上下面を押えて半田付けを行ってください 図 13 When FPC is inserted the upper and lower sides of SHELL may be deflected Hold top and bottom surfaces of the shell with a jig before soldering or mating failure may occur 例 Example View B View B JIG HOLD SHELL TOP HOLD SHELL BOTTOM Fig 13 ...

Reviews: