background image


CABLINE-UX II PLUG Assembly Manual


Document No. 

ASM-10001


9

  / 

17


Confidential C                                                                   

極間が短絡または半田が溶け残ってしまった場合は

(

下記

Photo.7

参照

ヒーターチップを洗浄して再度パルスヒートにて加熱を行って下さい。


製品にダメージを与える恐れがある為、回数は

1

回だけです。


これで短絡が直らない場合は、

NG

箇所のみ半田コテにて手修正して下さい。


Blank pin

についても同様のご対応をお願いします。

(Photo.4

参照

In case short circuit occurred or there was any unmelted solder (See photo.7 below), 

wash the heater tip and heat again with pulse heater only one time. (Several heating can damage the product.)   

If the short circuit can’t be repaired, use the soldering iron and repair it (NG point only). 

Please take measure for Blank pin as well. (Refer to Photo.4)


半田コテの条件

  (Condition of Soldering iron)

: 

50W 

半田コテ先温度

  (Operating temperature)   

: 

350

℃~

380


コテ先当て時間

  (Application time of soldering iron)

  : 

5

秒以内

  (Within 5sec.) 


Photo.6


Melted solder                                          Photo.7


Unmelted solder 


2nd

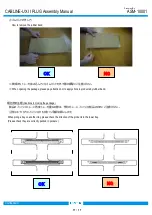
ヒート設定温度と加圧力を上げ過ぎないでください。

Housing

が溶ける可能性があります。


下記

Photo.9

参照


The setting temperature of 2nd heat and the pressure shall not be too high. Housing has possibility to melt. 

Please refer to Photo.9. 


Photo.8


Unmelted Housing


                              Photo.9


Melted Housing 


OK 

NG 

Summary of Contents for CABLINE-UX II PLUG

Page 1: ...8 CABLINE UX II PLUG Part No 20531 Assembly Manual 6 S20185 March 24 2020 A Koyanagi T Kurachi Y Shimada 5 S19431 July 8 2019 A Koyanagi T Kurachi H Ikari 4 S16608 September 9 2016 S K K N 3 S14251 J...

Page 2: ...se heat condition 3 1 Fixtures Pulse heater Name P N Manufacturer Reflow head NA 66 Nippon Avionics Co Ltd Pulse heat power supply TCW 215 Nippon Avionics Co Ltd Heater chip 30P 34P 40P 50P Thickness...

Page 3: ...0 5sec holding time 3 0sec Heater tip Pressure 15 0 15 6N Temperature 26 5 Humidity 43 1 Reference This pulse heat condition was evaluated and confirmed by our pulse heat jig and instruments The most...

Page 4: ...rocedures 4 1 Soldering of center conductor First process the cable end as shown below Micro coax cable Part No E F G 20531 030T 2 3 50 7 50 8 50 20531 034T 2 4 00 8 50 9 50 20531 040T 2 4 75 10 00 11...

Page 5: ...Assembly Manual Document No ASM 10001 5 17 Confidential C Discrete cable Part No E F 20531 030T 2 3 50 7 50 20531 034T 2 4 00 8 50 20531 040T 2 4 75 10 00 20531 050T 2 6 00 12 50 a AWG 39 0 102 Cable...

Page 6: ...area Please confirm all contacts were applied flux Photo 2 After applying flux Photo 3 Please do not apply flux too much like Photo 3 It can cause flux splash or leak to the mating area Photo 3 Extra...

Page 7: ...UX II PLUG Assembly Manual Document No ASM 10001 7 17 Confidential C Solder Bar Place a solder bar at center of connector HSG ASS Y Fig 1 Placing solder bar Set the cable Fig 2 Setting cable Solder Ba...

Page 8: ...II PLUG Assembly Manual Document No ASM 10001 8 17 Confidential C Photo 4 5 Solder center conductors with a pulse heater For soldering condition see photo 4 and 5 Photo 4 AWG 44 Photo 5 Expansion part...

Page 9: ...short circuit can t be repaired use the soldering iron and repair it NG point only Please take measure for Blank pin as well Refer to Photo 4 Condition of Soldering iron 50W Operating temperature 350...

Page 10: ...able please apply an insulating tape to the connection before assemble METAL COVER Fig 3 Insulating tape position mm L h t 20531 030T 2 3 73 0 82 0 07 MAX 20531 034T 2 4 23 20531 040T 2 4 98 20531 050...

Page 11: ...ut METAL COVER from Career Cut Line Cut carrier on the cut line of a lower left picture green line by a scissors for metal PLUG COVER 45 12 13 Hold the center of Plug cover and bend it 45 deg back and...

Page 12: ...Plug Cover Detail of Notch Caution By pulling like a lower photo to cut off by force Red arrow direction burrs and transformation can be caused Without burrs View A Photo 13 After cut Photo 14 Bottom...

Page 13: ...ousing ass y and the plug cover circled in the following figure then slide the both sides of plug cover in the direction of the blue arrow for assembly Do not add the load to part so that there is a p...

Page 14: ...cover 3 30P 2 GND Bar Fig 7 Fig 8 8 METAL COVER Solder holes of metal cover 3 positions 2 positions only 30P and GND Bar with the soldering iron Fig 7 point Refer to Fig 8 for a limit of the solder h...

Page 15: ...001 15 17 Confidential C 4 4 Cable fixation LOCTITE 352 To protect the cable it is recommended to fix the cable terminal part with bond Recommended bond LOCTITE 352 Fig 9 Bonding 0 05 MAX 1 50 MAX NG...

Page 16: ...y attention Unfold the folded AIR BUBBLE SHEET at the top Pull up AIR BUBBLE SHEET to take out from the carton How to take out from the carton When opening the package Please pay attention not to appl...

Page 17: ...rubber band When opening the package please pay attention not to apply shock to products by rubber band Cautions in closing the package When piling a tray on another tray please check the direction o...

Reviews: