background image


EVAFLEX 5-SE-GHT Connector Instruction Manual


Document No. 

HIM-18018


4

  / 

9


Confidential C                                                                   

②  図

2-3

の様に、

FFC/FPC

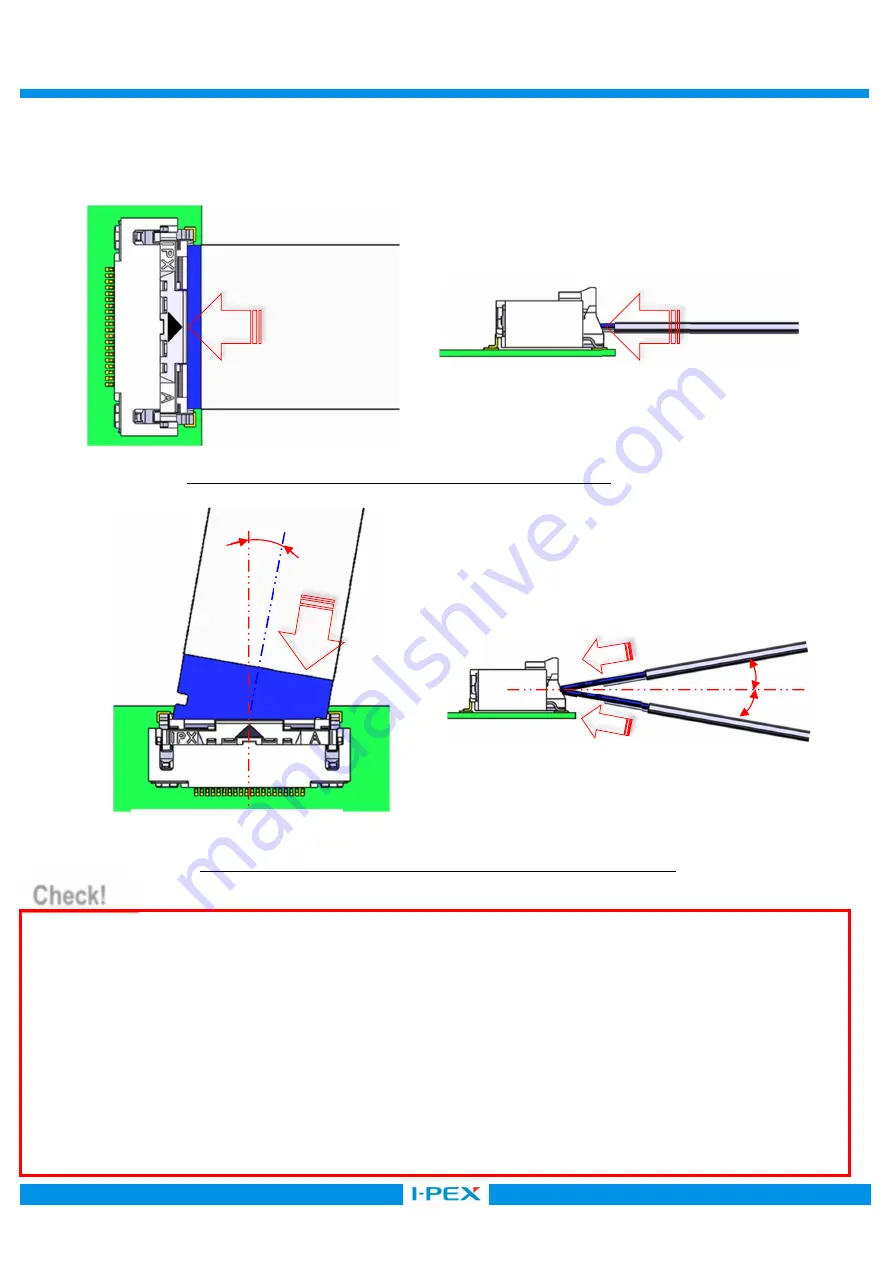
をコネクタに対して、水平に挿入していき、奥までしっかり挿入する。


※奥までしっかり挿入するとロックがかかります。


Insert FFC/FPC horizontally into the connector and push it all the way in. (Fig.2-3) 

FFC/FPC will be locked when insertion is completed. 


10

°

  MAX. 

15

°

  MAX. 

15

°

  MAX. 

. 2-3 FFC/FPC

挿入方法

2 / Fig.2-3 Horizontally Inserting FFC/FPC 

插入方法

2-4 (a)

斜め挿入

(

製品ピッチ方向

)

10

°以内とし、コネクタに対して垂直になるまでは、挿入方向に過度な荷重は加えずに


仮挿しした後、挿入してください。


In case of slightly insertion from the connector pitch direction, misalignment allowable angle is maximum 10 degrees (Fig.2-4 (a)).   

Slightly insert the connector (Connector pitch direction) without applying excessive load

.

 Insert FFC / FPC fully until it is vertical   

to the connector.   

2-4 (b)

操作側、反操作側からの斜め挿入は、嵌合間口に沿わせながら、挿入方向以外への過度な荷重は加えず仮挿し


した後、最終嵌合位置まで挿入方向に対して

15

°以内で挿入してください。


In case of slightly insertion from the operating and anti-operating direction, place the FFC/FPC along the mating throttle. Slightly insert the 

FFC/FPC and excessive load shall not be applied. The FFC/FPC shall be inserted within 15 degrees to the inserting direction. (Fig.2-4 (b)) 


. 2-4 FFC/FPC

挿入方法

3 / Fig.2-4 FFC/FPC Maximum Misalignment Angle 

Check! 

(a) Pitch direction 

(b) Operating and anti-operating direction 

Summary of Contents for EVAFLEX 5-SE-GHT

Page 1: ...o HIM 18018 Confidential C I PEX Inc QKE DFFDE09 03 REV 8 EVAFLEX 5 SE GHT Part No 20899 0 E 01 Instruction Manual 0 S19209 March 26 2019 M Nakamura T Kurachi H Ikari Rev ECN Date Prepared by Checked...

Page 2: ...le EVAFLEX 5 SE GHT connector properly and safely connector Product Name EVAFLEX 5 SE GHT Part No 20899 0 E 01 Note1 Note 1 Connector position number Labelled Diagram of the Connector Mating throttle...

Page 3: ...so that the pattern faces PCB side as shown in Figure 2 1 insert it parallel to the PCB 2 1 FFC FPC 1 Fig 2 1 FFC FPC Pattern Facing Correct Direction 2 2 FFC FPC NG 1 Fig 2 2 FFC FPC Pattern Facing W...

Page 4: ...wable angle is maximum 10 degrees Fig 2 4 a Slightly insert the connector Connector pitch direction without applying excessive load Insert FFC FPC fully until it is vertical to the connector 2 4 b 15...

Page 5: ...ck or may deform connector or FFC FPC 2 Caution 2 2 6 15 FFC FPC Do not exceed 15 degrees angle or it will not be locked nor may deform connector or FFC FPC 2 5 FFC FPC NG 2 Fig 2 5 Bad FFC FPC insert...

Page 6: ...e button Fig 3 2 FFC Pinch release button and FFC FPC 3 1 FFC FPC 1 Fig 3 1 Pushing Release Button Push release button Push 3 2 FFC FPC 2 Fig 3 2 Withdrawing FFC FPC FFC FPC 3 3 FFC FPC FFC FPC 3 1 Wi...

Page 7: ...rt circuit 4 Caution 4 Do not push the release button using the nails it may deform nor cause short circuit 3 4 FFC FPC NG 2 Fig 3 4 Bad Ways to Push Release Button 3 5 FFC FPC NG 3 Fig 3 5 Bad Ways t...

Page 8: ...dly withdraw FFC FPC without pushing a release button as this may damage FFC FPC or the connector 3 6 FFC FPC NG 4 Fig 3 6 Withdrawing FFC FPC Without Pushing Release Button Damage b Properly Withdraw...

Page 9: ...his may damage FFC FPC or the connector See Photo 4 1 FFC FPC FFC FPC FFC FPC Do not apply excessive force to the connector and FFC FPC or they may be damaged FFC FPC FFC FPC Do not pull around FFC FP...

Reviews: