background image


MHFI with LOCK function Instruction Manual


Document No. 

HIM-17020


6

  / 

7


Confidential C                                                                   


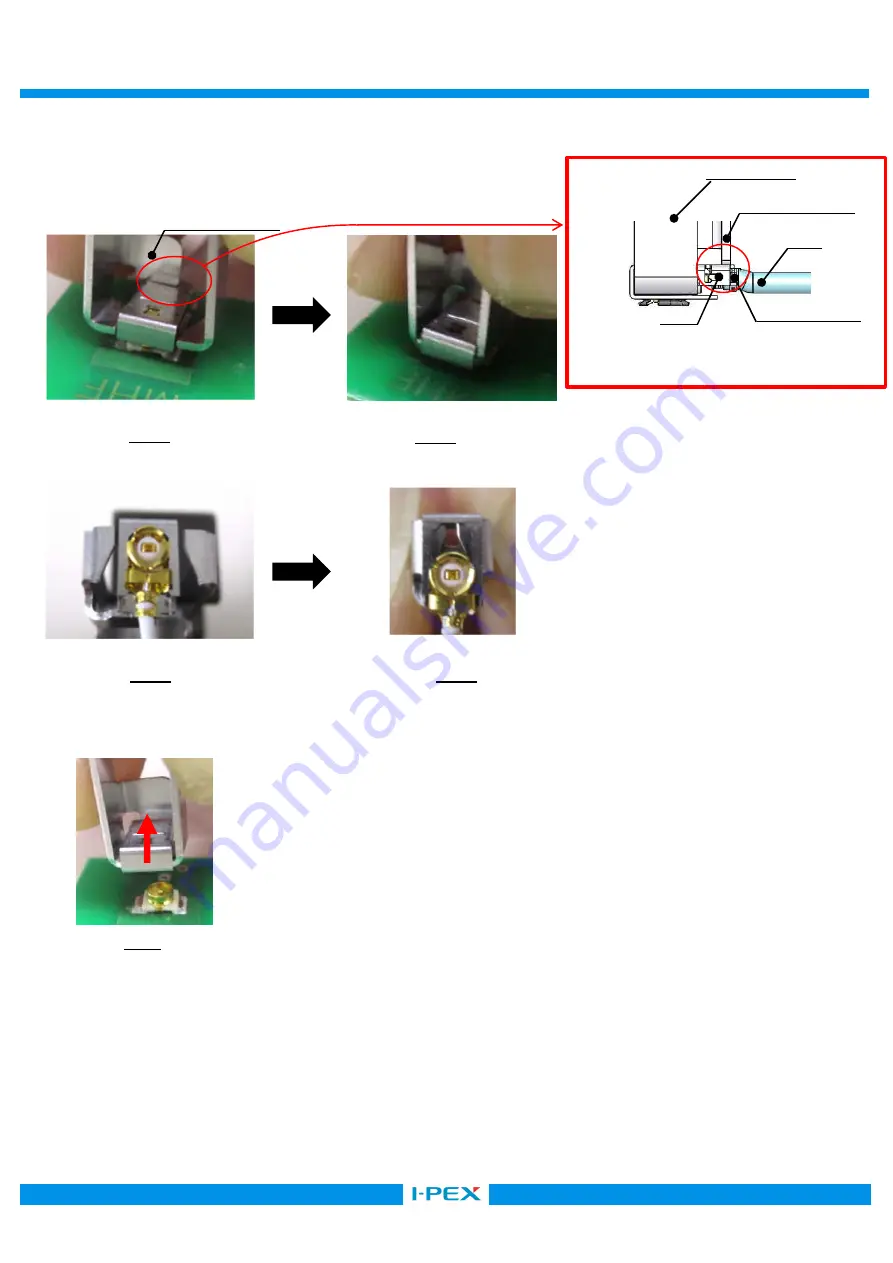
  How to unlock by the unmating jig


The unmating jig’s parts number is 91026-0001 

1. Place positioning guide on the lock. [ Fig.9-1.]


2. Clip lock with jig and slide it to unlock.. [Fig. 9-2] 


Reference: Fig.9-3 & 9-4 shows how lock slide to unlock. 


  How to un-mate cable connector by the un-mate JIG


Pull up plug connector vertically against the PCB surface. 


CAUTION 

Do not pull cables to unmate cable connectors. 

Pull plug connector vertically by holding the hooks on connector side surfaces. 


Fig.9-1 

Fig.9-2 

Fig.9-3 

Fig.9-4 

Place positioning guide on the lock 

Lock clipped with jig 

Clipping lock parts with unmating jig 

The lock parts slides automatically and lock will be released 

Fig.10 

Pull 

Do not place positioning guide on ground 

contact or the cable. 

  Ground contact 

Cable 

unmating JIG   

Lock   

Positioning guide   

Positioning guide   

Summary of Contents for MHF I

Page 1: ...020 Confidential C I PEX Inc QKE DFFDE09 03 REV 8 MHF I with LOCK function Instruction Manual 1 S18608 Sep 21 2018 Y Fukumoto K Narita 0 S17459 Jun 20 2017 Y Fukumoto K Narita Rev ECN Date Prepared by Checked by Approved by ...

Page 2: ...e both ends of cable connector as show in Fig 1 Fig 1 Which direction to mate Set connectors of the board side and of the cable side as shown in Fig 2 Please check they are set firmly by moving back and forth slightly Fig 2 How to mate Push cable connector at it s center location vertically as show in Fig 3 When click sound can be heard the connector mating action is complete Fig 3 Cable Connector...

Page 3: ...idential C CAUTION Please make sure to set the cable side connector parallel to the board If you mate in not parallel condition as shown in Fig 4 2 connector will be damaged Correct connector mating Parallel OK Wrong connector mating Not parallel NG Fig 4 1 Fig 4 2 PUSH PUSH ...

Page 4: ...k parts it shown Fig 5 1 CAUTION As shown in Fig 6 2 please slide until the connector comes to the whole hole In the state of Fig 6 3 the connector fitting holding force decrease Do not add excessive force PUSH PUSH Fig 6 1 Unlock state Fig 6 2 Lock state Fig 6 3 Half lock state Fig 5 1 Fig 5 2 Check Point NG ...

Page 5: ...nmating jig page 6 How to Un LOCK by a hand Slide the lock parts as shown in figures 7 1 and 7 2 How to un mate cable connector by a hand Pull plug connector vertically against the PCB surface Fig 8 1 Fig 8 2 CAUTION Do not pull cables to unmate cable connectors Pull plug connector vertically by holding the hooks on connector side surfaces Pull PUSH PUSH Fig 7 1 Fig 7 2 ...

Page 6: ...by the un mate JIG Pull up plug connector vertically against the PCB surface CAUTION Do not pull cables to unmate cable connectors Pull plug connector vertically by holding the hooks on connector side surfaces Fig 9 1 Fig 9 2 Fig 9 3 Fig 9 4 Place positioning guide on the lock Lock clipped with jig Clipping lock parts with unmating jig The lock parts slides automatically and lock will be released ...

Page 7: ...BLE CONNECTOR HANDLING In the case of figure 11 it has possibility to damage to the housing and come off from rece connector Especially when operator give continuous force to the direction black allow the tendency become higher So please take care of handling of harness Fig 11 4N MAX 2N MAX 2N MAX ...

Reviews: