36
www.i-sens.com
www.i-sens.com
37
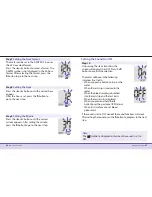
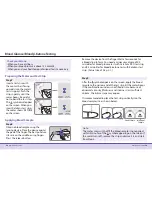
Step 5
The lancing device has seven puncture
depth settings, numbered 1 through 7
(1 for a shallow puncture, 7 for a deeper
puncture).
Choose a depth by rotating the top
portion of the adjustable tip until the
desired number aligns with the arrow.
Step 6
To cock the lancing device, hold the
body of lancing device in one hand and
pull the sliding barrel with the other
hand. The device is loaded when you
feel a click and the load confirmation
window turns red.
Note:
The skin depth to get blood samples will vary for various
people at different sample sites. The lancing device's
adjustable tip allows the best depth of skin penetration to
get an adequate sample size.
3
4
5
6
7
Note:
1 = least penetration of lancet into the skin.
7 = most penetration of lancet into the skin.
1
2
3
4
5
6
7
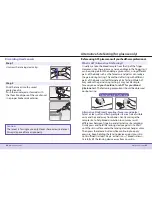
Step 1
Wash hands and sample site with
soap and warm water. Rinse and dry
thoroughly.
Step 2
Unscrew and remove the
lancing device tip.
Step 3
Firmly insert a new lancet into the
lancet holder. Hold the lancet firmly.
Gently twist to pull off protective disk.
Save disk to recap lancet after use.
Replace lancing device tip.
Step 4
Turn the adjustable tip until it is aligned
with the load confirmation window and
release button as shown.
Preparing the Lancing Device
3
4
5
6
7

