background image

8

9

[1]

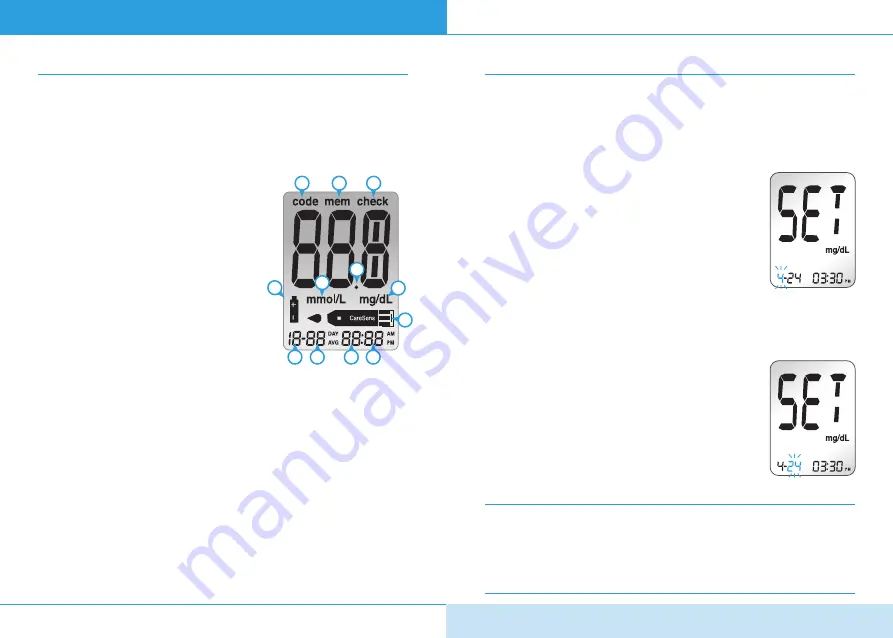
 code

shows code for three (3) seconds after 
test strip insertion

[2]

 mem

appears when test results stored in the 
memory are displayed

[3]

 check

appears when test results have not been 
saved and the 

CareSens

 Check Strip is 

inserted 

[4]

 Battery Symbol

indicates meter battery is running low and needs to be replaced

[5]

 mmol/L

unit for measuring blood glucose

[6]

 Decimal Point

appears when the blood glucose measuring unit is set to mmol/L

[7]

 mg/dL

unit for measuring blood glucose

[8]

 Blood insertion symbol

indicates meter is ready for the application of a drop of blood or 
control solution

[9]

 Month  

[10]

 Day  

[11]

 Hour  

[12]

 Minute

Display Segment Check

It is recommended to check if the display screen on the meter 
matches the illustration (below, above, etc.) every time the meter 
turns on. Do not use the meter if the display screen does not 
exactly match the illustration as the meter may show incorrect 
results.

CareSens II Blood Glucose Meter Display

1

2

3

4

5

6

7

8

12

11

10

9

• Note

It is recommended to check if the display screen on the meter 
matches the illustration on the page 8 every time the meter turns 
on. Do not use the meter if the display screen does not exactly 
match the illustration as the meter may show incorrect results.

Adjusting the Date, Time and Unit
[1] Setting the Month

Press and hold the 

M

 button for 3 seconds 

to enter the set mode. After all the segments 

flash across the screen, the ‘SET’ character 

will be displayed on the screen.

Then, a number indicating the month will 

be blinking on the left corner of the screen. 

Press 

C

 button until the correct month 

appears. Press the 

M

 button to confirm your 

selection and progress to the next step.

[2] Setting the Date

Press 

C

 button until the screen displays the

correct day. Press the 

M

 button to confirm 

your selection and progress to the next step.

Setting up Your System

Press and hold the 

M

 button for 3 seconds to enter the set mode.

After all settings are finished, press and hold the 

M

 button for 3 

seconds to turn off the meter.

Press 

C

 button to reach the accurate value. Press and hold 

button to scroll faster.

Summary of Contents for CareSens II

Page 1: ...e monitoring through advanced biosensor technology Blood Glucose Monitoring System Owner s Booklet 2017 i SENS Inc All Rights Reserved PGA1E3350 REV3 02 2017 i SENS Inc 43 Banpo daero 28 gil Seocho gu...

Page 2: ...just 5 seconds with a small 0 5 L blood sample No part of this document may be reproduced in any form or by any means without the prior written consent of i SENS The information in this manual is cor...

Page 3: ...ter to Match Test Strips Checking the System Control Solution Testing Comparing the Control Solution Test Results Using the Lancing Device Preparing the Lancing Device Applying Blood Sample Discarding...

Page 4: ...code Temperature limitation Do not discard this product with other household type waste Serial number Glucose in blood samples reacts with the chemical in the test strip to produce a small electrical...

Page 5: ...e data transmission cable can be ordered separately Please contact your authorised i SENS sales representative CareSens II Blood Glucose Meter 1 Meter Display Test result symbol and simple message dis...

Page 6: ...play 1 2 3 4 5 6 7 8 12 11 10 9 Note It is recommended to check if the display screen on the meter matches the illustration on the page 8 every time the meter turns on Do not use the meter if the disp...

Page 7: ...tton to confirm your selection and progress to the next step 6 Setting the Year Press and release C button to adjust until the correct year appears Press the M button to confirm your selection and pro...

Page 8: ...results stored in the meter can be deleted Please note that if you select YES all the stored test results will be deleted and can not be restored After the unit is set press the M button to enter the...

Page 9: ...with the meter turned off Use the CareSens Check Strip when the CareSens II meter is used for the first time the battery is replaced thetestresultseemsinaccurateordoesnotreflecthowyoufeel the CareSens...

Page 10: ...areSens test strip package insert Keep the meter and testing supplies away from young children The test strip vial contains drying agents that are harmful if inhaled or swallowed and may cause skin or...

Page 11: ...rinted on their labels Compare the result displayed on the meter to the CareSens Control Solution range printed on the test strip vial Before using a new meter or a new vial of test strips you may con...

Page 12: ...he symbol will be displayed on the screen Confirm matching the code number on display and test strip vial If the code number does not match see Coding Meter to Match Test Strips on pages 17 18 2 Shake...

Page 13: ...the control solution test if the test result falls outside of this range Out of range results may occur in following situations If results continue to fall outside the range printed on the test strip...

Page 14: ...ays use a new sterile lancet Keep the lancing device clean Note Repeated puncturing at the same sample site may cause pain or skin calluses thick hard skin Choose a different site each time you test E...

Page 15: ...d sample using the lancing device Place the device against the pad of the finger as shown in the diagram The best puncture sites are on the middle or ring fingers Press the release button Remove the d...

Page 16: ...utomatically stored in the meter s memory If the test strip is removed after the test result is displayed the meter will automatically switch off after 3 seconds Discard used test strips safely in app...

Page 17: ...d hold the lancing device against site Wait until the skin surface under the lancing device changes color Then press the release button while continuing to apply pressure Keep holding the lancing devi...

Page 18: ...poglycemic shock or symptoms Note If the sample drop of blood runs or spreads due to contact with hair or with a line in your palm do not use that sample Try puncturing again in a smoother area Note P...

Page 19: ...tion Standards of Medical Care in Diabetes 2016 Diabetes Care January 2016 39 1 S15 S100 Reminders Time of day Yourtargetranges fromyourhealthcareexpert Before breakfast Before lunch or dinner 1 hour...

Page 20: ...from sources of strong electromagnetic radiation especially when measuring your blood glucose The CareSens II meter should be used only with CareSens strips Keep the meter in a cool and well ventilate...

Page 21: ...Humidity 10 90 Hematocrit 20 60 Specifications Message What It Means What To Do A used test strip was inserted Repeat the test with a new test strip The blood or control solution sample was applied b...

Page 22: ...strip The test does not start even after applying the blood sample on the strip The test result does not match the way you feel Check whether the test strip is inserted with the contact bars facing up...

Page 23: ...nts at clinic centers Slope 0 961 Y intercept 3 5 mg dL 0 2 mmol L Correlation coefficient r 0 995 Number of samples 115 Range tested 40 521 mg dL 2 2 28 9 mmol L Accuracy results for glucose concentr...

Page 24: ...rvice of the meter Any claim must be made within the warranty period The i SENS company will at its discretion repair or replace a defective meter or meter part that is covered by this warranty As a m...

Page 25: ...46 MEMO...

Reviews: