background image

38

   www.i-sens.com

www.caresens.co.nz  

39

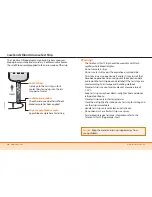
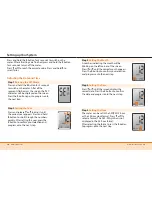
Setting the Alarm Function

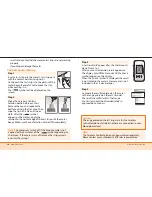
Step 1

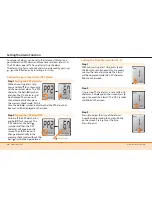
 Setting the PP2 alarm On

Without inserting a test strip, 

press and hold 


for 3 seconds to 

set the post-meal alarm. The ‘PP2’ 

character, the bell ( ) symbol 

and then the ‘On’ character will 

be displayed. The screen will 

then automatically change to 

the memory check mode. At this 

time, the bell ( ) symbol, indicating that the PP2 alarm has 

been set, will be displayed on the screen.

Step 2 

Setting the PP2 alarm OFF

To turn off the PP2 alarm, press 

and hold 


for 3 seconds. The 

‘PP2’ character, the bell (

) symbol and then the ‘OFF’ 

character will appear on the 

screen. Then the screen will 

change automatically to the 

memory check mode without the 

bell ( ) symbol being displayed.

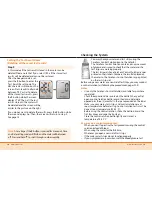
Setting the post-meal alarm (PP2 alarm)

Four types of alarms can be set in the CareSens N Meter: one 

post-meal alarm (PP2 alarm) and three time set alarms (alarm1-3).

The PP2 alarm goes off 2 hours after setting the alarm. 

The alarms ring for 15 seconds and can be silenced by pressing 


,  


or the 

S

 button or by inserting a test strip.

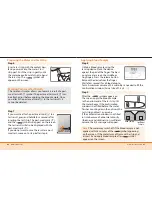
Step 1 

Without inserting a test strip, press   and 

the 

S

 button simultaneously for 3 seconds 

to enter the time alarm mode. The ‘alarm1’ 

will be displayed while the ‘OFF’ character 

blinks on the screen.

Step 2

On pressing 


, the ‘alarm1’ is set and the ‘On’ 

character is displayed on the screen. Press 


again to cancel the ‘alarm1’. The ‘OFF’ symbol 

will blink on the screen .

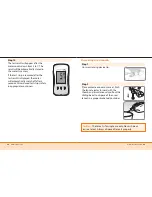
Step 3

Press   to adjust the time of the ‘alarm1’.  

A number representing the time will blink 

on the screen. Press 


to set the time.  

Press   to end.

Setting the Time Alarms (alarm 1-3)

     symbol vanishes

Summary of Contents for CareSens N Voice

Page 1: ...ion Testing 20 Comparing the Control Solution Test Results 22 Testing Using the Lancing Device 23 Preparing the Lancing Device 24 Preparing the Meter and Test Strip 26 Marking Post meal Test Results 26 Applying Blood Sample 27 Discarding Used Lancets 29 Alternative Site Testing 30 HI and Lo Messages 33 Target Blood Glucose Ranges 34 Transferring Test Results 35 Additional Functions Meter Memory 36...

Page 2: ...ce a small electrical current The CareSens N meter detects this electrical current and measures the amount of glucose in the blood sample The CareSens N Blood Glucose Meter is designed to minimize code related errors in monitoring by using the no coding function The CareSens N Blood Glucose Meter should be used only with the CareSens N Strip An abnormally high or low red blood cell count hematocri...

Page 3: ...3 3 mmol L Sample size Minimum 0 5 µL Test time 5 seconds Sample type Fresh capillary whole blood Calibration Plasma equivalent Assay method Electrochemical Battery life 1 000 tests Power Two 3 0 V lithium batteries disposable type CR2032 Memory 250 test results Size 93 X 47 X 15 mm Weight 51 5 g with batteries Temperature 10 40 C Relative humidity 10 90 Hematocrit 20 60 Components CareSens N Bloo...

Page 4: ...y compartment Push down until you hear the tab click into place Note Removing the meter batteries will not affect your stored result However you may need to reset your meter settings See pages 14 16 Caring for Your System Use a soft cloth or tissue to wipe the meter exterior If necessary the soft cloth or tissue might be dipped in a small amount of alcohol Do not use organic solvents such as benze...

Page 5: ... use test strips past the expiration or discard date Test strips in new unopened vials and test strips in vials that have been opened can be used up until the expiration date printed on the test strip box and vial label if the test strips are used according to its storage and handling methods Store test strips in a cool and dry place at a temperature of 1 30 C Keep test strips away from direct sun...

Page 6: ...en the time alarm has been set Battery symbol indicates meter battery is running low and needs to be replaced Post meal test flag appears during post meal testing and when post meal test results are displayed Alarm symbol appears when the post meal alarm has been set mmol L unit for measuring blood glucose Sound symbol appears only when the sound is set to OFF check means test results have not bee...

Page 7: ...ust until the correct year appears Press and hold button to scroll through the numbers quickly After setting the year press the S button to confirm your selection and progress onto the next step Step 3 Setting the Month A number indicating the month will be blinking on the left corner of the screen Press or until the correct month appears Press the S button to confirm your selection and progress o...

Page 8: ...F Press the S button to confirm the selection The meter will beep in the following instances if set to On When the test strip is inserted in the meter When the blood sample is absorbed into the test strip and the test starts When the test result is displayed When you push the S button or button to turn on the meter When you push the button to set the post meal PP2 alarm When it is time for a prese...

Page 9: ...se and is used to check that the meter and the test strips are working properly The test strip vials have CareSens Control Solution ranges printed on their labels Compare the result displayed on the meter to the CareSens Control Solution range printed on the test strip vial Before using a new meter or a new vial of test strips you may conduct a control solution test following the procedure on page...

Page 10: ...ds Gently push the test strip into the port until the meter beeps Be careful not to break the strip while pushing it in The symbol will be displayed on the screen Step 3 A test result will appear after the meter counts down from 5 to 1 After your control solution result appears on the display press for 3 seconds till the check symbol appears on the display When the check symbol is displayed the re...

Page 11: ...may use the lancing device contained in the CareSens N Blood Glucose Monitoring System or any other medically approved lancing device The lancing device may not be used by more than one individual Ensure the lancing device is not shared among different users Use a soft cloth or tissue to wipe the lancing device If necessary a small amount of alcohol on a soft cloth or tissue may be used Adjustable...

Page 12: ... of one to five 1 5 on the lancing device s adjustable tip Choose a depth by rotating the top portion of the adjustable tip until the setting number matches the arrow A beginning setting of three 3 is recommended Step 5 To cock the lancing device hold the body of lancing device in one hand Pull the sliding barrel with the other hand The lancing device is cocked when you feel a click Note The skin ...

Page 13: ...into the meter s test strip port Push the strip in gently until the meter beeps Be careful not to bend the test strip The symbol will appear on the screen Step 7 If you want to attach a post meal mark to a test result press and hold for 3 seconds after inserting the test strip The post meal mark and the symbol will appear on the screen The test result will also be displayed with the post meal mark...

Page 14: ...automatically switch off after 3 seconds Discard used test strips safely in appropriate containers Step 1 Unscrew lancing device tip Step 2 Place protective cover on lancet Push the lancet ejector forward with the thumb and simultaneously pull out the sliding barrel to dispose of the used lancet in a proper biohazard container Discarding Used Lancets Caution The lancet is for single use only Never...

Page 15: ...may differ This is because things such as lifestyle and ingested food have an effect on glucose levels Acceptable situations for AST When your blood glucose levels are stable Fasting period Before a meal Before sleeping Situations requiring fingertip test When your glucose levels are unstable During the two 2 hours after a meal or exercise When sick or when glucose levels seem quite lower than tes...

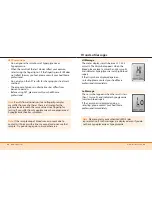
Page 16: ...hypoglycemia or have experienced hypoglycemic shock or symptoms Note If the sample drop of blood runs or spreads due to contact with hair or with a line in your palm do not use that sample Try puncturing again in a smoother area HI and Lo Messages HI Message The meter displays results between 1 1 33 3 mmol L The HI symbol appears when the blood glucose level is more than 33 3 mmol L and indicates ...

Page 17: ...rs after a meal the range of a normal blood glucose level for non diabetic adults is between 5 6 7 7 mmol L Fasting is defined as no caloric intake for at least eight 8 hours Reference American Diabetes Association Standards of Medical Care in Diabetes 2012 Diabetes Care January 2012 35 1 S11 S63 Test results stored in CareSens N meter can be transferred from the meter to a computer using PC care ...

Page 18: ...numberof post mealtests The CareSens N Meter can save up to 250 glucose test results with time and date If the memory is full the oldest test result will be deleted and the latest test result will be stored The CareSens N Meter calculates and displays the averages of total test results pre meal test results and post meal test results from the last 14 days Thenumberof totaltests withinthe last14day...

Page 19: ...e bell symbol being displayed Setting the post meal alarm PP2 alarm Four types of alarms can be set in the CareSens N Meter one post meal alarm PP2 alarm and three time set alarms alarm1 3 The PP2 alarm goes off 2 hours after setting the alarm The alarms ring for 15 seconds and can be silenced by pressing or the S button or by inserting a test strip Step 1 Without inserting a test strip press and ...

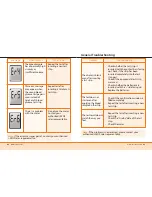
Page 20: ...A used test strip was inserted The blood or control solution sample was applied before the symbol appeared The temperature during the test was above or below the operating range WhatTo Do Repeat the test with a new test strip Repeat the test with a new test strip and wait until the symbol appears before applying the blood or control solution sample Move to an area where the temperature is within t...

Page 21: ...ing Check whether the test strip is inserted with the contact bars facing up Check if the strip has been inserted completely into the test strip port Check if the appropriate test strip was used Check whether the batteries are inserted with the side facing up Replace the batteries Check if the confirmation window is filled completely Repeat the test after inserting a new test strip Repeat the test...

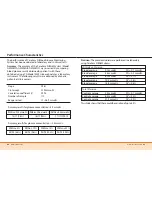
Page 22: ...mber of sample 110 Range tested 1 7 26 9 mmol L Within 0 28mmol L Within 5 Within 10 Within 15 Within 20 45 93 48 88 93 96 93 93 100 93 93 100 13 17 76 Accuracy results for glucose concentration 4 2 mmol L Accuracy results for glucose concentration 4 2mmol L 16 17 94 17 17 100 Within 0 56mmol L Within 0 83mmol L Within Run Precision Blood average 2 1 mmol L SD 0 1 mmol L Blood average 4 8 mmol L S...

Page 23: ...y claim must be made within the warranty period The i SENS company will at its discretion repair or replace a defective meter or meter part that is covered by this warranty As a matter of warranty policy i SENS will not reimburse the consumer s purchase price Obtaining Warranty Service To obtain warranty service you must return the defective meter or meter part along with proof of purchase to your...

Reviews: