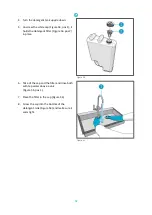
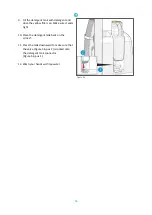
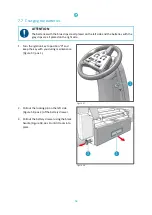
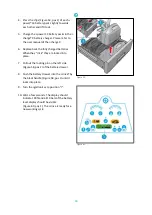
background image


66 

This document is part of the technical file of the i-drive® and will be available upon request. 

Summary of Contents for i-drive

Page 1: ...i drive Continuously easy User manual i team Professional b v Hoppenkuil 27b 5626 DD Eindhoven The Netherlands Telephone 31402662400 Email hello i teamglobal com Internet www i teamglobal com ...

Page 2: ...glish Language Future Cleaning Technologies B V Hoppenkuil 27b 5626 DD Eindhoven The Netherlands Telephone 31402662400 Email hello i teamglobal com Internet www i teamglobal com Model i drive Date 29 10 2020 Product code i drive Version v 4 0 ...

Page 3: ...gies B V an affiliate company of i team in Eindhoven the Netherlands Whenever this manual mentions the partner it refers to your local i team resell and support service partner Purpose of the user manual The purpose of the user manual is to provide the user with information during the life of the i drive in such a way that the i drive is used correctly efficiently and safely even in the event of r...

Page 4: ...operator or bystanders and light or moderate damage to the product or the environment CAUTION Indicates a hazardous situation which if the safety instructions are not followed can lead to light and or moderate damage to the product or the environment ATTENTION Indicates a liability situation for which the manufacturer or its partners and affiliates cannot be held accountable for damages caused by ...

Page 5: ...1 2 Codes alarm display 16 2 2 Solution level indicator 17 2 3 Safety features on the i drive 17 2 3 1 The emergency stop 17 2 3 2 The electromagnetic brake 18 2 4 Different types of squeegee blades 18 2 5 Disc brushes and pads 18 2 6 Cleaning agent 18 3 Safety 19 3 1 General safety instructions 19 3 1 1 Sweep before scrub 19 3 1 2 Disc brush condition 19 3 1 3 Batteries 19 3 2 Risks during operat...

Page 6: ...rive 33 6 2 3 Using the horn 33 6 2 4 At the job site 34 6 2 5 Working in ECO mode 35 6 2 6 Checking the solution level 35 6 2 7 Making an emergency stop 36 7 Maintenance 37 7 1 Cleaning 37 7 1 1 Clean the machine 37 7 2 Checking the machine operating hours 38 7 3 Maintenance tasks on the squeegee 39 7 3 1 Removing the squeegee body from the squeegee lifting plate 39 7 3 2 Placing the squeegee bod...

Page 7: ...6 7 9 Cleaning the i mop lite plateau 57 7 10 Cleaning the suction line 58 7 11 Cleaning the water filter 60 7 12 Damaged or worn parts 61 7 13 Maintenance frequency 61 7 13 1 Maintenance frequency table 61 7 13 2 Servicing the i drive 62 7 14 Storage 62 8 Trouble shooting 63 9 Decommissioning and disposal 64 10 Attachments 65 10 1 CE Certificate 65 ...

Page 8: ...ance The manual must be read in full before the first actions This manual describes the correct method of use safety measures maintenance and transport i team continuously improves all their products based on user experience and feedback Any deviations between the texts and or images from the manual and your i drive could therefore arise from the difference in model or from possible changes due to...

Page 9: ...hemicals will contaminate the wastewater and the recovery tank as well as the disc brushes and squeegee Oil resistant squeegee blades and disc brushes are available do not use the i drive as stepladder or platform do not carry passengers on top of the i drive no riders do not store the i drive outside in order to avoid damage to electronic components never operate the i drive near flammable dusts ...

Page 10: ...6 Li Io batteries i mop lite chemical tank full solution tank full operator 75kg 349 kg Li on batteries DC 25 2V 14 Ah 2117 Wh in total Battery capacity 6 batteries Operation time of batteries 120 min Operating temperature 5 C up to 40 C Storage temperature 20 C up to 70 C Humidity 30 up to 90 Disc brush pressure 24 8 gr cm2 Disc brush speed 175 RPM Solution tank capacity 58 L Detergent tank capac...

Page 11: ... A Sound power Theoretical performance Up to 2745 m2 per hour Practical performance 1400 m2 per hour Speed Forward 2 5 4 0 4 5 km h Reverse 3 km h Turning circle Left 166 cm Right 215 cm Maximum slope normal operation 10 Maximal truck ramp 18 Working lights YES Autobrake YES i mop lite storage YES Disc brush wear indicator YES Operation timer YES ...

Page 12: ...se a risk to the operator The use of alternative supplies voids the manufacturer s warranty The warranty period is 1 year 1 7 Identification Each i drive has a unique serial number that can be found on the platform for the i mop lite at the back side of the i drive Your i team partner needs this number when you order parts Explanation type plate Distributer i team Professional Hoppenkuil 27 b NL 5...

Page 13: ...nt tank 13 A squeegee and a vacuum hose 4 A steering column and steering wheel 14 A front wheel 20 x 6 cm motor 5 An accelerator pedal 15 A front light drive 6 Two deflector rollers and tilt protection wheels 16 A main squeegee body 7 Two rotating disc brushes 17 A recovery tank 8 Two back wheels 25 x 7 5 cm 18 A solution tank 9 A battery drawer 19 An adjustable operator seat 10 An i mop lite ramp...

Page 14: ...4 5 LEDs on 5 2 Combined squeegee and disc brush ON OFF touch button 3 Squeegee and vacuum ON OFF touch button 4 Disc brush ON OFF touch button 5 Multifunctional display See section 2 1 1 6 ECO mode ON OFF touch button If you switch the ECO mode to ON the voltage level on the disc brushes and vacuum motor is decreased by 30 It does not slow down the speed of the i drive 7 Reverse touch button If r...

Page 15: ...umption Push the button to increase the consumption There are five different levels indicated by the LEDs in the blue arch Level 1 0 8 L min 78 minutes using a full tank Level 2 1 5 L min Level 3 2 3 L min Level 4 3 0 L min Level 5 3 5 L min 18 minutes using a full tank 2 1 1 Multifunctional display The multifunctional display has the following functions 1 Indicate battery level Figure 5 pos 2 2 I...

Page 16: ... Check if the recovery tank floating switch works correctly DRIVE ALARM SUMMARY TABLE Alarm Description Solution AL_13 Traction Pedal Failure Pedal tear Check pedal potentiometer wirings AL_14 Traction Release Pedal Pedal active at power on Moving switch active at power on release the pedal AL_15 Traction Overtemperature Traction circuit overtemperature Traction power stage overtemperature check a...

Page 17: ...tank The floating switch inside the tank avoids that the pump runs dry When it is activated all cleaning functions of the i drive stop You are still able to drive it Figure 6 2 3 Safety features on the i drive 2 3 1 The emergency stop The emergency stop button Figure 7 pos 1 is positioned on the steering column 1 To activate it push it in The i drive shuts down completely 2 To start the i drive ag...

Page 18: ... or polyurethane blades for the squeegee depending on the type of surface that you are going to clean with the i drive For more information please visit www i teamglobal com 2 5 Disc brushes and pads You can order disc brushes or pads Brushes can be used to clean most types of surfaces Pads are used in situations in which a low noise level is required like offices and hospitals For more informatio...

Page 19: ...f the disc brush before use Check the red indictor mark before you start Figure 9 pos 1 See section 7 4 4 Make sure the machine is completely turned off when replacing the disc brushes Figure 9 3 1 3 Batteries To charge the batteries always use the automatic battery charger provided by the manufacturer CAUTION During normal operation the 24 V batteries in itself cause no safety hazard Please keep ...

Page 20: ...on OFF please mark the job site with a wet floor marker CAUTION Marking the jobsite with a wet floor marker is not required when using the vacuum function of the i drive unless this is a mandatory work safety requirement by local law When unsure mark the job site to warn passersby 3 2 3 Careful when parking Do not park the i drive on ramps or slopes Always park the i drive on a level hard surface ...

Page 21: ...stic parts of the i drive to secure it during transport It will damage the i drive You can transport your i drive using a truck equipped with a loading ramp with a 18 slope Make sure the machine is safely secured 1 Make sure both tanks are empty 2 Drive the machine up the loading ramp 3 Turn off the machine 4 Step off the machine 5 Raise the loading ramp of the truck bed level 6 Turn on the machin...

Page 22: ...gnetic brake engaged again push the machine to check that the brake is actually enabled and properly functioning never turn on the i drive during the time the electromagnetic brake is released The electromagnetic brake must be released when the i drive cannot be used due to low battery level or because there are no batteries or other causes See section 2 3 2 ...

Page 23: ...ite Please refer to the i mop lite manual for assembly instructions 5 1 Unboxing The i drive comes in a single delivery The i mop lite is delivered separately in a box The batteries and the charger are also delivered separately as they can also be used for other i team products 5 1 1 Contents of the delivery Figure 11 Legend 1 1x i drive 4 2x brush covers 2 1x i mop bar 5 2x disc brushes 3 1x sque...

Page 24: ...he i drive is now free to be moved from the pallet Figure 12 5 2 Assembly 5 2 1 Attaching the disc brushes and brush covers Please see section 7 4 2 5 2 2 Attaching the squeegee Please see section 7 3 2 5 2 3 Inserting the batteries Please see section 6 1 1 5 2 4 Attach the i mop bar 1 Place the i mop bar on the backside of the i drive Figure 13 2 Tighten the 4 bolts Figure 13 pos 1 Torque is 15 N...

Page 25: ...e back of the i drive ATTENTION It is recommended to fully charge the batteries before inserting them into the i drive How to charge the batteries see User Manual i charge 9 ATTENTION The batteries with the blue clips are all placed on the left side and the batteries with the grey clips are all placed on the right side 1 Turn the ignition key to position 0 and keep the key with you 2 Pull out the ...

Page 26: ...y click they are locked into place Figure 15 pos 1 Figure 15 5 Pull out the locking pin on the left side Figure 16 pos 2 of the battery drawer 6 Push the battery drawer into the i drive by the black handle Figure 16 pos 1 until it locks into place Figure 16 ...

Page 27: ...27 7 Turn the ignition key to position l 8 Wait a few seconds The display should indicate 100 and all 10 bars of the battery level display should be visible Figure 17 pos 1 Figure 17 ...

Page 28: ... section 2 6 1 Remove the detergent tank and put it on a flat surface 2 Open the yellow filler cap Figure 18 pos 1 3 While holding the handle and filler cap pour in a maximum of 5 5 L of cleaning agent using a funnel 4 Replace the filler cap and make sure it seals tight 5 Put the detergent tank back in the i drive valve first and the handle facing towards you 6 Clean your hands afterwards Figure 1...

Page 29: ... Figure 19 pos 1 2 Place a water hose in the opening Figure 20 pos 2 3 While keeping an eye on the solution level indicator Figure 20 pos 1 fill the tank with a maximum of 58 L of water 4 Replace the yellow filler cap and make sure it seals tight Figure 19 Figure 20 ...

Page 30: ... 21 pos 1 3 Move the seat Figure 21 pos 2 backward or forward until you are comfortable behind the steering wheel Figure 21 6 1 5 Personal locker Behind the i mop lite you can find a personal locker Figure 22 pos 1 where you can store personal belongings It can be locked with a key supplied with the i drive Figure 22 ...

Page 31: ... 23 pos 1 3 Turn the ignition key to position l The dashboard lights up 4 Check the display for the start up sequence to finish it will show Ready Figure 23 pos 4 5 Check the battery level CAUTION Make sure you have enough capacity left for the job to do At 20 capacity alarm level 1 will be activated and shuts down the squeegee and disc brush function CAUTION DO NOT push the accelerator pedal befo...

Page 32: ...push the accelerator pedal down Figure 23 pos 3 to move forward 8 Lift your feet off the accelerator pedal to brake the automatic break will stop the machine CAUTION Take some time to get acquainted with the handling of the machine note the smaller left turning circle compared to turning right Figure 23 ...

Page 33: ...given 1 Make sure the i drive is stopped and your foot is off the accelerator pedal 2 Press push button Figure 24 pos 1 to select reverse drive 3 Gently push the accelerator pedal to move backwards Figure 24 6 2 3 Using the horn 1 Push the horn button Figure 25 pos 1 to sound the horn Figure 25 ...

Page 34: ... There are five different levels see section 2 1 4 Choose the operating mode disc brush motor ON OFF Figure 26 pos 4 or vacuum motor ON OFF Figure 26 pos 3 or disc brush and vacuum motor ON OFF Figure 26 pos 2 5 Turn on the working lights Figure 26 pos 5 6 Choose your speed Figure 26 pos 6 ATTENTION The water level detergent level and speed depend on the amount of dirt and smoothness of the floor ...

Page 35: ...2 6 Checking the solution level ATTENTION It is important to check the solution level regularly as the i drive will shut down the squeegee and disc brushes if the solution level gets to 20 The solution level can be checked visually on the solution level indicator which is situated on the solution tank Figure 28 pos 1 underneath the seat See section 2 2 Figure 28 ...

Page 36: ...36 6 2 7 Making an emergency stop In case of an emergency push the emergency stop button Figure 29 pos 1 It shuts down the machine completely See section 2 3 1 Figure 29 ...

Page 37: ... done by a person who has correctly read and understood the instructions in this manual is qualified is trained by an experienced operator who has read and understood the instructions in this manual is an adult person is a supervisor for specific maintenance tasks 7 1 Cleaning 7 1 1 Clean the machine Clean the exterior of the machine using a damp cloth after operating it and before storing it WARN...

Page 38: ... Turn the ignition key to position l The dashboard on the steering wheel lights up 3 Wait until Ready Figure 31 pos 2 appears on the display 4 The amount of operating hours and minutes spent is shown in the top right corner of the display Figure 31 pos 1 5 Check the maintenance frequency table in section 7 13 to see which actions should be taken 6 Turn the ignition key to 0 to switch off the i dri...

Page 39: ...tton Figure 32 pos 1 The squeegee moves to its lowest position 4 Turn the ignition key to position 0 and remove it Keep the key with you during maintenance 5 Go to the right side of the i drive 6 Remove the vacuum hose from the hose connector Figure 33 pos 1 7 Loosen the two rotary knobs Figure 33 pos 2 8 Pull the squeegee body backwards out of the squeegee lifting plate Figure 33 pos 3 9 Carefull...

Page 40: ...e 34 pos 3 Make sure to push it fully into the cutout 4 Tighten the rotary knob hand tight Figure 34 pos 1 5 Repeat for the rotary knob closest to you Figure 34 pos 2 6 Push the vacuum hose onto the hose connector of the squeegee Figure 35 pos 1 7 Check that the vacuum hose fits tightly 8 Take place on the seat behind the steering wheel 9 Place the ignition key back in the keyhole Turn the ignitio...

Page 41: ...ve cleaning TIP Daily cleaning can be done with the blades in the squeegee body Clean the edges of the blades with a damp cloth Only step 1 and step 15 need to be done 1 To remove the squeegee body from the squeegee lifting plate of the i drive please see section 7 3 1 Removing the back blade no holes 2 Loosen the small rotary knobs at both ends of the squeegee Figure 36 pos 1 3 Remove the clampin...

Page 42: ...re 37 pos 2 6 Remove the clamping plate of the front blade Figure 37 pos 3 7 Remove the front blade Figure 37 pos 1 from the squeegee body Figure 37 8 Clean the squeegee blades with tap water in a sink 9 Carefully remove debris from the recovery water inlet Figure 38 pos 1 by hand Figure 38 ...

Page 43: ...t blade If it is damaged or torn on the top and bottom replace it by a new one Placing back the back blade See Figure 36 12 Place the back blade and the clamping plate on the squeegee body 13 Hold the clamping plate into place with the two small rotary knobs 14 Lock the clamping plate Placing back the front blade See Figure 37 15 Do step 5 to 7 in reverse order start tightening the wing nuts on on...

Page 44: ...ng maintenance 2 Lift the grey brush cover a little 3 Pull it from its supporting bolts Figure 40 pos 1 to remove it 4 Carefully place it on the floor or a level surface Figure 40 5 Push the two springs Figure 41 pos 1 fully outward until they lock into place behind the cams The clamp is now released 6 Carefully remove the disc brush Figure 41 pos 2 7 Place it on the floor or on a level surface 5 ...

Page 45: ...port bolts push it down to lock it 6 Repeat this sequence for the second brush Figure 42 WARNING After replacing the disc brush check that it is secured as the discs brush rotates at high speed and a loose disc brush can cause serious harm 7 4 3 Cleaning the disc brushes CAUTION Wear protective gloves when cleaning the disc brushes as sharp debris may be attached to it 1 To remove the disc brushes...

Page 46: ...disc brushes back please see section 7 4 2 Figure 44 7 4 5 Replacing the pads 1 To remove the pad drivers please follow the same procedure as for removing the disc brushes see section 7 4 1 2 Check the condition of the pads Figure 45 pos 1 If they look compressed they lose their function and they need to be replaced 3 Pull the pad out of the three locking tabs Figure 45 pos 2 and remove the pad fr...

Page 47: ...covery tank Figure 46 pos 4 4 Check the rubber seal Figure 46 pos 3 if it is polluted clean it with a damp cloth Figure 46 WARNING DO NOT poor water in the suction inlet covered by the rubber flap as this will damage the vacuum motor wear protective gloves the maximum temperature of any fluid in the recovery tank is 50 gr Celsius make sure that you follow your local regulations with regard to wast...

Page 48: ...ed way 10 When the recovery tank is empty hose down the tank with water Figure 46 11 Clean the underside of the lid with water Figure 46 12 Clean the float switch Figure 46 pos 1 with water to avoid that it sticks 13 When the recovery tank is clean place the recovery tank wastewater tube in the clamp Figure 47 pos 4 14 Tighten the lid of the recovery tank wastewater tube Figure 47 pos 1 Make sure ...

Page 49: ...ure 48 pos 2 from the separator Figure 48 pos 1 anti clockwise to remove it 2 Clean the yellow cup with tap water above a sink Figure 49 pos 1 3 Clean the separator with a hose Figure 49 pos 2 4 Turn the yellow cup clockwise to tighten it Figure 48 Figure 49 ...

Page 50: ...attached to it 1 Remove the recovery water inlet Figure 50 pos 1 2 Remove the debris by hand and clean it with tap water and a brush Figure 51 pos 2 above a sink 3 Rinse it with tap water Figure 51 pos 1 4 Replace the recovery water inlet 5 Unlock the safety hook Figure 46 pos 2 and close the lid of the recovery tank Figure 50 Figure 51 ...

Page 51: ...t on a level surface 2 Open the yellow filler cap Figure 52 pos 1 3 Hold the detergent tank by the handle and pour in approx 2 liters of water use a funnel Shake it Pour the contents into the recovery tank Figure 53 pos 1 Figure 52 Figure 53 WARNING Make sure that you follow your local regulations with regard to wastewater ...

Page 52: ... the detergent filter Figure 54 pos 2 in place 6 Take of the cap and the filter and rinse both with tap water above a sink Figure 55 pos 1 7 Place the filter in the cap Figure 54 8 Screw the cap into the bottom of the detergent tank Figure 54 and make sure it seals tight Figure 54 Figure 55 ...

Page 53: ...low filler cap Make sure it seals tight 10 Place the detergent tank back on the i drive 11 Press the tank downward to make sure that the valve Figure 56 pos 2 is locked onto the detergent tank connector Figure 56 pos 1 12 Wash your hands with tap water Figure 56 ...

Page 54: ...ey clips are all placed on the right side 1 Turn the ignition key to position 0 and keep the key with you during maintenance Figure 57 pos 1 Figure 57 2 Pull out the locking pin on the left side Figure 58 pos 2 of the battery drawer 3 Pull out the battery drawer using the black handle Figure 58 pos 1 until it locks into place Figure 58 ...

Page 55: ...teries When they click they are locked into place 7 Pull out the locking pin on the left side Figure 58 pos 2 of the battery drawer 8 Push the battery drawer into the i drive by the black handle Figure 58 pos 1 until it locks into place Figure 59 9 Turn the ignition key to position l 10 Wait a few seconds The display should indicate 100 and all 10 bars of the battery level display should be visibl...

Page 56: ...e i mop lite ATTENTION Make sure you have the user manual of the i mop lite by hand 1 Remove the cleaning solution tank from the i mop lite please refer to the user manual of the i mop lite 2 Take the filling tube out of the clamps Figure 62 pos 1 3 Open the stopper of the i mop lite Figure 62 pos 4 4 Place the filling tube into the tank Figure 62 pos 5 5 Open the red valve Figure 62 pos 3 6 Push ...

Page 57: ... i mop lite Please refer to the user manual of the i mop lite 7 9 Cleaning the i mop lite plateau First unload the i mop lite see section 7 8 1 Wipe the plateau on which the wheels of the i mop lite rest Figure 63 pos 1 with a damp cloth Figure 63 ...

Page 58: ...lay Figure 64 pos 2 3 Press the push button Figure 64 pos 1 The squeegee moves to its lowest position 4 Turn the ignition key to position 0 and remove it Keep the key with you during maintenance 5 Remove the vacuum hose from the hose connector of the squeegee Figure 65 pos 1 6 Place the vacuum hose end above a recovery water disposal drain Figure 65 pos 2 Figure 64 Figure 65 ...

Page 59: ...ine 10 When the suction line is clean replace the vacuum hose on the hose connector of the squeegee Figure 65 pos 1 11 Replace the recovery water inlet 12 Close the lid of the recovery tank 13 Take place on the seat behind the steering wheel 14 Turn the ignition key to position l After a few seconds the text Ready appears on the display Figure 64 pos 2 Figure 66 ...

Page 60: ...er filter Figure 67 pos 2 anti clockwise to remove it The water filter has an integrated valve that avoids water running when the filter is open 4 Remove the water filter Figure 67 pos 3 from the cover 5 Clean the water filter with tap water from the inside outwards Clean the cover with tap water Clean both in a sink Figure 68 pos 1 6 Replace the water filter in the cover 7 Turn the cover clockwis...

Page 61: ...separator 7 5 1 Daily Daily or weekly Action Chapter Frequency Cleaning the squeegee blades 7 3 3 Daily weekly Monthly Cleaning the detergent filter and detergent tank 7 6 Monthly Depending on frequency of usage Action Chapter Frequency Clean the machine 7 1 1 After each use Replacing the front and rear squeegee blades 7 3 3 When worn out or damaged Replacing the disc brushes 7 4 4 Depending on th...

Page 62: ...able Every 125 hours See Service Manual Every 250 hours Every 500 hours 7 14Storage before you store the i drive drain and clean the machine before you store the i drive open all filler caps to let the tanks air out remove the batteries before storage and charge the batteries for next use store the i driveindoors always park the i drive on a level hard surface the storage temperature must be betwe...

Page 63: ... from the squeegee Connect the vacuum hose Vacuum motor not working Contact service department No insufficient flow of detergent solution or washing water to the disc brush The detergent solution or water filter is dirty Clean the filter The detergent solution or water tank is dirty Clean the tank Detergent tank filter dirty Clean detergent tank filter Service valve not closed correctly Check the ...

Page 64: ... electrical equipment Before disposal please make sure to 1 Remove the batteries for separate disposal see section 7 7 TIP Alternatively keep the batteries for use in another piece of i team equipment 2 Remove all loose components such as the disc brush squeegees plastic parts and hoses 3 Dispose all items according to your local laws and regulations TIP Contact you local i team partner to explore...

Page 65: ...65 10 Attachments 10 1CE Certificate ...

Page 66: ...66 This document is part of the technical file of the i drive and will be available upon request ...

Reviews: