background image


10 


1.6


Warranty 

The i-mop® XL Plus should be used as intended and described in this manual. Using the i-mop XL Plus 

outside will void the warranty on the product. 


1.7


Identification 

The ID tag, containing a serial number and 

production number, can be found on the bar 

behind the wastewater tank. 

1.


Serial number 

2.


Production day 

3.


Production year 


Figure 3 

Summary of Contents for i-mop XL Plus

Page 1: ... Plus Auto scrubber for hard floor surfaces User manual i team Professional b v Hoppenkuil 27b 5626 DD Eindhoven The Netherlands Telephone 31402662400 Email hello i teamglobal com Internet www i teamglobal com ...

Page 2: ...anguage Future Cleaning Technologies B V Hoppenkuil 27b 5626 DD Eindhoven The Netherlands Telephone 31402662400 Email hello i teamglobal com Internet www i teamglobal com Model i mop XL Plus Date 28 04 2020 Product code K 1 IMOPXLP FCT 7 Version 2 0 ...

Page 3: ... manufacturer this means Future Cleaning Technologies B V an affiliate company of i team in Eindhoven the Netherlands When this manual mentions the partner this refers to your local i team resell and support service partner Purpose of the user manual The purpose of the user manual is to provide the user with information in such a way that during the life of the i mop XL Plus the machine is used co...

Page 4: ...iliates cannot be held accountable for damages caused by non compliance STRONG MAGNET Indicates the machine contains strong magnets These can cause pacemakers to stop working or cause electronic data to be damaged such as information stored on access passes PACEMAKER Indicates operators and maintenance crew wearing pacemakers should keep a minimal distance of 6 in 15 cm In this specific case opera...

Page 5: ...instructions 12 3 1 1 Sweep before scrub 12 3 1 2 Brush condition 12 3 1 3 Machine orientation 12 3 1 4 Strong magnets 12 3 1 5 Batteries 12 3 2 Risks during operation 13 3 2 1 Dress safely 13 3 2 2 Mark the job site 13 3 2 3 Careful when parking 13 3 3 Risks after operation 13 3 3 1 Remove battery packs 13 3 3 2 Machine orientation 13 4 Transport and storage 14 4 1 General 14 4 2 Park position 14...

Page 6: ...XL Plus 26 6 2 6 Emptying tanks 26 6 3 Cleaning and storage 27 6 3 1 Flush the system 27 6 3 2 Cleaning the tanks 27 6 3 3 Removing battery packs 27 6 3 4 Check the brushes and squeegee 28 6 3 5 Store in an upright position 28 7 Maintenance 29 7 1 Brush replacement 29 7 2 Squeegee replacement 30 7 2 1 Detach the squeegee 30 7 2 2 Flip replace the squeegee blade 30 7 2 3 Attach the squeegee 31 7 3 ...

Page 7: ...es the correct method of use safety measures maintenance and transport The manufacturer continuously improves all their products based on user experience and feedback Any deviations between the texts and or images from the manual and your i mop XL Plus can therefore arise from the difference in model or from possible changes due to continuous development and innovation 1 1 Intended use of the prod...

Page 8: ...ctrical floor outlets in order to avoid electrical shock NO RIDERS Do not carry passengers on top of the i mop XL Plus DO NOT use the i mop XL Plus as stepladder or platform DO NOT store the i mop XL Plus outside in order to avoid damage to electronic components ONLY use manufacturer supplied parts for maintenance KEEP AWAY from children The i mop XL Plus is a professional cleaning machine to be u...

Page 9: ...1 5 gr cm2 Brush speed 350 RPM Detergent tank capacity 4 L Recovery tank capacity 6 L 4 L recommended max Vibration Amplitude mm 0 4442 Velocity m s 0 008 Acceleration m s 0 943 Noise level 1m 79 6 Db Theoretical performance Up to 1800 m2 per hour Practical performance 1000 1300 m2 per hour Scrub deck coating YES Castor wheels YES Power cut off at park position YES Angle power cut off YES 45 Float...

Page 10: ... in this manual Using the i mop XL Plus outside will void the warranty on the product 1 7 Identification The ID tag containing a serial number and production number can be found on the bar behind the wastewater tank 1 Serial number 2 Production day 3 Production year Figure 3 ...

Page 11: ...le with triggers and control panel The scrub deck that contains the brushes and squeegee The i mop XL Plus can be folded into a park position this is recommended for storage The i mop XL Plus consists of Figure 4 Legend 1 Trigger 6 Vacuum hose 2 Control panel 7 Rotating brushes 3 Batteries 8 Squeegee 4 Scrub deck 9 Solution tank 5 Recovery tank ...

Page 12: ... Plus in an upright position when cleaning fluid or batteries are inserted 3 1 4 Strong magnets CAUTION Please be aware of the integrated magnets that hold the fluid tanks in place WARNING Operators and maintenance crew wearing pacemakers should keep a minimal distance of 6 in 15 cm 3 1 5 Batteries Always use the automatic battery charger provided by the manufacturer CAUTION During normal operatio...

Page 13: ...rker CAUTION Marking the jobsite with a wet floor marker is not required when using the vacuum function of the i mop XL Plus Unless this is a mandatory work safety requirement by local law When unsure mark the job site to warn passersby 3 2 3 Careful when parking Do not park the i mop XL Plus on ramps or slopes Always park the i mop XL Plus on a level hard surface 3 3 Risks after operation 3 3 1 R...

Page 14: ...he park position is the upright vertical position for storage and maintenance tasks 1 Make sure the vacuum hose Figure 5 pos 2 is pushed back into the machine so it cannot get squeezed 2 Crouch down and hold the handle Figure 5 pos 1 with one hand while holding the scrub deck Figure 5 pos 3 with your other hand 3 Lift the scrub deck slowly until it stands upright on the front wheels Figure 5 pos 4...

Page 15: ... refer to section 4 2 2 Carry the i mop XL Plus with one hand while holding the handle Figure 6 pos 1 with your other hand CAUTION The transport wheels are not designed to roll over dirty surfaces sand can cause the wheels to block Lift the i mop XL Plus going from one building to another ...

Page 16: ...L Plus in park position refer to section 4 2 2 Remove the batteries and both tanks and pack them separately for transport 3 Lift the i mop XL Plus into your vehicle Don t forget the tanks and batteries 4 Prevent the i mop XL Plus from moving around during transport by using a tension belt or another appropriate restraint CAUTION The seal of the solution and recovery tank can be damaged during tran...

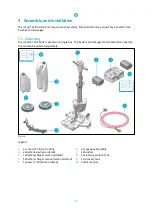
Page 17: ...packed in a single box The battery and charger are delivered in a separate box and can be ordered separately Figure 8 Legend 1 1x i mop XL Plus main body 6 1x squeegee assembly 2 2x batteries when ordered 7 2x brushes 3 1x battery charger when ordered 8 1x cleaning solution tank 4 1x battery charger manual when ordered 9 1x recovery tank 5 1x power cord when ordered 10 1x this manual ...

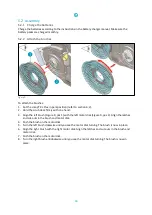
Page 18: ...nd 3 Align the left brush Figure 9 pos 1 with the left motor disk Figure 9 pos 2 Align the latches and cut outs in the brush and motor disk 4 Push the brush on the motor disk 5 Turn the left brush clockwise until you see the motor disk turning The brush is now in place 6 Align the right brush with the right motor disk Align the latches and cut outs in the brush and motor disk 7 Push the brush on t...

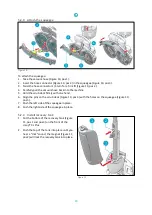
Page 19: ... Hold the scrub deck firmly with one hand 6 Align the pins on the scrub deck Figure 10 pos 4 with the holes on the squeegee Figure 10 pos 5 7 Push the left side of the squeegee in place 8 Push the right side of the squeegee in place 5 2 4 Install recovery tank 1 Put the bottom of the recovery tank Figure 11 pos 1 and pos 3 on the front of the i mop XL Plus 2 Push the top of the tank into place unt...

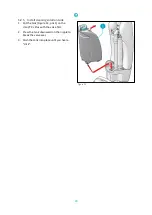
Page 20: ...cleaning solution tank 1 Put the tank Figure 12 pos 1 on the i mop XL Plus with the valve first 2 Press the tank downward on the nipple to break the valve seal 3 Push the tank into place until you hear a click Figure 12 ...

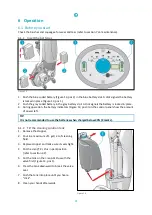
Page 21: ...ration the battery indicators Figure 13 pos 3 on the control panel show the amount of power left TIP It is not recommended to use the batteries when charged below 40 2 marks 6 1 2 Fill the cleaning solution tank 1 Remove the stopper 2 Pour in a maximum of 1 gal 4 L of cleaning fluid 3 Replace stopper and make sure it seals tight 4 Put the i mop XL Plus in park position refer to section 4 2 5 Put t...

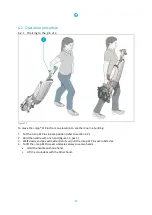
Page 22: ...uilding 1 Put the i mop XL Plus in park position refer to section 4 2 2 Hold the handle with one hand Figure 15 pos 1 3 Walk slowly and pay extra attention if you pull the i mop XL Plus over obstacles 4 To lift the i mop XL Plus over obstacles always use two hands Hold the handle with one hand Lift the scrub deck with the other hand ...

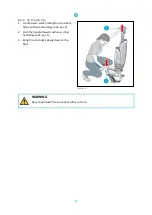
Page 23: ...while holding the scrub deck firmly with one hand Figure 16 pos 2 2 Push the handle forward with your other hand Figure 16 pos 1 3 Bring the scrub deck slowly down to the floor WARNING Never push down the scrub deck with your foot Figure 16 ...

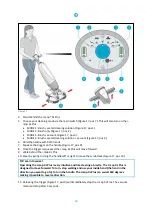
Page 24: ...trigger is squeezed the i mop XL Plus will move forward 9 Walk behind the i mop XL Plus 10 Steer by gently turning the handle left or right to move the scrub deck Figure 17 pos 10 11 Releasing the trigger Figure 17 pos 9 will immediately stop the i mop XL Plus The vacuum motor will stop after 3 seconds TIP Learn to swivel Operating the i mop XL Plus is very intuitive and like steering a bicycle Th...

Page 25: ...perating below a 45 degree angle can cause water to run into the vacuum engine Figure 18 6 2 3 ECO mode The ECO mode will use 40 less cleaning solution 1 Turn on the ECO mode by pushing the ECO button Figure 19 pos 1 2 Turn off ECO mode by pushing the ECO mode again Figure 19 ...

Page 26: ... vacuum Figure 21 pos 2 2 Operate it about 15 20 feet farther to vacuum remaining cleaning solution up 3 Then set the main switch to the OFF position Note that the vacuum motor will continue to run for approximately 3 more seconds 6 2 6 Emptying tanks Dispose water or cleaning solution from both tanks in an appropriate drain Even though the recovery tank is bigger empty it each time the cleaning s...

Page 27: ... fresh water and hold it horizontally with the holes facing up Tilt the tank repeatedly thoroughly rinsing all the dirt and debris out from the tank 3 To clean the solution tank follow the same procedure 6 3 3 Removing battery packs 1 Put the i mop XL Plus in park position refer to section 4 2 2 Hold the i mop XL Plus by the scrub deck to stabilize 3 While pressing both plastic pins inwards Figure...

Page 28: ... is clean and intact refer to section 7 2 1 on how to remove it Clean it with fresh water and wipe it with a clean damp cloth Replace the squeegee blades when necessary 6 3 5 Store in an upright position 1 Please ensure that the i mop XL Plus is parked in a place where nobody can bump into it 2 Put the i mop XL Plus in park position refer to section 4 2 3 Store the i mop XL Plus close to a wall Fi...

Page 29: ... hand to turn the left brush Figure 25 pos 1 anticlockwise until you feel resistance or see the motor disk turning as well 4 Pull the brush off the motor disk toward you 5 Turn the right brush clockwise until you feel resistance or see the motor disk turning as well 6 Pull the brush off the motor disk toward you 7 Visually inspect the motor disks 8 Clean the i mop XL Plus scrub deck with a clean d...

Page 30: ...screw the 8 plastic nuts on the back 2 Take off the squeegee rear plate 3 Once the plastic part is removed you can easily take off the rear rubber blade 4 Push the 8 screws through the front blade in order to remove the squeegee front plate 5 Take off the rear rubber blade 6 Inspect the front and rear rubber blades The first time flip the blades so the top of the blade is now facing the floor Push...

Page 31: ... 1 Detach the squeegee as described in 7 2 1 2 Remove the solution tank You can see where the vacuum hose is connected at the i mop XL Plus handle 3 Hold the scrub deck firmly with one hand 4 Detach the vacuum hose by twisting the connector 1 4 turn anticlockwise 5 Now you can carefully pull the vacuum hose from the top of the machine 6 Guide the new vacuum hose via the opening to the hose connect...

Page 32: ...registers 6 minutes of operation The i mop XL Plus requires service every 5000 clicks 7 6 Accessories The i mop XL Plus can be equipped with different brushes and polishing pads The use of these accessories is only allowed by experienced and trained operators as some polishing pads can be abrasive and can cause damage to the floor surface when applied incorrectly For more information please contac...

Page 33: ...seal replace the tank Filter blocked Ensure the solution tank has no dirt particles and the filter is clean Blocked water pipe Request for service Poor water recovery Squeegee opening blocked Remove the pipe and clean the squeegee opening Tears in squeegee blades Replace squeegee blades Filter blocked Check the yellow filter and clean if necessary Vacuum hose blocked Check and remove blockage Vacu...

Page 34: ...of according to your local laws and regulations regarding recycling of electrical equipment Before disposal please 1 Flush the machine refer to section 6 3 1 2 Remove the batteries for separate disposal refer to section 6 3 3 TIP Alternatively keep the batteries for use in another piece of i team equipment 3 Remove all loose components like brushes tanks and squeegee 4 Dispose all items according ...

Page 35: ...35 10 Attachments 10 1CE Certificate ...

Reviews: