background image

26 

EUROPEAN UNION ONLY

NOTE: MARKING IS IN COMPLIANCE WITH EU WEEE DIRECTIVE

ENGLISH

This equipment is marked with the above recycling symbol. It means 

that at the end of the life of the equipment you must dispose of it 

separately at an appropriate collection point and not place it in 

the  normal  domestic  unsorted  waste  stream.  This  wil  benefit  the 

environment for all. (European Union only)

DEUTSCH

Dieses Produkt trägt das Recycling-Symbol gemäß der EU-Richtinie. 

Das bedeutet, dass das Gerät am Ende der Nutzungszeit bei einer 

kommunalen Sammelstelle zum recyceln abgegeben werden muss, 

(kostenloss).  Eine  Entsorgung  űber  den  Haus-/Restműll  ist  nicht 

gestattet. Dies ist ein aktiver Beitrag zum Umweltschutz. (Nur 

innerhalb der EU)

FRANÇAIS

Ce dispositif est revêtu du marquage avec le symbole de recyclage 

indiqué ci-dessus. Ça veut dire, qu’une fois découlée la vie utile 

dudit dispositif, vous vous voyez dans l’obligation d’assurer, que le 

dispositif se trouve déposé en un respectif centre de collecte, dûment 

établi à cette fin, et non en d’autres centres de ramassage qui soient 

destinés à déposer de courants déchets municipaux non triés. De 

cette manière, on contribue considérablement à une amélioration 

en matière d’environnement où nous vivons tous. (Seulement pour 

l’Union Européenne).

ESPAÑOL

El dispositivo está indicado por el símbolo de reciclaje. Esto significa 

que al final de la vida útil de la instalación, debe asegurarse de que 

se almacene por separado en un punto de recolección establecido 

para este fin y no en los lugares designados para la eliminación de 

desechos municipales ordinarios sin clasificar. Contribuirá a mejorar 

el medio ambiente de todos nosotros. (Sólo para la Unión Europea)

ITALIANO

Questo dispositivo è contrassegnato con il seguente simbolo di 

riciclaggio. Si chiede di consegnarlo alla fine del suo ciclo di vita a 

un Centro di raccolta dei rifiuti differenziati istituita per questo scopo 

Summary of Contents for U3CEXTEND22

Page 1: ... U3CEXTEND22 User guide Gebrauchsanweisung Mode d emploi Manual de instrucciones Manuale Uživatelská příručka Instrukcje obsługi Užívateľská príručka Vartotojo vadovas Handleiding FRONT PANEL USB C USB 3 0 ...

Page 2: ...amente todo el manual El manual detallado está disponible en nuestro sitio web www i tec cz es bajo la pestaña Manuales y controladores de este producto Si tiene algún problema póngase en contacto con nuestro equipo de soporte en support itecproduct com IT Leggere attentamente tutto il Libretto d uso Il Libretto d uso è a disposizione anche sulla scheda Manuali e strumenti del nostro sito web www ...

Page 3: ...dovą galite rasti mūsų svetainėje www i tec cz en šio produkto skyrelyje Manuals drivers Iškilus problemoms galite susisiekti su mūsų technine pagalba support itecproduct com NL Wij vragen u vriendelijk om de volledige handleiding zorgvuldig door te lezen Een gedetailleerde handleiding van dit product is beschikbaar op onze website www i tec cz nl onder het tabblad Handleidingen en drivers Mochten...

Page 4: ......

Page 5: ...6 07 DEUTSCH 08 09 FRANÇAIS 10 11 ESPAÑOL 12 13 ITALIANO 14 15 ČESKY 16 17 POLSKI 18 19 SLOVENSKY 20 21 LIETUVOS 22 23 NEDERLANDS 24 25 WEEE 26 27 Declaration of Conformity 28 29 FCC 30 FRONT PANEL USB C USB 3 0 ...

Page 6: ...B 3 0 port on the motherboard of your PC The included 75 cm long USB 3 0 cable is long enough to connect the motherboard to the front panel 2 Connect the power part of the SATA cable to the front panel and connect the other end to the power supply of your PC 3 Finally fix the metal frame using screws to the front 3 5 position on the front side of the PC SOFTWARE INSTALLATION Windows 8 8 1 10 macOS...

Page 7: ...ent Check functionality after falling to water or to the ground Check functionality when the cover is broken Send the device back if it does not work in accordance with the user manual FREQUENTLY ASKED QUESTIONS Available on our website www i tec cz en on the FAQ tab of this product ...

Page 8: ...ALLATION 1 Verbinden Sie den USB 3 0 Anschluss des Front Panels mit dem USB 3 0 Anschluss auf der Hauptplatine Ihres PCs Das mitgelieferte 75 cm lange USB 3 0 Kabel reicht aus um die Systemplatine mit dem Frontpanel zu verbinden 2 Schließen Sie den Stromführende Teil des SATA Kabels am Front Panel an und verbinden Sie das andere Ende mit der Stromversorgung Ihres PCs 3 Befestigen Sie abschließend ...

Page 9: ...auf In Zusammenarbeit mit der Serviceabteilung Überprüfen Sie die Funktionalität nachdem das Gerät ins Wasser oder auf den Boden gefallen ist Überprüfen Sie die Funktionalität bei Beschädigung der Abdeckung Reklamieren Sie Geräte die nicht so funktionieren wie im Handbuchs beschrieben HÄUFIG GESTELLTE FRAGEN Verfügbar auf unserer Webseite www i tec cz de auf der Registerkarte FAQ dieses Produkts ...

Page 10: ...teur USB 3 0 de la plaque frontale au port USB 3 0 de la plaque de base de votre PC Le câble USB 3 0 fourni de 75 cm est suffisamment long pour connecter la plaque de base à la plaque avant 2 Connectez la partie d alimentation du câble SATA à la plaque avant et l autre extrémité à la source d alimentation de votre PC 3 Enfin fixez la plaque 3 5 sur le châssis métallique de la face avant de votre P...

Page 11: ...e Service Pour vérifier le bon et correct fonctionnement du dispositif après une tombée à l eau ou à terre Pour vérifier le bon et correct fonctionnement quand le couvercle montre une rupture Pour procéder à une réclamation du dispositif qui ne fonctionne pas conformément au présent Guide d instructions et mode d emploi RÉPONSES AUX QUESTIONS FRÉQUEMMENT POSÉES À votre disposition sur notre page w...

Page 12: ...l panel frontal USB 3 0 al puerto USB 3 0 de la placa base de su PC El cable USB 3 0 de 75 cm incluido es largo para conectar la placa base al panel frontal 2 Conecte la parte de alimentación del cable SATA al panel frontal y conecte el otro extremo a la fuente de alimentación de su PC 3 Finalmente use los tornillos para asegurar la estructura metálica a la posición frontal de 3 5 en la parte fron...

Page 13: ... el departamento de servicio técnico Verifique el funcionamiento tras una caída al agua o al suelo Compruebe el funcionamiento en caso de que la cubierta esté agrietada Formule una reclamación del dispositivo según lo indicado en el manual PREGUNTAS FRECUENTES Disponible en nuestra página web www i tec cz es en la pestaña FAQ de este producto ...

Page 14: ...B 3 0 sulla scheda madre del vostro PC Il cavo USB 3 0 lungo 75 cm in dotazione è abbastanza lungo per collegare la scheda madre al pannello frontale 2 Collegare l estremità di alimentazione SATA del cavo al pannello frontale e collegare l altra estremità alla fonte di alimentazione del vostro PC 3 Infine aiutandosi con le viti fissare la struttura metallica alla posizione 3 5 sul lato anteriore d...

Page 15: ...nica Controllare il funzionamento del dispositivo dopo la sua caduta per terra o nell acqua Verificare il funzionamento del dispositivo in caso di rottura dell involucro Sporgere il reclamo se il dispositivo non funziona secondo il Libretto d uso DOMANDE FREQUENTI Si veda la scheda FAQ di questo prodotto sulle nostre pagine web www i tec cz it ...

Page 16: ...o panelu připojte k USB 3 0 portu na základní desce Vašeho PC Přibalený 75 cm dlouhý USB 3 0 kabel je dostatečně dlouhý k propojení základní desky s čelním panelem 2 Připojte napájecí část SATA kabelu k přednímu panelu a druhý konec připojte ke zdroji Vašeho PC 3 Nakonec pomocí šroubků upevněte kovovou konstrukci do přední 3 5 pozice na čele PC SOFTWAROVÁ INSTALACE Windows 8 8 1 10 macOS X a vyšší...

Page 17: ...jší možné použití V součinnosti se servisním oddělením Ověřte funkčnost po pádu do vody nebo na zem Ověřte funkčnost při prasknutí krytu Reklamujte zařízení nefungující dle manuálu ČASTO KLADENÉ OTÁZKY K dispozici na našem webu www i tec cz v záložce FAQ u tohoto produktu ...

Page 18: ...3 0 na płycie głównej komputera Dołączony kabel USB 3 0 o długości 75 cm jest wystarczająco długi aby podłączyć płytę główną do panelu przedniego 2 Podłącz część zasilającą kabla SATA do panelu przedniego i podłącz drugi koniec do zasilacza komputera 3 Na koniec przymocuj metalową ramkę za pomocą śrub do przedniej części obudowy w miejscu przeznaczonym na urządzenia 3 5 INSTALACJA OPROGRAMOWANIA W...

Page 19: ...cy z działem serwisu Sprawdzić funkcjonalność po upadku do wody lub na twarda powierzchnię Sprawdzić funkcjonalność gdy obudowa uległa uszkodzeniu Odesłać urządzenie gdy nie pracuje zgodnie z instrukcją CZĘSTO ZADAWANE PYTANIA Dostępne na naszych stronach www i tec cz pl w zakładce FAQ przy niniejszym produkcie ...

Page 20: ...predného panelu pripojte k USB 3 0 portu na základnej doske Vášho PC Pribalený 75 cm dlhý USB 3 0 kábel je dostatočne dlhý na prepojenie základnej dosky s čelným panelom 2 Pripojte napájaciu časť SATA kábla k prednému panelu a druhý koniec pripojte k zdroju Vášho PC 3 Nakoniec pomocou skrutiek upevnite kovovú konštrukciu do prednej 3 5 pozície na čele PC SOFTWAROVÁ INŠTALÁCIA Windows 8 8 1 10 macO...

Page 21: ... možné použitie V súčinnosti so servisným oddelením Overte funkčnosť po páde do vody alebo na zem Overte funkčnosť pri prasknutí krytu Reklamujte zariadenie nefungujúce podľa manuálu ČASTO KLADENÉ OTÁZKY K dispozícii na našom webe www i tec cz v záložke FAQ pri tomto produkte ...

Page 22: ...ilgas kad pagrindinę plokštę būtų galima prijungti prie priekinio skydo 2 Prijunkite SATA laido maitinimo dalį prie priekinio skydo o kitą galą prie kompiuterio maitinimo šaltinio 3 Galiausiai pritvirtinkite metalinį rėmą varžtais prie korpuso priekio vietoje kuri skirta 3 5 įrenginiams PROGRAMINĖS ĮRANGOS ĮDIEGIMAS Windows 8 8 1 10 macOS X ir aukštenė Būtina įdiegti naujausias kompiuterio pagrind...

Page 23: ...SB C USB 3 0 LT Įskilus dangčiui patikrinkite veikimą Jeigu įrenginys neveikia pateikite pretenzijas vadovaudamiesi įrenginio vadovu DAŽNAI UŽDUODAMI KLAUSIMAI Rasite mūsų svetainėje www i tec cz en skiltyje FAQ prie šio produkto ...

Page 24: ...aneel aan op de USB 3 0 poort op het moederbord van uw PC De bijgesloten 75 cm lange USB 3 0 kabel is voldoende lang om het moederbord met het frontpaneel te verbinden 2 Sluit het voedingsgedeelte van de SATA kabel aan op het frontpaneel en het andere uiteinde op de voedingsbron van uw PC 3 Bevestig tot slot de metalen constructie m b v schroefjes in de 3 5 positie op de voorkant van de PC SOFTWAR...

Page 25: ...ceafdeling Controleer de functionaliteit na het vallen van het product in water of op de grond Controleer de functionaliteit als het product barsten vertoont Reclameer dit product als het niet werkt in overeenstemming met de handleiding VEELGESTELDE VRAGEN Beschikbaar op onze website www i tec cz nl op het tabblad FAQ bij dit product ...

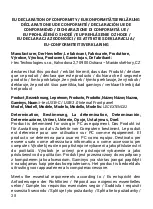
Page 26: ... utile dudit dispositif vous vous voyez dans l obligation d assurer que le dispositif se trouve déposé en un respectif centre de collecte dûment établi à cette fin et non en d autres centres de ramassage qui soient destinés à déposer de courants déchets municipaux non triés De cette manière on contribue considérablement à une amélioration en matière d environnement où nous vivons tous Seulement po...

Page 27: ... životného prostredia nás všetkých Iba pre Európsku úniu POLSKI To urządzenie oznakowane jest specjalnym symbolem odzysku Pookresie użytkowania trzeba je zwrócic do odpowiedniego punktu zbiörki i nie wolno umiestczać go razem z nieposortowanymi odpadami Takie dzialanie przyniese korzyść dla środowiska Tylko w Unii Europejskiej LIETUVIU Šis gaminys yra pažymetas specialiu atlieku tvarkymo ženklu Ba...

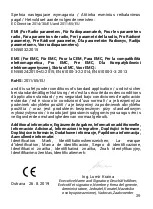
Page 28: ...lis U2CEXTEND22 Determination Bestimmung La détermination Determinación Determinazione Určení Určenie Opcje Ustatymas Doel Product is determined for using in PC as equipment Das Produkt ist für Austattung und als Zubehör von Computern bestimmt Le produit est déterminé pour une utilisation sur PC comme équipement El producto se determina para usar en PC como equipo Destinato per essere usato come a...

Page 29: ...61000 3 3 2013 RoHS 2011 65 EU and it is safety under conditions of standard application und ist sicher bei standardmäßiger Nuttzung et c est la sécurité dans des conditions d application standard y es seguridad bajo condiciones de aplicación estándar ed è sicuro in condizioni d uso normali a je bezpečný za podmínek obvyklého použití a je bezpečný za podmienok obvyklého použitia oraz jest produkte...

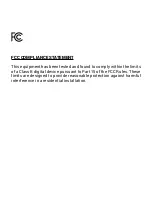
Page 30: ...nt has been tested and found to comply within the limits of a Class B digital device pursuant to Part 15 of the FCC Rules These limits are designed to provide reasonable protection against harmful interference in a residential installation ...

Page 31: ......

Page 32: ...www i tec cz en ...

Reviews: