background image

Jan 05       


                                    P.6


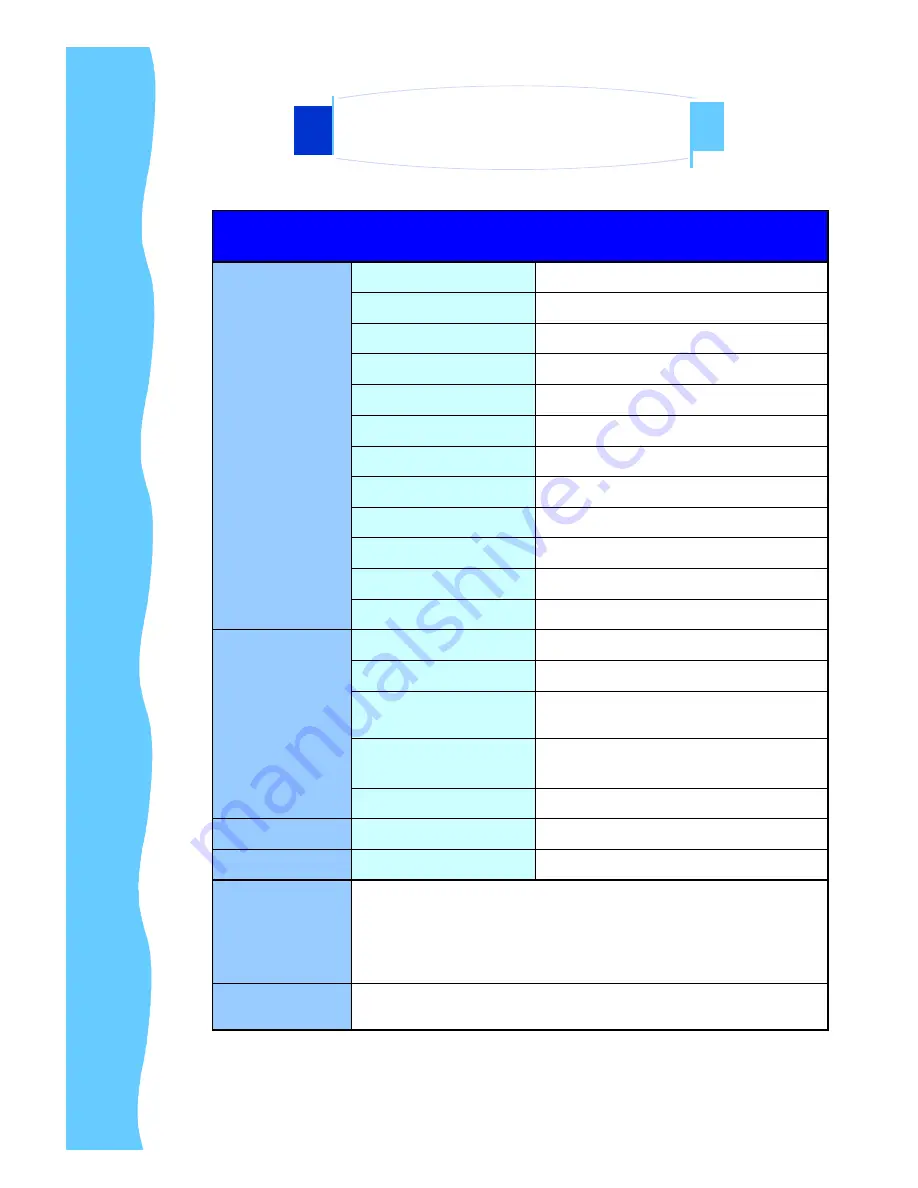
Technical Specifications


 Monitor


Panel 

17" LCD Panel 

Display Type 

TFT LCD active matrix colour 

Resolutions 

1280 x 1024 

Response Time 

Tr=3ms, Tf=10ms 

Contrast Ratio 

500:1 typical 

Brightness 

300 cd/m

2

 typical 

Pixel Pitch 

0.264(H) x 0.264(V) 

Panel Colour 

16.2M display colour 

Viewing Angle 

70 / 70 / 75 / 60 (L / R / U / D) 

Storage Temp. 

-25

°

 to 60

°

Operating Temp. 

0

°

 to 50

°

MTBF 

50,000 hours 

 Power Supply


Remote Adapter 

110V - 220V AC Input 

Adapter Size 

108(L) x 64 (W) x 30 (D) mm 

Cable Length from   
mains plug to adapter 

182cm 

Cable Length from 
adapter Unit 

180cm 

Power Socket 

12V (+) female 

 Connectors 

VGA 

HDDB 15-pin (female) x 1 

 Video 

Standards 

Supports NTSC, PAL or SECAM 

 Product        
 Dimension            


AP Series : 440(W) x 364(H) x 44(D) mm 

DP Series : 390(W) x 320(H) x 55(D) mm 

OP Series : 406(W) x 324(H) x 51(D) mm 

 Packing  
 Dimension        

  AP / DP / OP Series : 630(L) x 550(W) x 110(H) mm 

2. Introduction


AP-17AV / DP-17AV / OP-17AV Series   


                                                                            User Manual


Summary of Contents for UltraView iAP1700

Page 1: ...User Manual Innovative LCD Display Solutions AP 17AV Series DP 17AV Series OP 17AV Series UltraView...

Page 2: ...ons Page 8 9 4 Using the System A Product Views Page 10 12 B I O Outlet Page 13 C Installation Procedures Page 14 D Setup Touchscreen Optional Page 15 i For Windows Page 15 ii For DOS Page 16 18 E OSD...

Page 3: ...ex graphics and high definition images Other outstanding designs that enhance this LCD monitor s performance are Plug Play compatibility and OSD On Screen Display controls High contrast color TFT LCD...

Page 4: ...Jan 05 P 3 AP 17AV series C Dimension Diagrams 2 Introduction AP 17AV DP 17AV OP 17AV Series User Manual...

Page 5: ...Jan 05 P 4 DP 17AV series C Dimension Diagrams 2 Introduction AP 17AV DP 17AV OP 17AV Series User Manual...

Page 6: ...Jan 05 P 5 OP 17AV series C Dimension Diagrams 2 Introduction AP 17AV DP 17AV OP 17AV Series User Manual...

Page 7: ...ing Temp 0 to 50 C MTBF 50 000 hours Power Supply Remote Adapter 110V 220V AC Input Adapter Size 108 L x 64 W x 30 D mm Cable Length from mains plug to adapter 182cm Cable Length from adapter Unit 180...

Page 8: ...deral Communications Commission warns the user that any unauthorized changes or modifications to the unit if not expressly approved by the party responsible for compliance could void the user s author...

Page 9: ...reen The LCD is very delicate D Precautions Power 1 Use the type of power indicated on the marking label Plugs 1 Do not remove any of the prongs of the monitor s three pronged power plug 2 Disconnect...

Page 10: ...ds Ensure that the total of all units plugged into the wall outlet does not exceed 10 amperes 5 Ensure that the total ampere ratings on all units plugged into the extension cord is not above the cord...

Page 11: ...A Product Views AP Series Front View AP Series Rear View Jan 05 P 10 4 Using the System AP 17AV DP 17AV OP 17AV Series User Manual...

Page 12: ...A Product Views Cont DP Series Front View DP Series Rear View Jan 05 P 11 4 Using the System AP 17AV DP 17AV OP 17AV Series User Manual...

Page 13: ...A Product Views Cont OP Series Front View OP Series Rear View AP 15AV DP 15AV OP 15AV Series User Manual Jan 05 P 12 4 Using the System...

Page 14: ...ect to power cable 2 PC IN Connect to D Sub 15 pin signal connector 3 S Video IN Connect to the S Video cable connector for AV series only 4 RCA IN Connect to the composite cable connector for AV seri...

Page 15: ...2 Plug the signal cable to the signal connector at the rear of PC and the rear of the LCD monitor 3 Plug adapter output cable to the jack at the rear of LCD monitor and the power cord to the adapter 4...

Page 16: ...stalls the required TouchWareTM software files create a TouchWareTM software program files and place a TouchWareTM software icon on the Windows desktop and control panel TouchWareTM will also determin...

Page 17: ...Configuration utility for DOS Microcal Diagnostic utility ThruGlass control panel for DOS DOS help files If you do not plan to use any of the touchscreen files for windows you may want to install just...

Page 18: ...diskette to the specified destination drive and directory Next the Install program automatically searched through the system and configures the touchscreen to the proper COM port interrupt and commun...

Page 19: ...computer To manually load the DOS touchscreen driver 1 Close all applications and exit from Windows 2 Access the DOS command line prompt 3 Use the Change Directory cd command to switch to the director...

Page 20: ...d to enter OSD main Menu Increase This button is used to adjust the increasing or next value of selected OSD control option Decrease This button is used to adjust the decreasing or next value of selec...

Page 21: ...Menu Bright Contrast To enter into the Bright Black level Contrast sub menu Auto Adjust To perform automatic optimisations of all functions An Adjusting message is displayed during the process Phase C...

Page 22: ...just and button to Contrast Phase Clock 1 Phase To adjust input video sampling clock s phase Use the Left Right button to adjust and button to Phase 2 Clock To adjust input video sampling clock Use th...

Page 23: ...row shows the vertical frequency of the current input signal 2 OSD Timer To modify the duration of the OSD time out 3 Color a 5500K Select Colour Temp at 5500K b 6500K Select Colour Temp at 6500K c 95...

Page 24: ...lue from 1 to 100 using and buttons Contrast Adjust the contrast value from 1 to 100 using and buttons Colour Adjust Select the colour temperature option for 9300K or 6500K or RGB Exit Exit the Colour...

Page 25: ...isplay image to upward with value from 0 to 100 Press shifting display image to downward from value 0 to 100 Sharpness Adjust the sharpness of the S Video and CVBS image with 5 levels Phase Adjust the...

Page 26: ...to adjusting horizontal position or vertical position Yes Enable No Disable Auto Phase Enable or disable function for auto adjusting physical voltage to improves focus clarity and image stability Yes...

Page 27: ...fting OSD Menu to left from value 0 to 100 OSD V Position Press shifting OSD Menu to upward with value from 0 to 100 Press shifting OSD Menu to downward from value 0 to 100 OSD Timer Enable or disable...

Page 28: ...eset Exit Mode Select Switch the display size for 640 x 400 or 720 x 400 in DOS mode Reset Enter for reloading all factory default Exit Exit the Function configuration Page 4 Using the System AP 17AV...

Reviews: