background image


PTZ Control 

To successfully control a PTZ camera through Annexxus 516 or SRX-Pro Server interface, start by correctly connecting the 
PTZ camera to the Annexxus 516 unit. 
  

1.


Connect the 

R+

 and 

R-

 terminals of the Pan/Tilt camera or a speed dome to 

RS-485 D+

 and 

RS-485 D-


terminals on the back of the Annexxus 516 unit, respectively. 

2.


Go to Configuration -> Remote Configuration -> Serial Port settings -> 485 Serial Port setup. 

3.


Configure RS-485 Settings for each connected PTZ Camera and speed dome. 

a.


Select the 

Channel No.

, which matches the VIDEO IN BNC port in the back of Annexxus 516 unit 

where the PTZ camera is plugged into. 

b.


Set the 

Camera Baud Rate

 (port speed) according to the PTZ camera specifications. 

Note: If using i3's PTZ730 camera, set the Baud Rate to 2400 

c.


Set the camera's 

PTZ Protocol


Note: If using i3's PTZ730 camera, use Pelco-D protocol  

d.


Set the 

PTZ Address

, which is Camera ID. PTZ Camera ID is usually set by hardware dip-switches on 

the camera. See camera manufacturer's manual for instructions on how to set / find the camera's PTZ 
Address / Camera ID. 

e.


Click 

Save

. Your PTZ Camera is now configured.  


Note: It is recommended to leave default settings for Data Bit, Stop Bit, Parity and Flow Ctrl options. 


Summary of Contents for ANNEXXUS Ax516

Page 1: ... 2014 i3 International Inc The contents of this user manual are protected under copyright and computer program laws ANNEXXUS Ax516 USER GUIDE Rev 1 1 ...

Page 2: ......

Page 3: ... 10 Connecting Encoder to the SRX Pro Server 11 Encoder Connection Options 11 Hardware Software Requirements 11 Assigning IP Address to your Annexxus Encoder 11 Accessing via Web Browser 13 Adding your IP Encoder to your SRX Pro Server 16 Accessing Encoder Settings 19 Configuring Video Settings 21 PTZ Control 23 Live View PTZ Control 24 PTZ Control via SRX Pro Server 25 Setting and Calling Presets...

Page 4: ......

Page 5: ...se Neither i3 International Inc nor its dealers or distributors shall be liable to any person or entity with respect to any liability loss or damage caused or alleged to have been caused directly or indirectly by this information Furthermore i3 International Inc reserves the right to revise this publication and to make changes to the content at any time without notice FCC This device complies with...

Page 6: ......

Page 7: ...an be avoided during network interruptions Additionally Ax516 encoder can be used as an IP Network video appliance for transmitting video over the LAN to i3 Digital Video Management Software DVMS software The Ax516 storage capabilities enable it to function as a conventional stand alone DVR as well as a high quality video streaming encoder Dual streaming provides two independent streams per video ...

Page 8: ......

Page 9: ...anical vibrations temperatures below 10 Celsius or 14 Fahrenheit and above 55 Celsius or 131 Fahrenheit environments with humidity levels in excess of 90 Power Supply Ensure the supplied voltage meets the power consumption requirements of this camera before powering the camera on Incorrect voltage may cause irreparable damage to the unit and will effectively void the device warranty Installation R...

Page 10: ...ch those listed on the order form and packing slip In addition to this manual the packing box includes 1 x Annexxus 516 encoder 1x Power cord 1x 12VDC power adapter 1x HDD Power Cable 1x HDD SATA Cable 2x Mounting Brackets 4x Mounting Screws 4x HDD Screws 1x CD Manual IP Finder ...

Page 11: ...tallation and removal of the hard disk must be performed by a qualified and experienced technicians to conform to all local codes and to maintain your warranty Before installing a hard disk drive HDD for Annexxus 516 ensure that the power is disconnected from the device Use only an i3 approved HDD Step 1 Ground yourself This will remove any static electrical charge your body might be carrying Step...

Page 12: ...power cable from the accessories box Plug one end of the cable into the power port on the HDD and the other end into the circuit board as shown in the image below Step 6 Remove the SATA cable from the accessories box Plug one end of the SATA cable into the SATA port on the HDD and the other end into the circuit board as shown in the image below ...

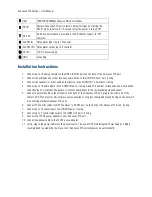
Page 13: ...een when the data is being transmitted received 3 LED blinks at higher frequency when the large amounts of data are being transmitted received Rear Panel Indicator Description 1 VIDEO IN BNC connectors for analog video inputs 1 16 2 LINE IN 3 5mm two way audio interface connect to active pick up microphone etc 3 AUDIO OUT 3 5mm audio output interface connect to audio output device such as a speake...

Page 14: ...s to the AUDIO IN ports if using Audio Port number corresponds and is hard linked with the Video Port number Make sure to connect audio inputs to the corresponding video channels 5 Connect a network cable to the LAN port on the back of the Annexxus 516 unit plug in the other end of the cable to SRX Pro Server for a direct cross over connection or plug into the Gigabit switch if using on the networ...

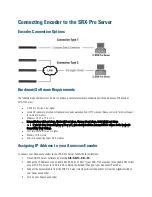
Page 15: ...lorer v 10 or v 11 you must first add the Annexxus 516 IP address to the browser s Compatibility View Settings CPU Intel Pentium Core 2 or higher Memory 1GB or more VGA card supporting Direct X 9 0 or above Assigning IP Address to your Annexxus Encoder To connect your Annexxus encoder to your SRX Pro Server follow these instructions 1 Close SRX Pro Server software by pressing Alt Shift Ctrl F4 2 C...

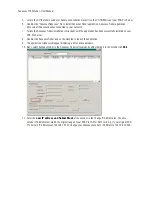
Page 16: ...y installed on your SRX Pro Server 8 Double click Annexxus Finder icon on the Desktop to launch the application 9 The application window will appear displaying a list of active encoders 10 Next select desired encoder in the Annexxus Finder software by double clicking it in the list and click Edit 11 Enter the new IP address and Subnet Mask of the encoder in the Change IP Address area The new encod...

Page 17: ...oder make sure you can connect to it through the web browser instructions below Accessing via Web Browser Annexxus 516 encoder can be accessed through Web Browser for live viewing or setup configuration The following web browser versions are supported Internet Explorer v6 0 and above Firefox v3 5 and above Chrome v8 and above Safari v5 0 2 and above Note If you are using Internet Explorer v 10 or ...

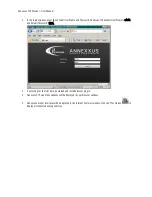
Page 18: ...ame is admin and default Password 1234 3 If accessing for the first time download and install browser plug in 4 Annexxus 516 Live View window will be displayed in your browser window 5 Annexxus encoder interface will be displayed in the Internet Explorer window Click the Play All icon to display all connected analog cameras ...

Page 19: ...Connecting Encoder to the SRX Pro Server 15 6 If you do not see the camera images on the screen call i3 International tech support for help ...

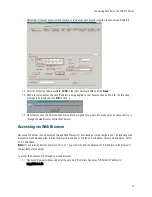
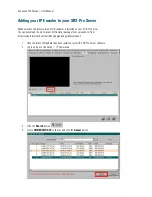
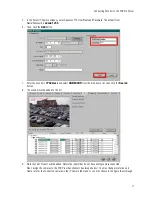
Page 20: ...erver You can download the most recent GiPi installer package from our website from http www i3international com index php en support downloads 2 1 Once the latest GiPi updater has been installed restart i3 SRX Pro Server software 2 Log In and go to the Setup IP Camera tab 3 Click the Search button 4 Locate ANNEXXUS 516 in the list and click the Select button ...

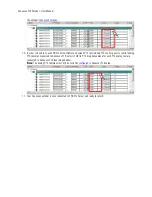
Page 21: ...ess and select ANNEXXUS from the drop down list then click the Search button 8 The encoder will be added to the list 9 Note that all 16 inputs will be added Delete the inputs that do not have analog camera connected Next assign the cameras to the SRX Pro video channels see image below You may change resolution and frame rate for the connected cameras in the IP Camera tab menu or you may choose to ...

Page 22: ... PTZ control panel to control analog PTZ cameras connected to Annexxus 516 select i3 GiPI in PTZ drop down menu for each PTZ analog camera connected to Annexxus 516 see image below Note The analog PTZ cameras must first be correctly configured in Annexxus 516 setup 11 Your Annexxus encoder is now connected to SRX Pro Server and ready to record ...

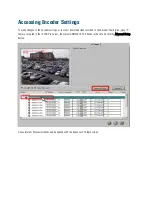
Page 23: ... to view download video recorded to the encoder s hard drive open IP Camera setup tab in the i3 SRX Pro Server then select ANNEXXUS 516 device in the list and click the Advanced Setup button A new Internet Browser window will be opened with the Annexxus 516 login screen ...

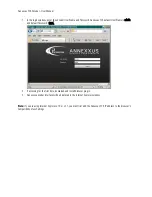
Page 24: ...is admin and default Password 1234 2 If accessing for the first time download and install browser plug in 3 Annexxus encoder interface will be displayed in the Internet Explorer window Note If you are using Internet Explorer v 10 or v 11 you must first add the Annexxus 516 IP address to the browser s Compatibility View Settings ...

Page 25: ...Pro Server To access Annexxus 516 Video Settings 1 Open the encoder s interface via the Web Browser 2 Go to Configuration Camera Settings Video Settings menu 3 Select the analog camera in the Channel No drop down menu 4 In the Video Settings setup configure the Main Stream settings a Select Main Stream under the Stream Type drop down menu b Set the Resolution Video Quality Frame Rate and Video Enc...

Page 26: ......

Page 27: ...annel No which matches the VIDEO IN BNC port in the back of Annexxus 516 unit where the PTZ camera is plugged into b Set the Camera Baud Rate port speed according to the PTZ camera specifications Note If using i3 s PTZ730 camera set the Baud Rate to 2400 c Set the camera s PTZ Protocol Note If using i3 s PTZ730 camera use Pelco D protocol d Set the PTZ Address which is Camera ID PTZ Camera ID is u...

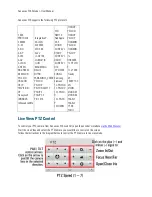
Page 28: ...edApple 4 SAE 5 SHINEI 6 SONY EVI D100 P 7 SONY EVI D30 31 8 SONY EVI D70 9 SPD 2200 10 SUNELL 11 Samsung 12 Siemens 13 TC PELCO D 14 TC PELCO P 15 TCL PELCO D 16 TCL PELCO P 17 TECHWIN 1 TIANDY PELCO D 2 TIANDY PELCO P 3 TIANMIN PELCO D 4 TIANMIN PELCO P 5 TL HHX2000 6 TL PELCO P 7 TL V1200 8 Tiandy 9 VC 2000PTC C 10 VCL 11 VICON 12 VIDO B 01 13 VIDO B 02 14 YAAN 1 15 YAAN 2 16 YF 06 17 YOULI Liv...

Page 29: ...ure to select i3 GiPI in PTZ drop down menu for each PTZ analog camera connected to Annexxus 516 see image below Setting and Calling Presets Annexxus 516 allows configuring up to 256 presets for each PTZ camera depending on the PTZ protocol used Note Presets configured through Annexxus 516 Web interface function independently from the presets configured inside SRX Pro Server software To set the pr...

Page 30: ...in response to a triggered alarm input Note When configured this feature will also affect the video feed recorded by SRX Pro Server To link the Alarm Input to the PTZ camera s preset 1 In Live View mode set the PTZ camera preset 2 Configure the selected Alarm Input in Configuration Alarm Settings Alarm Input setup 3 Go to Configuration Remote Configuration Alarm Settings Alarm Input Linkage Method...

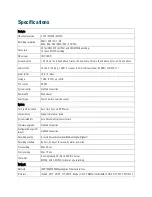
Page 31: ...tion Remote SW Web viewer Search type Search by time search by event System Time synchronization Auto Time Sync via NTP Server User authority Supports multi user levels System reliability Auto Recovery after power Failure Firmware upgrade Via Web Connection Configuration export import Via Web Connection Recording quality 6 Levels Lowest Lower Low Medium Higher Highest Recording schedule By hour by...

Page 32: ...configuration setup via network web connection Two Way audio Via Web Connection 1 ch 3 5mm interface 2 0 Vp p 1 kΩ Physical Environment and Qualifications Weight 4 Kg 8 81 lb Power 12V DC Operating temperature 10 C 55 C 14 F 131 F Operating humidity 10 90 Dimensions W D H 440 274 x 45 mm 17 3 x 10 8 x 1 8 Certifications FCC Warranty Standard warranty 3 year parts 1 year labor ...

Reviews: