QUICK START GUIDE
Page -3-
Ax48DC Covert IP Camera
Rev.
160826
1.
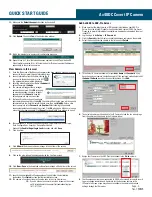
Make sure that the latest version of GiPi updater is installed on your SRX-Pro
Server. Once the latest GiPi updater has been installed, restart i3 SRX-Pro Server.
Please go to www.i3international.com/software-downloads to download the most
recent GiPi.
2.
Log In and go to the
Setup
->
IP Camera
tab.
3.
Click the
Search
button to display connected Annexxus cameras on the network.
4.
Select the desired detected camera in the list and click
Select
.
5.
In the
Select IP Camera window, enter your
User Name
and
Password
if you
have changed your camera’s default password. If the camera’s credentials are still
i3admin
/
i3admin
, leave User Account fields blank. Click
Add
.
6.
The selected camera will be added to the IP Camera list and the live video image
from the camera will be shown in the Preview window.
7.
Assign the IP camera to the SRX-Pro video channel in the
Ch. In.
column.
1.
Once the IP address of the Annexxus camera(s) has been changed, make sure you can
connect to the camera(s) through Internet Explorer:
2.
Launch Internet Explorer by double-clicking the IE
icon next to the desired camera in the ACT.
The password window will be displayed.
3.
Enter the default camera User Name:
i3admin
and
default Password:
i3admin
4.
The camera will suggest that a stronger
password be entered. Click
OK
in the pop-
up message window to enter a stronger
password or click
Cancel
to keep the
default password and see Live video.
5.
(Optional) If you have chosen to enhance
your camera’s password by clicking
OK
, the camera’s User setup page will be opened
automatically. In the User tab, select i3admin user, then click
Modify
. Enter a more
secure password in the
Password
and
Confirm
fields following the password
requirement guidelines shown on the screen. Click
OK
when done. Make sure to keep
a record of your new password. Click
Cancel
to close Modify User window to close it.
6.
(Recommended) i3 recommends disabling Illegal Login feature on the first login.
Go to Configuration > Security > Security Service tab.
Uncheck the
Enable Illegal Login Lock
checkbox and click
Save
.
7.
Click Live View.
8.
Click
Allow
in the browser add-on message at the bottom of the screen.
9.
Click on the plug-in download message inside the Live View screen .
10.
Click
Run
or
Save
in the download confirmation message at the bottom of the screen.
11.
Launch the downloaded WebComponents.exe file and follow the installation
instructions. Click
Finish
to close the final installation screen.
12.
The camera’s live video stream will now be seen in the Live View screen.
11.
Make sure the
Default Account
checkbox is checked off.
12.
Click
Update
. Then click
Yes
in the confirmation window.
13.
Wait a few moments for a successful confirmation message.
14.
Repeat Steps 9-13 for all detected Annexxus cameras in the ACT application OR
Select multiple cameras (Ctrl + left-click) and enter IP range to assign IP addresses
sequentially to the selected cameras.
View Camera in IE browser
13.
If you do not see the camera live video stream on the screen,
call i3 International tech support for troubleshooting tips:
1.877.877.7241
Add Ax48DC to SRX-Pro Server
8.
Your Annexxus camera is now connected to SRX-Pro Server and is ready to record.
You may change resolution and frame rate for the Annexxus camera in the
IP Camera tab menu or you may choose to configure the camera’s advanced
settings through the IE browser.


