10
Max 8 blocks can be set on the
screen. Move the cursor to the PRIVACY
ZONE set up item. Press ENTER to get
into the submenu. In the submenu, the
user can select ON or OFF of the privacy
zoneand set up to 8 blocks on any
position of the screen.
Select Blemish compensation, Chroma,
Camera Text. Move the cursor to the
OPTION set up item. Press the ENTER
button (Center) to view the OPTION
MENU.
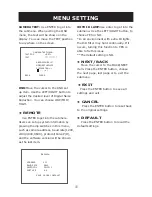
BLEMISH DET:
Make sure that the
lens is completely covered (by a lens
cap or a lens mount cap). Press the
ENTER button once (Center) on the OSD
control. “<SET>” will become blemish.
“WAITING”. After waiting is completed,
the white blemish will be removed.
CHROMA:
Use the LEFT/ RIGHT button
to choose from 1 to 9.
MENU SETTING
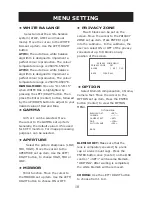
• PRIVACY ZONE
PRIVACY ZONE MENU
PRIVACY ZONE OFF
BLOCK 1 SET CLR
BACK CLEAR ALL
OPTION MENU
BLEMISH DET <SET>
CHROMA ----*----
CAMERA TEXT <SET>
DNR <LOW>
WITH IR LAMP <YES>
BACK
Select and set the white balance
system (ATW2, ATW1 and manual
mode). Move the cursor to the WHITE
BAL set up item. Use the LEFT/ RIGHT
button.
ATW1:
The auto trace white balance
algorithm is designed to implement a
perfect colour reproduction. The colour
temperature range is 2600°K-6500°K
ATW2:
The auto trace white balance
algorithm is designed to implement a
perfect colour reproduction. The colour
temperature range is 2500°K-9500°K.
MANUAL MODE:
Move to “R:15 B:15”
when WHITE BAL is highlighted by
pressing the LEFT/RIGHT button. Then
press the Enter (Center) button, followed
by the UP/DOWN button to adjust to your
desired value of Red and Blue.
0.45 or 1 can be selected. Move
the cursor to the GAMMA set up item.
Generally, the default value 0.45 is used
for CCTV monitors. For image processing
purpose 1 can be selected.
Select the picture sharpness. (LOW,
MID, HIGH). Move the cursor to the
APERTURE set up item. Use the LEFT/
RIGHT button, to choose HIGH, MID or
LOW.
Mirror function. Move the cursor to
the MIRROR set up item. Use the LEFT/
RIGHT button to choose ON or OFF.
• WHITE BALANCE
• GAMMA
• APERTURE
• MIRROR
• OPTION

