U1 Integrated DVMS
i3 INTERNATIONAL INC.
1.866.840.0004
www.i3international.com
U.S.A 4450 Witmer Industrial Estates Unit 4
Niagara Falls, NY 14305
Canada 780 Birchmount Road, Unit 16,
Scarborough, ON, M1K 5H4
i3-TRNG-DVR-
U1-QIG
.indd
QUICK START GUIDE
6. Once the software loads, the following message will be displayed on the
screen.
7. Click
OK
(Highly recommended) to format all storage drives and erase
video data recorded in a different time zone.
8. Click
OK
in the “All old data will be formatted” warning window.
9. Wait until the “Start allocating selected drive(s). It may take several minutes
to finish.” message changes to “Storage Drives have been allocated”.
10. Click
OK
in the Allocation window to close it. The Login window will open
on the screen. See Login Information below.
Main Screen Features
Once logged in you will see the SRX-Pro software main screen. Your connected
cameras will be visible in the Live View Display window. If the cameras are not
visible in the live view mode please contact Tech Support at: 1.877.877.7241 or
by email at: support@i3international.com.
LOGIN INFORMATION
3 users will have been created with different levels of access to the
machine.
Username/Password
Level of Access
user1 / manager
View/ Search/ Playback/ burn CD-DVD/
View setup tab
user2 / assistant
View/ Search/ Playback/ Burn CD-DVD
user3 / associate
View/ Search/ Playback
NOTE:
It is strongly recommended that after first logging into SRX-Pro as
user1/manager
the passwords for all three users should be changed.
Follow the instructions listed below.
1. Click the Setup button from
the icon menu in the upper left
corner of SRX-Pro.
2. Click the User Management Tab.
This will display a list of the users in the left hand panel.
3. Click the User Name on the left to highlight it and then click the Edit
button at the top of the window.
4. The User Information will be displayed in the Right hand pane. Enter a
new Password and confirm the new password. Click “Apply” button at
the bottom to save the changes.
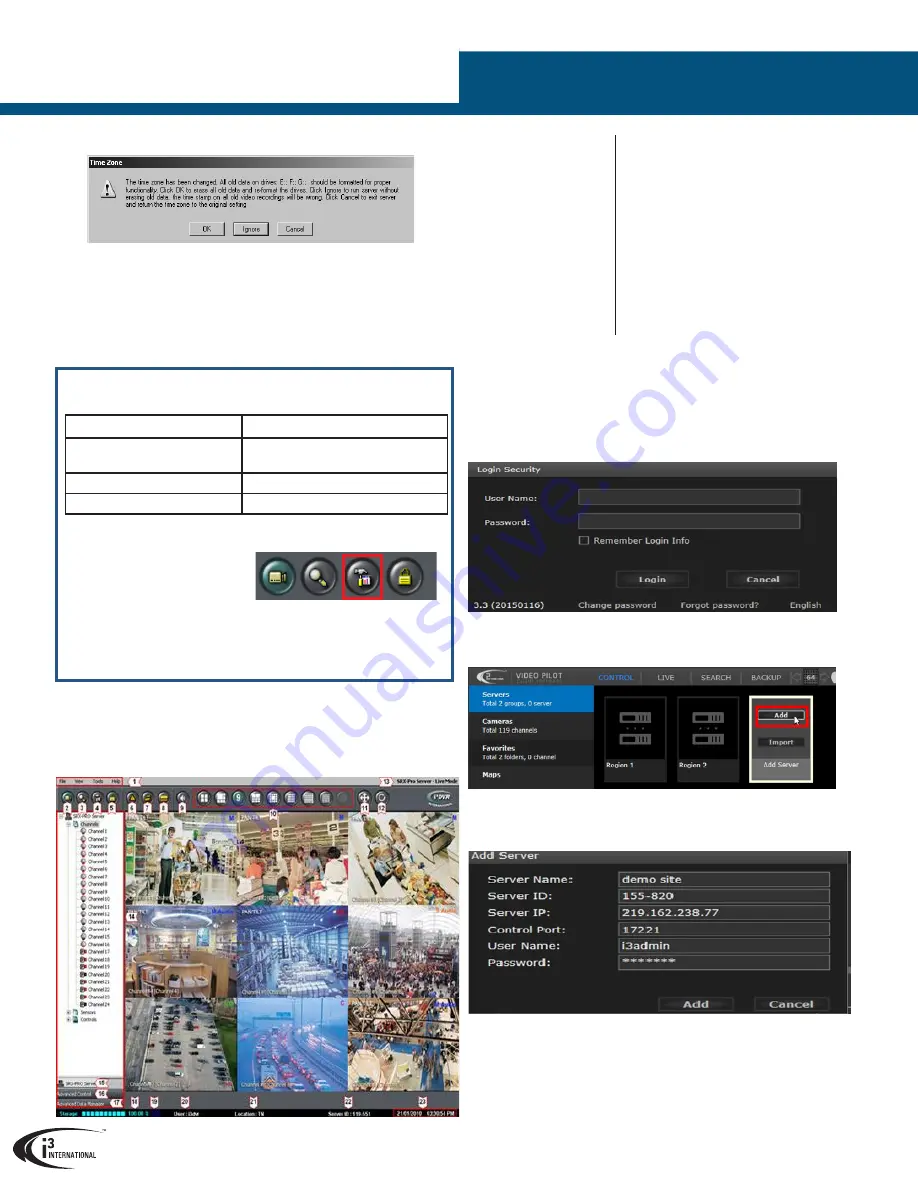
The Main Screen contains the following areas:
1. Menu Bar
2. Live Mode
3. Search Mode
4. Setup Mode
5. Login/Logout
6. Panic
7. PAC
8. Card Access (Portal)
9. 2-Way Audio
10. Screen Divisions
11. Full Screen
12. Rotate Channels
13. Current server Mode
14. SRX-Pro Control Center (tree View)
15. Channels/ Controls/Sensors Panel
16. Advanced Control Panel -PTZ
17. Advanced Data Manager Panel
18. Storage
19. Recording Indicator
20. Current User
21. Location
22. Server ID
23. Current Date/Time
Video Pilot Client (VPC Remote Connection)
Video Pilot Client (VPC) is i3 International’s remote software solution that allows
for simple and efficient video surveillance from a remote location by connect-
ing directly to your U1 DVMS.
Download VPC from our website (i3international.com/index.php/software-
downloads) and install it on your desktop. To launch VPC click the icon on the
Desk Top. You will be asked to enter a User name and Password.
Once you are logged into VPC it will be necessary to add a new server. Mouse
over “Add Server” and click “Add”.
The server information for your U1 will need to be entered. If you do not have
this information please contact Tech Support. For full operational instructions
Please see the full VPC documentation available from our web site.
Cloud Managed Service (CMS)
Cloud Managed Services or CMS is the engine for business insights. If CMS is
part of your U1 package please contact our CMS team
cmssupport@i3international.com
to complete the CMS set up.


