background image

UserManual

01

02

04

03

A

IMPORT ANT

: Inst all using a

fine-tipped

screwdriver

.

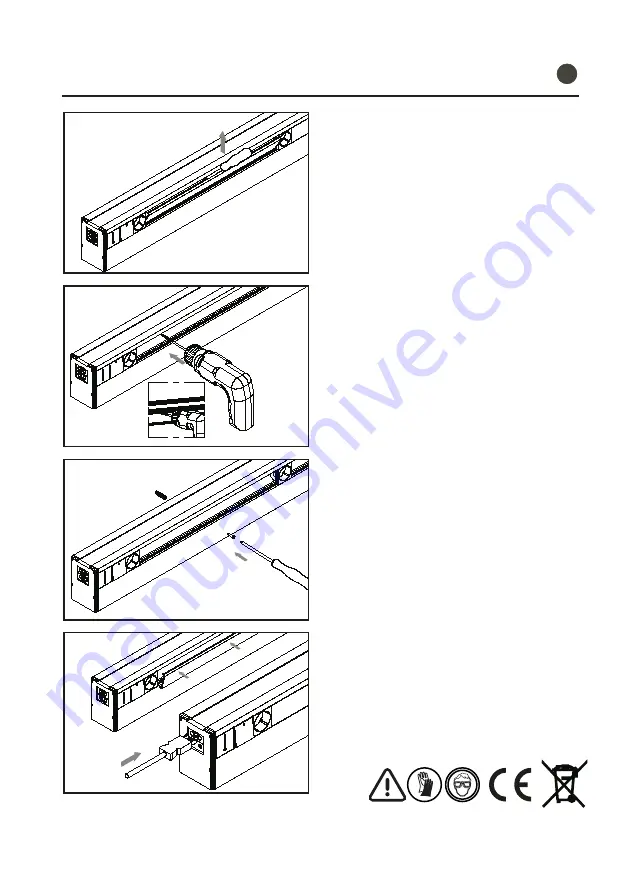
Remove

the

aluminum

front

covers

with

a

fine-

tipped

screwdriver,

pryingas

shown

in

the figure.

Press the front covers into place.
Connect the power cable to the GST

-18

connection.

The product is inst

alled

Depending on

the wall material, screw anchors

may need to be installed. In

the

case

of wood,

only wood screws will be required.

Use a

screwdriver

to secure

the light

assembly

to the wall as shown in the figure.

After the covers have been removed, drill two 

holes,

one at

each end,

as

shown

in

the figure.

Make the hole in the slot as shown in det

ail

(A)

.

Detail A

ESEN

Summary of Contents for Lumen

Page 1: ...LUMEN mas que iluminaci n more than lighting MANUALDEUSUARIO USERMANUAL MANUELD INSTALLATION BENUTZERHANDBUCH ES EN FR DE...

Page 2: ...nd Data RJ45 Multimedia connections Electricity Nominal voltage 230 V a c monophase Nominal current 16 amps Frequency 50 60 Hz ES EN FR DE Anschl sse Stromeingang GST18 Buchse Stromausgang Steckdose i...

Page 3: ...icinatecnica ib connect com For any query visit www ib connect com Installateur Ce produit doit tre install par un sp cialiste qualifi L installationdoit treprot g epar un disjoncteur magn tothermique...

Page 4: ...ectar el cable de alimentaci n a la entrada de conexi n GST 18 El producto esta instalado Dependiendodel materialde la paredse deber a colocar unos tacos Si el material es madera bastar a con unos tor...

Page 5: ...le de alimentaci n a la entrada de conexi n GST 18 El producto esta instalado Para extraerel fluorescente agarrarlode ambos extremos y hacelo girar hasta que las patillas de conexi n de los extremos q...

Page 6: ...er cable to the GST 18 connection The product is installed Depending on the wall material screw anchors may need to be installed In the case of wood only wood screws will be required Use a screwdriver...

Page 7: ...Connect the power cable to the GST 18 connection The product is installed To remove the fluorescent tube grasp at both ends and turn until the connection pins at the ends are aligned with the lamp soc...

Page 8: ...nt dessus Connectez le c ble d alimentation l entr e GST 18 Le produit est install En fonction du mat riau de la paroi utilisez ventuellement des chevilles Si la paroi est en bois des vis bois suffise...

Page 9: ...il s encliquesur toute la longueur Connectez le c ble d alimentation l entr e GST 18 Le produit est install Pour enlever le tube fluorescent saisissez le des deux c t s et tournez le jusqu ce que les...

Page 10: ...eckung entfernt ist bohren Sie links und rechts zwei L cher durch die R ckseite des Profils siehe die Detailabbildung A Detalle A Abh ngig vom Material an dem das Produkt befestigt werden soll verwend...

Page 11: ...halten Sie dieses an beiden Enden und drehen es bis die Kontaktstifte zur Anschluss ffnung ausgerichtet sind A Sie k nnen das Leuchtmittel dann aus dem Anschluss entfernen B Setzen Sie das neue Leuch...

Page 12: ......

Reviews: