background image


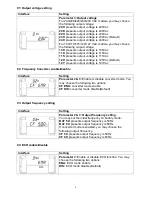
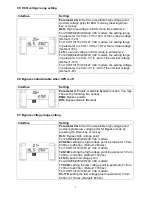
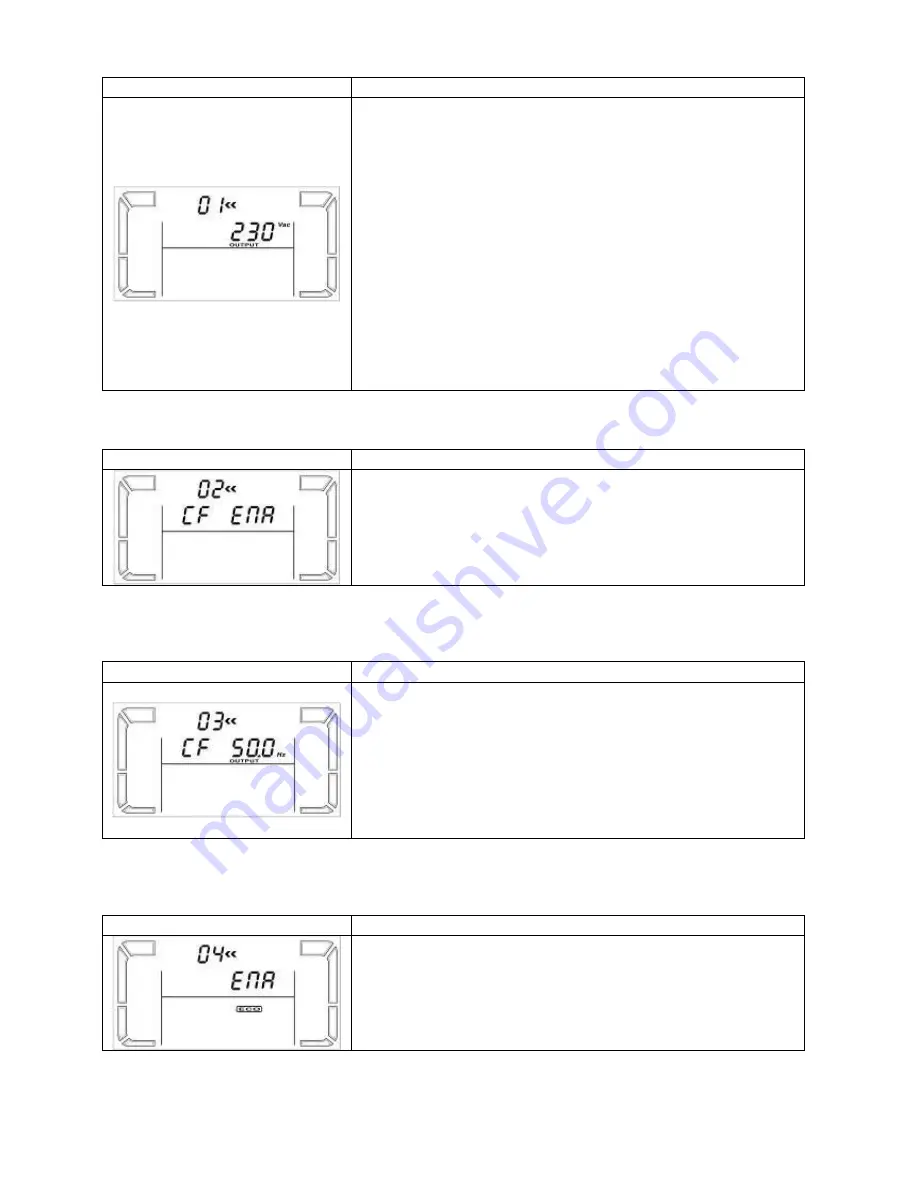
01: Output voltage setting 


Interface 

Setting 


Parameter 3: Output voltage 

For 200/208/220/230/240 VAC models, you may choose 
the following output voltage: 

200:

 presents output voltage is 200Vac 

208:

 presents output voltage is 208Vac 

220:

 presents output voltage is 220Vac 

230:

 presents output voltage is 230Vac (Default) 

240:

 presents output voltage is 240Vac 

For 100/110/115/120/127 VAC models, you may choose 
the following output voltage: 

100:

 presents output voltage is 100Vac 

110:

 presents output voltage is 110Vac 

115: 

presents output voltage is 115Vac 

120: 

presents output voltage is 120Vac (Default) 

127: 

presents output voltage is 127Vac 


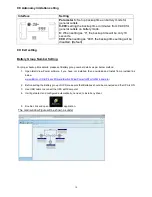
02: Frequency Converter enable/disable 


Interface 

Setting 


Parameter 2 & 3: 

Enable or disable converter mode. You 

may choose the following two options:


CF ENA: 

converter mode enable 

CF DIS: 

converter mode disable(Default) 


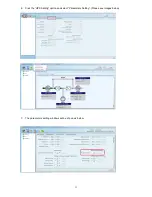
03: Output frequency setting 


Interface 

Setting 


Parameter 2 & 3: Output frequency setting.   

You may set the initial frequency on battery mode: 

BAT 50:

 presents output frequency is 50Hz 

BAT 60:

 presents output frequency is 60Hz 

If converter mode is enabled, you may choose the 
following output frequency: 

CF 50: 

presents output frequency is 50Hz 

CF 60: 

presents output frequency is 60Hz 


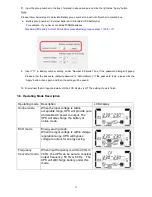
04: ECO enable/disable 


Interface 

Setting 


Parameter 3: 

Enable or disable ECO function. You may 

choose the following two options:   

ENA:

 ECO mode enable 

DIS: 

ECO mode disable (Default) 


Summary of Contents for NIRANTAR 1006B

Page 1: ...1KVA 3KVA Online UPS User Manual...

Page 2: ...2 2 Installation and Setup 3 2 1 Rear panel view 3 2 2 Setup the UPS 3 3 Operations 5 3 1 Button operation 5 3 2 LCD Panel 5 3 3 Audible Alarm 7 3 4 LCD display wordings index 7 3 5 UPS Setting 7 3 6...

Page 3: ...er them Do not connect domestic appliances such as hair dryers to UPS output sockets The UPS can be operated by any individuals with no previous experience Connect the UPS system only to an earthed sh...

Page 4: ...must be kept well away from the batteries Caution risk of electric shock The battery circuit is not isolated from the input voltage Hazardous voltages may occur between the battery terminals and the...

Page 5: ...unication Port 4 RS 232 Communication Port 5 SNMP Intelligent Slot 6 External Battery Connection only available for E model 7 Output Receptacles 2 2 Setup the UPS Step 1 UPS input connection Plug the...

Page 6: ...ttery charges fully during the first five hours of normal operation Do not expect full battery run capability during this initial charge period Step 5 Install software For optimal computer system prot...

Page 7: ...in standby mode under power normal or transfer to Bypass mode if the Bypass enable setting by pressing this button Confirm selection key Press this button to confirm selection in UPS setting mode Sele...

Page 8: ...frequency Load information Indicates the load level by 0 25 26 50 51 75 and 76 100 Indicates overload Indicates the load or the UPS output is short circuit Mode operation information Indicates the UPS...

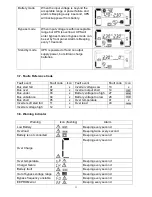
Page 9: ...iation Display content Meaning ENA Enable DIS Disable ESC Escape HLS High loss LLS Low loss BAT Battery CF Converter TP Temperature CH Charger FU Bypass frequency unstable EE EEPROM error 3 5 UPS Sett...

Page 10: ...7 presents output voltage is 127Vac 02 Frequency Converter enable disable Interface Setting Parameter 2 3 Enable or disable converter mode You may choose the following two options CF ENA converter mod...

Page 11: ...ult 6V 06 Bypass enable disable when UPS is off Interface Setting Parameter 3 Enable or disable Bypass function You may choose the following two options ENA Bypass enable DIS Bypass disable Default 07...

Page 12: ...proper backup time details please set Battery group number details as per below method 1 Open iBall View Power software if you have not installed then download and Install from provided link below ww...

Page 13: ...11 6 Click the UPS Setting option and select Parameters Setting Please see images below 7 The parameters setting windows will be shown as below...

Page 14: ...or If the password is ok please click the Apply button once again and then the setting will be saved 10 Disconnect the AC input and wait until the LCD display is off The setting of ups is finish 3 6 O...

Page 15: ...tart fail 01 x Inverter voltage Low 13 x Bus over 02 x Inverter output short 14 Bus under 03 x Battery voltage too high 27 Bus unbalance 04 x Battery voltage too low 28 Bus short 05 x Over temperature...

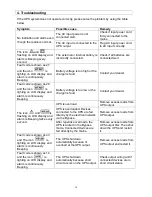
Page 16: ...sly Beeping Battery voltage is too low or the charger is fault Contact your dealer The icon and is flashing on LCD display and alarm is Beeping twice every second UPS is overload Remove excess loads f...

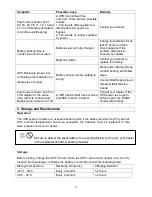
Page 17: ...port team Nearest iBall Service Centre Fault code is shown as 05 on LCD display At the same time alarm is continuously Beeping and output is cut off A UPS internal fault has occurred and BUS is short...

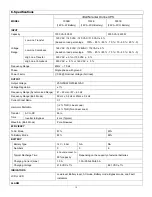
Page 18: ...ll load OUTPUT Output Voltage 200 208 220 230 240VAC Voltage Regulation 1 Frequency Range Synchronized Range 47 53 Hz or 57 63 Hz Frequency Range Batt Mode 50 Hz 0 2 Hz or 60Hz 0 2 Hz Current Crest Ra...

Page 19: ...MENT Humidity 20 90 RH 0 40 C non condensing Noise Level Less than 45dBA 1 Meter MANAGEMENT Smart RS 232 Supports Windows 2000 2003 XP Vista 2008 7 Linux Unix and MAC Optional USB Optional SNMP Power...

Page 20: ...s Refer www iBall co in for details Product specifications are subject to change without notice all trademarks logos brands product names are properties of their respective owners For any technical he...

Reviews: