6
To have additional storage for your images, videos, music, and files, you can purchase a memory card and install it into your
device.
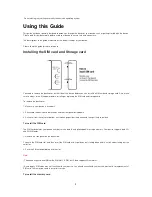
1. Make sure that your device is turned off, and then remove the back cover.
2. Locate the memory card slot on the upper part of the exposed right panel.
3. Insert the memory card into the slot with its gold contacts facing down until it clicks into place.
Note:
To remove the memory card, pull it to eject it from the slot.
Which class of SD card is supported on my device?
The word class is another term for speed. Different type of flash memory is used for different SD cards. This suggests that the
read/write speed of the SD card differs in different classes.
Class 2 SD card
2 MB/s
SD card recording
Class 4 SD card
4 MB/s
HD recording including full HD (from 720p to 1080p/1080i)
Class 6 SD card
6 MB/s
HD recording including full HD (from 720p to 1080p/1080i)
Class 10 SD card
10 MB/s
Full HD (1080p) video recording and consecutive recording of HD stills
For HD video recording a SD card of class 6 or higher is suggested because of the constant stream of data that needs to be
written. If you will use a class 2 SD card for HD video recording, the video will sufferer dropouts and you will get a corrupted
video.
Charging the Battery
New batteries are shipped partially charged. Before you start using your device, it is recommended that you charge the battery.
Some batteries perform best after several full charge/discharge cycles.
The battery can be charged and discharged many times, but it will eventually wear out. When the talk and standby times are
noticeably shorter than normal, get the battery replaced. Use only iBall approved batteries, and recharge your battery only with
iBall approved chargers designated for this device. If a battery is being used for the first time or if the battery has not been used
for a prolonged period, it may be necessary to connect the charger, then disconnect and reconnect it to begin charging the
battery. If the battery is completely discharged, it may take several minutes before the charging indicator appears on the display
or before any calls can be made.
Note:
Only the AC adapter provided with your device must be used to charge the device.
Connect the USB connector of the AC adapter to the sync connector on your device, and then plug in the AC adapter to an
electrical outlet to start charging the battery.
As the battery is being charged while the device is on, a charging icon appears in the title bar of the Home screen. After the
battery has been fully charged, a full battery icon appears on the title bar of the Home screen.
Warning!
• As a safety precaution, the battery stops charging before it overheats.
Protect environment save energy
You do not need to charge your Slide battery so often if you do the following:
Close applications and data connections, for example, your Bluetooth connection, when not in use.

