background image


62 

AMS210 

User Manual


A.  I/O Port Address Map 

Each peripheral device in the system is assigned a set of I/O port addresses 
which also becomes the identity of the device. The following table lists the I/O 
port addresses used. 

Address 

Device Description 

0x00000000-0x00000CF7 

PCI Express Root Complex 

0x00000020-0x00000021 

Programmable interrupt controller 

0x00000024-0x00000025 

Programmable interrupt controller 

0x00000028-0x00000029 

Programmable interrupt controller 

0x0000002C-0x0000002D 

Programmable interrupt controller 

0x0000002E-0x0000002F 

Motherboard resources 

0x00000030-0x00000031 

Programmable interrupt controller 

0x00000034-0x00000035 

Programmable interrupt controller 

0x00000038-0x00000039 

Programmable interrupt controller 

0x0000003C-0x0000003D 

Programmable interrupt controller 

0x00000040-0x00000043 

System timer 

0x0000004E-0x0000004F 

Motherboard resources 

0x00000050-0x00000053 

System timer 

0x00000060-0x00000060 

Standard PS/2 Keyboard 

0x00000061-0x00000061 

Motherboard resources 

0x00000063-0x00000063 

Motherboard resources 

0x00000064-0x00000064 

Standard PS/2 Keyboard 

0x00000065-0x00000065 

Motherboard resources 

0x00000067-0x00000067 

Motherboard resources 

0x00000070-0x00000070 

Motherboard resources 

0x00000080-0x00000080 

Motherboard resources 

0x00000092-0x00000092 

Motherboard resources 

0x000000A0-0x000000A1 

Programmable interrupt controller 

0x000000A4-0x000000A5 

Programmable interrupt controller 

0x000000A8-0x000000A9 

Programmable interrupt controller 

0x000000AC-0x000000AD 

Programmable interrupt controller 

0x000000B0-0x000000B1 

Programmable interrupt controller 

0x000000B2-0x000000B3 

Motherboard resources 

0x000000B4-0x000000B5 

Programmable interrupt controller 

0x000000B8-0x000000B9 

Programmable interrupt controller 

0x000000BC-0x000000BD 

Programmable interrupt controller 

Summary of Contents for AMS210

Page 1: ...AMS210 Embedded System with MB211 User s Manual Version 1 0 March 2020...

Page 2: ...o the products described in this document without prior notice Every effort has been made to ensure the information in the document is correct however IBASE does not guarantee this document is error f...

Page 3: ...energy and if not installed and used in accordance with manufacturer s instructions may cause harmful interference to radio communications WEEE This product must not be disposed of as normal househol...

Page 4: ...he device chassis with a cloth Then wipe the chassis with a dry cloth Vacuum the dust with a computer vacuum cleaner to prevent the air vent or slots from being clogged WARNING Attention during use Do...

Page 5: ...UNAUTHORIZED REPAIR SHALL BE TREATED AS OUT OF WARRANTY AND CUSTOMERS SHALL BE BILLED FOR REPAIR AND SHIPPING CHARGES Technical Support Services 1 Visit the IBASE website at www ibase com tw to find...

Page 6: ...mpers Quick Reference 17 2 5 Connectors Quick Reference 21 Chapter 3 Driver Installation 36 3 1 Introduction 37 3 2 HD Graphics Driver Installation 38 3 3 HD Audio Driver Installation 40 3 4 LAN Drive...

Page 7: ...1 Chapter 1 General Information The information provided in this chapter includes Features Packing List Optional Accessories Specifications Overview Dimensions...

Page 8: ...uring 265mm x 247mm the system has four Gigabit Ethernet connectors four serial ports USB 3 1 and USB 2 0 connectors two DP display ports and 24V DC power input Pictures of AMS210 1 2 Features With IB...

Page 9: ...ibutor or the dealer from whom you have purchased the product AMS210 AMS210 x 1 Bracket x 2 Terminal block x 1 Round Head Screw for Bracket x 6 PCI Power Cable x1 1 4 Optional Accessories IBASE provid...

Page 10: ...s for 2 5 SATA HDD or SSD Expansion Slot The riser cards ABP IP701 ABP IP702 and ABP IP703 come with two golden fingers to support 2 slots 1xPCI e x16 slot 1 xPCIe x4 slot ABP IP701 1xPCI e x16 slot 1...

Page 11: ...lor Silver Mounting type Desktop Wall mount Operating Temperature 20 C to 55 C Storage Temperature 20 C 80 C Humidity 5 90 45 C non condensing Vibration Operating 0 25Grms 5 500Hz Non operating 1Grms...

Page 12: ...MS210 User Manual 1 6 System View AMS210 Front View No Name No Name 1 24V Power Input 6 USB 3 0 Ports 2 Power Switch 7 USB 2 0 Ports 3 Expansion Slots 8 DP Ports 4 COM1 Serial Port 9 Line Out 5 GbE Po...

Page 13: ...Hardware Configuration AMS210 User Manual 7 2 Rear View No Name No Name 1 Optional COM Ports 4 BIOS POST Code 2 DC Fan for PSU 5 Power and HDD LEDs 3 NVRAM Battery Compartment...

Page 14: ...8 AMS210 User Manual 1 7 Dimensions AMS210 Unit mm...

Page 15: ...Hardware Configuration AMS210 User Manual 9 2 This page is intentionally left blank...

Page 16: ...10 Chapter 2 Hardware Configuration The information provided in this chapter includes Essential installations before you begin Information and locations of connectors...

Page 17: ...o the installation the PCI E expansion card The left side cover uses six screws M3x6 To remove or install the HDD there is no need to remove any of the above mentioned screws just the two screws of th...

Page 18: ...n card in the upper empty expansion slot as shown in the pictures below After installing the card into place secure the expansion card slot cover by using one M3 4 screw The riser card bracket as enci...

Page 19: ...upplied screws M3 6 to install the mounting brackets 2 1 4 Hard Disk Drive Installation Remove the M3 6 screws of the HDD tray cover and pull the tray out There are four screws securing the hard disk...

Page 20: ...remove the following left chassis cover by loosening the six screws that are securing the cover 2 Locate the Mini PCIe slot inside the system 3 Align the key of the mini PCIe card to the mini PCIe int...

Page 21: ...odules 1 Remove the left chassis cover by loosening the six screws that are securing the cover 2 Locate the memory slots inside the system 3 Align the key of your memory module with that on the memory...

Page 22: ...with a non conductive base mounted on the circuit board Jumper caps are used to have the functions and features enabled or disabled If a jumper has 3 pins you can connect either PIN1 to PIN2 or PIN2...

Page 23: ...or Locations on Motherboard MB211 Motherboard 2 4 Jumpers Quick Reference Function Jumper Name Page Clearing CMOS Data JP6 18 Clearing ME Register JP7 18 ATX AT Select JP4 19 PCIe x16 Bifurcation Sele...

Page 24: ...ser Manual 2 4 1 Clearing CMOS Data JP6 Function Pin closed Illustration Normal default 1 2 Clear CMOS 2 3 2 4 2 JP7 Clearing ME Register Function Pin closed Illustration Normal default 1 2 Clear ME 2...

Page 25: ...Function Pin closed Illustration ATX default 1 2 AT Mode 2 3 2 4 4 JP1 JP2 PCIe x16 Bifurcation Selection Function Pin closed Illustration 1 x PCIe x16 JP1 Open JP2 Open 2 x PCIe x8 JP1 Open JP2 Clos...

Page 26: ...JP3 PCIe_X16 Reverse Function Pin closed Illustration Normal Open Reverse default Closed 2 4 6 JP8 Flash Descriptor Security Override Factory use only Function Pin closed Illustration Disabled Default...

Page 27: ...rt CN9 31 DisplayPort CN10 CN13 CN14 31 Audio L OUT Connector CN12 32 DC_IN Power 2X2 Connector J1 Battery 1 2AA Connector J2 SATA Power Connector J4 J7 COM2 COM3 COM4 RS 232 Ports J10 J8 J6 MINI_PCIE...

Page 28: ...6 DSR Data set ready 2 RXD Receive data 7 RTS Request to send 3 TXD Transmit data 8 CTS Clear to send 4 DTR Data terminal ready 9 RI Ring indicator 5 Ground Pin Signal Name RS 232 RS 422 RS 485 1 DCD...

Page 29: ...1 DCD Data carrier detect 2 RXD Receive data 3 TXD Transmit data 4 DTR Data terminal ready 5 Ground 6 DSR Data set ready 7 RTS Request to send 8 CTS Clear to send 9 RI Ring indicator 10 Key 2 5 3 J12...

Page 30: ...24 AMS210 User Manual 2 5 4 CPU_FAN1 CPU Fan Power Connector Pin Signal Name Pin Signal Name 1 Ground 3 Rotation detection 2 12V 4 Control 2 5 5 SYS_FAN1 2 System Fan Power Connector...

Page 31: ...Hardware Configuration AMS210 User Manual 25 2 2 5 6 PCIE1 PCIEx16 Slot Including PCI E x16 signal 2 5 7 PCIE2 PCIEx16 Slot Including PCI E x4 PCI signals...

Page 32: ...26 AMS210 User Manual 2 5 8 J16 DDR SO DIMM Channel A 2 5 9 J15 DDR SO DIMM Channel B...

Page 33: ...Hardware Configuration AMS210 User Manual 27 2 2 5 10 J1 DC in Connector Pin Signal Name Pin Signal Name 1 Power Ground 3 24V 2 Power Ground 4 24V 2 5 11 J17 SPI Flash Connector Factory use only 2mm...

Page 34: ...Factory use only 2mm Pin Signal Name Pin Signal Name 1 LPC_AD0 2 Reset 3 LPC_AD1 4 LPC_FRAME 5 LPC_AD2 6 3 3V 7 LPC_AD3 8 Ground 9 CLK_33MHz 10 Protect Pin 2 5 13 J4 J7 SATA Power Connector Pin Signa...

Page 35: ...ware Configuration AMS210 User Manual 29 2 2 5 14 J11 J14 PCI Power Connector Pin Signal Name Pin Signal Name 1 5V 3 Ground 2 Ground 4 12V 2 5 15 J2 Battery 1 2AA Connector Pin Signal Name 1 BAT 2 Gro...

Page 36: ...30 AMS210 User Manual 2 5 16 CN1 Interface to ABP ID45 2 5 17 CN5 RJ45 I219LM USB3 1 Gen1 Connector 2 5 18 CN6 RJ45 I210IT USB3 1 Gen1 Connector...

Page 37: ...Hardware Configuration AMS210 User Manual 31 2 2 5 19 CN9 Dual RJ45 I210IT Connector 2 5 20 CN10 CN13 CN14 DP Connector...

Page 38: ...l 2 5 21 Audio Connector J20 Pin Assignment Pin Assignment 1 Lineout_L 2 Lineout_R 3 JD_FRONT 4 Ground 5 LINEIN_L 6 Linein_R 7 JD_LINEIN 8 Ground 9 MIC_L 10 MIC R 11 JD_MIC1 12 Ground 2 5 22 Audio Lin...

Page 39: ...Hardware Configuration AMS210 User Manual 33 2 2 5 23 USB 2 0 Connector CN7 CN8 2 5 24 USB 2 0 DF11 Pin Header J18 Pin Assignment Pin Assignment 2 Ground 1 Vcc 4 D 3 D 6 D 5 D 8 Vcc 7 Ground...

Page 40: ...ower 2X2 Connector J14 24 DC_IN Connector DINKLE J15 24 ISMART Debug Connector factory use J1 24 SPI Flash Connector factory use J2 24 LPC Debug Connector factory use J12 25 SATA Power Connector J8 J9...

Page 41: ...Hardware Configuration AMS210 User Manual 35 2 This page is intentionally left blank...

Page 42: ...lation The information provided in this chapter includes Intel Chipset Software Installation Utility Graphics Driver Installation HD Audio Driver Installation LAN Driver Installation Intel Management...

Page 43: ...soft Windows 10 64 bit RS3 RS4 RS5 and Server 2016 RS1 only 3 1 Intel Chipset Software Installation Utility 1 Insert the disk enclosed in the package with the board Click Intel on the left pane and th...

Page 44: ...38 AMS210 User Manual 3 2 HD Graphics Driver Installation 1 Click Intel R Coffeelake Chipset Drivers on the right pane 2 Click Intel R HD Graphics Driver...

Page 45: ...ome screen appears click Next to continue 4 Accept the license agreement and click Next 5 On the Readme File Information screen click Next until the installation starts 6 When the driver is completely...

Page 46: ...ake Chipset Drivers on the right pane 2 Click Realtek High Definition Audio Driver 3 On the Welcome screen of the InstallShield Wizard click Next 4 Click Next until the installation starts 5 When the...

Page 47: ...Driver Installation AMS210 User Manual 41 3 3 4 LAN Driver Installation 1 Click Intel R Coffeelake Chipset Drivers on the right pane 2 Click Intel R PRO LAN Network Drivers...

Page 48: ...e agreement and click Next 5 On the Setup Options screen click the checkbox to select the desired driver s for installation Then click Next to continue 6 The wizard is ready for installation Click Ins...

Page 49: ...Driver Installation AMS210 User Manual 43 3 3 5 Intel Management Engine Drivers Installation 1 Click Intel R Coffeelake Chipset Drivers on the right pane 2 Click Intel R ME 12 x Drivers...

Page 50: ...er Manual 3 When the Welcome screen appears click Next 4 Accept the license agreement choose a destination folder and click Next until the installation starts 5 Restart the computer when installation...

Page 51: ...apter describes the different settings available in the AMI BIOS that comes with the board The topics covered in this chapter are as follows Main Settings Advanced Settings Chipset Settings Security S...

Page 52: ...es thus preventing you from invoking the Setup You can also press F7 to call the pop up Boot menu immediately If you still need to enter Setup restart the system by pressing the Reset button or simult...

Page 53: ...n Settings BIOS Setting Description System Language Choose the system default language System Date Sets the date Use the Tab key to switch between the data elements System Time Set the time Use the Ta...

Page 54: ...ualization Technology When enabled a VMM can utilize the additional hardware capabilities provided by Vanderpool Technology Active Processor Cores Number of cores to enable in each processor package A...

Page 55: ...S210 User Manual 49 4 4 4 2 Power Performance BIOS Setting Description CPU Power Management Control CPU Power Management Control Options 4 4 3 PCH FN Configuration Configure Management Engine Technolo...

Page 56: ...Enables Disables the system ability to hibernate OS S4 Sleep State This option may not be effective with some operating systems ACPI Sleep State Selects the highest ACPI sleep state for the system wil...

Page 57: ...er Manual 51 4 4 4 5 F81966 Super IO Configuration BIOS Setting Description Serial Port Configuration Sets parameters of Serial Ports Enables Disables the serial port and select an optimal setting for...

Page 58: ...d 50 C 60 C 70 C 80 C 90 C System Fan Smart Fan Control Enables Disables the system smart fan feature Options Disabled 50 C 60 C 70 C 80 C 90 C Temperatures Voltages These fields are the parameters of...

Page 59: ...USB Mass Storage Driver Support Enables Disables the support for USB mass storage driver USB Transfer time out The time out value for control bulk and Interrupt transfers Options 1 sec 5 sec 10 sec 2...

Page 60: ...S210 User Manual 4 4 8 CSM Configuration BIOS Setting Description CSM Support Enables Disables CSM support Network Controls the execution of UEFI and Legacy Network OpROM Options Do not launch UEFI Le...

Page 61: ...BIOS Setup AMS210 User Manual 55 4 4 5 Chipset Settings BIOS Setting Description System Agent SA Configuration System Agent SA parameters PCH IO Configuration PCH parameters...

Page 62: ...d be primary display or selects SG for switchable Gfx Select PCIE Card Select the card used on the platform Auto Skip GPIO based Power Enable to dGPU Elk Creek 4 DGPU Power Enable ActiveLow PEG Eval D...

Page 63: ...anual 57 4 4 5 2 PCH IO Configuration BIOS Setting Description SATA and RST Configuration Configures SATA devices PCH LAN Controller Enables Disables onboard NIC Wake on LAN Enables Disables integrate...

Page 64: ...tor password for the setup utility User Password Sets a user password HDD Security Configuration HDD Security Configuration for selected drive Secure Boot Secure Boot feature is Active if Secure Boot...

Page 65: ...0xFFFF means indefinite waiting Bootup NumLock State Selects the keyboard NumLock state Quiet Boot Enables Disables Quiet Boot option Boot mode select Selects a Boot mode Legacy UEFI Fixed Boot Order...

Page 66: ...er saving the changes Discard Changes and Reset Resets system setup without saving any changes Save Changes Saves changes done so far to any of the setup options Discard Changes Discards changes done...

Page 67: ...ppendix This section provides the mapping addresses of peripheral devices and the sample code of watchdog timer configuration I O Port Address Map Interrupt Request Lines IRQ Watchdog Timer Configurat...

Page 68: ...40 0x00000043 System timer 0x0000004E 0x0000004F Motherboard resources 0x00000050 0x00000053 System timer 0x00000060 0x00000060 Standard PS 2 Keyboard 0x00000061 0x00000061 Motherboard resources 0x000...

Page 69: ...0001800 0x000018FE Motherboard resources 0x00001854 0x00001857 Motherboard resources 0x00002000 0x000020FE Motherboard resources 0x00003000 0x00003FFF Intel R PCI Express Root Port 12 A333 0x00004000...

Page 70: ...Q 12 Microsoft PS 2 Mouse IRQ 13 Numeric data processor IRQ 14 Intel R Serial IO GPIO Host Controller INT3450 IRQ 16 High Definition Audio Controller IRQ 19 Intel R Active Management Technology SOL CO...

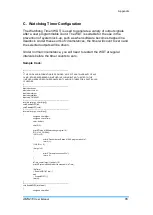
Page 71: ...ITHOUT WARRANTY OF ANY KIND EITHER EXPRESSED OR IMPLIED INCLUDING BUT NOT LIMITED TO THE IMPLIED WARRANTIES OF MERCHANTABILITY AND OR FITNESS FOR A PARTICULAR PURPOSE include dos h include conio h inc...

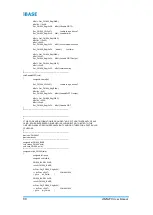
Page 72: ...Get_F81966_Reg 0xFA bBuf 0x01 Set_F81966_Reg 0xFA bBuf disable WDTO output bBuf Get_F81966_Reg 0xF5 bBuf 0x20 bBuf 0x40 Set_F81966_Reg 0xF5 bBuf disable WDT THIS CODE AND INFORMATION IS PROVIDED AS IS...

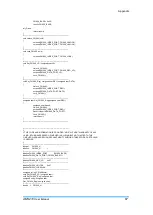
Page 73: ...unsigned char Get_F81966_Reg unsigned char REG unsigned char Result Unlock_F81966 outportb F81966_INDEX_PORT REG Result inportb F81966_DATA_PORT Lock_F81966 return Result THIS CODE AND INFORMATION IS...

Reviews: