background image

6

Tips for burn-in

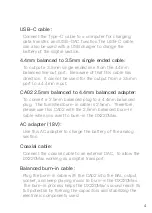
The use of the burn-in cable is very straightforward. The 
burn-in cable is used to form the capacitors and to condition 
the rest of the circuitry.  The method for burn-in is to use 
normal resolution music, as higher resolution causes more 
heat due to the higher demand on the system. Also, use a 
normal listening volume, as the higher volume will have a 
higher power consumption therefore more heat will be 
generated.  While burning in the Max, both the balanced and 

the single ended components are being affected and burned 

in. 

The burn-in time can be from 100 to 200 hours and the 

burn-in doesn't have to be continual.  You can power off the 
player and continue the burn-in process after a few days.  It 

is also not mandatory to use the burn-in cable, we supply it 
as a convenience for when you are not listening to the Max 
and you would like to get your dap conditioned as soon as 
possible. You can also just listen to the player and enjoy the 
music as your player goes through this process while playing 

through IEMs or headphones.  

Summary of Contents for OX220 MAX

Page 1: ...iBasso Audio USER GUIDE...

Page 2: ...18 30 iBasso Mango Music Player Application 31 63 18 20 Charge 16 17 Application APP Installation App to Uninstall USB Connections 21 23 Power O Reboot System Switching 30 Playback Screen home screen...

Page 3: ...2 Package Components DX220MAX player 4 4mm balanced to 3 5mm single ended cable CA02 2 5mm balanced to 4 4mm balanced adapter Coaxial cable Balanced burn in cable Leather case...

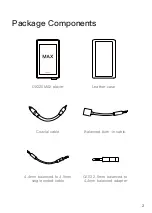
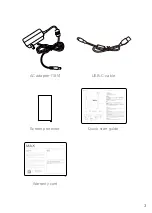
Page 4: ...3 USB C cable Screen protector Quick start guide Warranty card AC adapter 18V...

Page 5: ...input Connect the Type C cable to a computer for charging data transfer and USB DAC function The USB C cable can also be used with a USB charger to charge the battery of the digital section To conver...

Page 6: ...scratches Screen protector Use the screen protector to protect the DX220Max s screen from scratches Warranty card The warranty will be requested at the time of warranty repair Please retain the warran...

Page 7: ...e generated While burning in the Max both the balanced and the single ended components are being a ected and burned in The burn in time can be from 100 to 200 hours and the burn in doesn t have to be...

Page 8: ...rs while providing the sound signature of a class A ampli er that also signi cantly reduces heat generation is used The MAX has versatile outputs that incorporate a 4 4mm balanced line out 4 4mm balan...

Page 9: ...icon ultra low phase noise Femtosecond oscillators 8 core CPU Mini optical output and mini coaxial output 4GB LPDDR3 128G internal memory 5G WiFi and Bluetooth 5 0 Support SDXC and SDHC Micro SD cards...

Page 10: ...VRMS 107dB 0 00045 300ohm 10Hz 40KHZ 0 2dB 125dB 125dB 114dB 0 0002 3VRMS DAC132 no load 113 5dB 0 00021 3VRMS 300ohm 101 5dB 0 00084 3VRMS 32ohm 119dB 4 4VRMS 105 5dB 0 00053 no load 4 35VRMS 104dB 0...

Page 11: ...dB 0 00025 no load 10Hz 40KHZ 0 2dB 125dB 125 8dB 115 4dB 0 00017 2 6VRMS DAC141 115dB 14 hours The play time varies with di erent resolutions and headphone IEM loads 4 4mm Line Out Average Play Time...

Page 12: ...SD Card Slot 5 0inch LCD Power System Switching Mini Optical Coaxial Output Port Digital Section Charging Data Transfer USB C Port Analog Section Charging Charge Port 4 4mm Line Out Port 3 5mm Phone P...

Page 13: ...charger to charge the MAX s digital section Connect the MAXto a computer to allow the MAX to work as a card readeror an external storage Connect the MAX to an OTG storage device to play music les stor...

Page 14: ...r and output sound through the phone port 4 4mm Balanced Phone Out Port Plug in the 4 4mm 2 5mm with adapter balanced earphone and output sound through the balanced phone port Micro SD Card Slot Inser...

Page 15: ...for 10 seconds to reset the DX220Max Charging DX220Max supports three quick charge protocols QC3 0 PD2 0 and MTK PE Plus Charging can be done with a standard 5V USB charger or with quick charger that...

Page 16: ...USB DAC 1 Power on the DX220Max 2 Press the DAC on button on Settings DAC 3 The USB DAC screen will be shown on the DX220Max 4 Connect the DX220Max to a computer via the furnished type C Cable 5 Selec...

Page 17: ...the left is the battery indicator the second one is the battery status The indicator will display the lightning symbol when charging and it will show a red exclamation mark when the battery is empty...

Page 18: ...ick charging protocols and the charging time is about 2 5 hours The status bar of the digital section is located at the upper right The third from the right is the battery indicator and the second fro...

Page 19: ...18 Battery indicator for analog section Battery indicator for digital section WIFI Time DAC Volume Android Basic Features Introduction...

Page 20: ...the Wireless local area network WLAN to turn on the WiFi function The rst time you enter the WLAN you need to choose the hot spot you will be using and enter the password From this point forward your...

Page 21: ...the Bluetooth icon to turn on the Bluetooth function The DX220Max will automatically search for the nearby Bluetooth device At the same time the DX220Max will be visible to the nearby devices Choose t...

Page 22: ...Installation 21 APKPure and CoolAPK are pre installed on the DX220Max They are similar to Play Store Launch one of them Search for the APP that you would like to install Download the APP and install...

Page 23: ...he internet browser on the desktop Enter the website address of the APP Find the download icon on the website and start the download Return to the desktop and open the download manager Press the on do...

Page 24: ...le Swipe down the screen from the topto display the noti cation bar Press the USB connection icon to choose the type of USB use Charging This only charges the DX220Max File Transfers Transfer les to W...

Page 25: ...24 System Settings Press Settings icon on the DX220Max desktop to go into system settings...

Page 26: ...alue between 132 150 to get the best result Automute When Automute is on it eliminates the noise when the music starts or when you switch songs However it may cause the music to be muted for 0 5 secon...

Page 27: ...l Output o when the optical output is not applicable Gain One of the three gains can be selected Digital Filter A total of seven lters are available for user setting Volume Limitation This sets the vo...

Page 28: ...Firmware Update 27 1 Press Settings Icon System Updater 2 Select Online Update or Local Update...

Page 29: ...DX220Max is connected to WiFi After online update is select press Check Update Press Download the DX220Max will start downloading the available update package After the download complete press Update...

Page 30: ...29 Firmware Version Press Settings icon System About DX220Max Scroll down the page the Build number is the rmware version...

Page 31: ...witching Long press the power button for 3 seconds There is a pop up window with three options When To Mango is selected system will be switched to Mango OS To return to the Android System go into the...

Page 32: ...he playback screen one can swipe left and right on the Album artwork area to switch a song Press the icon on the top left corner to go into Music Screen Press the icon on the top right corner to go in...

Page 33: ...c screen Settings Battery indicator for digital section DAC Volume Scanning Battery indicator for analog section L R Balance Equalizer Track title Artist name Album name Music info Previous Rewind Pla...

Page 34: ...o display the now playing screen One can swipe a song to the left to display the Delete button Press Delete to delete it from this playlist Press the Music info icon the album artwork will show the mu...

Page 35: ...tory view icon to browse in le structure 34 Music Screen Search bar Directory view Detail view Navigation bar Playback bar Thumbnail artwork Play Pause Track title and artist name of the song that is...

Page 36: ...wipe it left or right to choose All Music view Album view Artist view Genre view Now Playing view or Playlist view Long Press Long pressing a song will pop up a window with more options Navigation Bar...

Page 37: ...Further Options Long Press of a song will pop up a window with further options that allows to play this song add this song to a playlist or delete this song Long Press Pop up 36...

Page 38: ...Artist View Thumbnail view Artwork view Thumbnail view Artwork view 37 Album View...

Page 39: ...t exporting the pla ylist or deletion of the playlist The playlist can be found on the internal storage of the iBasso mango player folder after the playlist has been exported New Playlist Press the Ne...

Page 40: ...39 Press the icon located on the right side of the navigation bar to go into the navigation bar management and music sorting screen Navigation Bar Management Screen...

Page 41: ...ar Otherwise it will not be shown All Music View Sorting One can sort the all music view by title album artist added time or folder Now Playing View Sorting One can sort the Now Playing by title album...

Page 42: ...o go into directory view One can browse the music les under internal storage and SD card via folder structure Press Internal Storage to see music les under internal storage Press SD Card to see music...

Page 43: ...42 Input the keywords to search a track an album or an artist Search Screen...

Page 44: ...he gapless to eliminate the gap between two tracks Gain There are three gain settings The low gain has the lowest noise oor it is good for ultra sensitive IEMs Settings Screen Press the Settings icon...

Page 45: ...can choose the desired play mode here L R Balance Press to go into the L R balance setting page Digital Filter There are seven lters press the number to quickly choose a lter Advanced To access to mor...

Page 46: ...able the folder play function tick the box on the left then select either the order play mode or loop play mode After a full media scan or rescan the library you can go to Directory and select a song...

Page 47: ...46 The DX220Max has two types of Equalizer Graphic EQ and Parametric EQ Equalizer...

Page 48: ...equalizer as desired by selecting them How to Adjust The EQ Settings Press on the response curve the 10 band slide bars will show up One can adjust the EQ settings by positioning the bars up or down P...

Page 49: ...the Parametric Equalizer to enable the it Parametric Equalizer How to Go Into The Parametric EQ Setting Screen Press the response curve to go into the parametric EQ setting screen Press the button of...

Page 50: ...49 Settings on the Selection Bar One can swipe left and right to select a setting Parametric Equalizer Setting Screen...

Page 51: ...is the central frequency Input a value between 33Hz to 16 000Hz This is the gain for each central frequency Input a value between 20dB to 20dB Gain This is the quality factor Input a value between 0 3...

Page 52: ...t compared the central frequency The smaller value of the Q factor the larger the e ect in relation to the central frequency The following are the curves of the lters Fc 100Hz gain 4dB Parametric Equa...

Page 53: ...a ected Gain setting is ine ective with high pass lter 3 All Pass Filte There is no e ect beside the central frequency Gain setting is ine ective with all pass lter Q 0 7071 Q 20 2 3 4 5 6 10 20 30 1...

Page 54: ...ain setting is ine ective with band lter 5 Peak Filter There is a large e ect on the central frequency The frequency beside the central frequency has similar e ect Q 0 7071 Q 20 2 3 4 5 6 10 20 30 100...

Page 55: ...e ect Gain setting is ine ective with notch lter 7 High Shelf Filter There is a wide e ect on the frequency that is higher than the central frequency 2 3 4 5 6 10 20 30 100 200 1k Q 0 7071 Q 20 4 5 6...

Page 56: ...55 8 Low Shelf Filter There is a wide e ect on the frequency that is lower than the central frequency Q 0 7071 Q 20 4 5 6 789 10 20 30 40 50 100 200 300 1k 2 3 4 5 6 10 20 30 100 200 1k...

Page 57: ...56 L R Balance Slide clockwise to decrease the volume in right channel Slide in counterclockwise to decrease the volume in left channel...

Page 58: ...57 Digital Filter There are seven digital lters available Press a digital lter to unfold the gure Digital Filter...

Page 59: ...58 To access more system settings Advanced...

Page 60: ...ee on a Mac computer and Linux computer For Windows PC one can download the driver from iBasso com and install it following the steps included with the download before using the USB DAC function The D...

Page 61: ...ll be shown on the DX220Max Connect the DX220Max to a computer via the furnished type C Cable Select iBasso Audio HiFi device as the audio output device Then one can play music on the computer and lis...

Page 62: ...eft hand side is the value of hours The right hand is the value of minutes The DX220Max will be powered o after the counter has completed If there are any operat ions in the meanwhile the DX220Max wil...

Page 63: ...62 Select the scan locations and the press start to perform a complete media scanning One can use this feature to rebuild the music library Scanning...

Page 64: ...63 One can see the rmware version on this screen Also one can see the space available of the internal memory and SD card System Info 128 GB...

Page 65: ...4 Mango OS To reboot to Mango OS from Android rst of all long press the power button for 3 seconds to pop up a window with three options When To Mango is selected the system will switch to the Mango O...

Page 66: ...layback screen homepage my music and settings On the Music playback screen press the icon to go to My Music press the icon to go to Settings The Mango OS operation is similar to the iBasso Mango APP p...

Page 67: ...66 To return to the Android System go into the Advanced menu press To Android then press Yes...

Page 68: ...s provenance to ensure that the sound is identical to that of the source material MQA indicates it is playing an MQA Studio le which has either been approved in the studio by the artist producer or ha...

Reviews: