background image


12 


   For bevelling (angle cutting), follow the steps below: 


Loosen the bevel locking bolt (2) on the bevel scale plate (3) on 
the front of the base plate. 


Tilt the body of the tool until the required angle is reached using 
the bevel scale as a guide. 


Tighten the bevel locking bolt to secure the base plate. 


Loosen the locking bolt on the depth guide and move the base 
plate so that the cutting depth is less than or equal 20mm. Then 
tighten the locking bolt to secure the base plate.  
If the cutting depth is more than 20mm, the outer flange may hit 
the work piece when you perform the bevel cut. 


Diamond cutting wheel of 125 mm should be used

. Only use 

sharp and undamaged cutting wheels. Cracked or distorted cutting 
wheels must be replaced immediately. 

   Follow the steps and figure below


for mounting/ replacing

:


Place the tool on its side on a flat surface. Hold the outer flange 
with the spanner wrench provided. 


Loosen the hex bolt clockwise with the socket wrench provided.   


Remove the bolt and outer flange. Remove the cutting wheel from 
the inner flange and pull it out.  


Do not touch the blade with your bare hand immediately after 
cutting, it may be extremely hot and could burn your skin. Put on 
a pair of gloves when removing a hot blade. 


Clean the flanges thoroughly before mounting the cutting wheel. 


Mount the new or existing cutting wheel onto the spindle and 
against the inner flange. 


Replace the outer flange and tighten the hex bolt anticlockwise. 


MOUNTING/ REPLACING THE CUTTING WHEEL 

            IBL MC25-84 

NOTE: 


The direction in which the cutting wheel rotates has to be the 

same as the direction of the arrow marked on the guard. 
After replacing the cutting wheel, make sure that the cutting wheel 
runs freely by turning the cutting wheel by hand.  


Summary of Contents for MC25-84

Page 1: ...MARBLE CUTTER MC25 84 ...

Page 2: ...1 ...

Page 3: ...___________________ 4 PRODUCT SPECIFICATIONS ___________________________ 5 SETUP _________________________________________________ 6 PRODUCT FUNCTIONS AND ASSEMBLY________________ 7 GENERAL OPERATION ________________________________ 8 TROUBLESHOOTING __________________________________ TABLE OF CONTENTS IBL MC25 84 3 6 8 9 9 10 14 17 ...

Page 4: ...body is earthed or grounded Do not expose power tools to rain or wet conditions Water entering a power tool will increase the risk of electric shock Do not abuse the cord Never use the cord for carrying pulling or unplugging the power tool Keep it away from heat oil sharp edges or moving parts When operating a power tool outdoors use an extension cord suitable for outdoor use Use of a cord suitabl...

Page 5: ...e power tool may result in personal injury Do not overreach Keep proper footing and balance at all times This enables better control of the power tool in unexpected situations Dress properly say no to loose clothing or jewellery Keep your hair clothing away from moving parts Loose clothes jewellery or long hair can be caught in moving parts If devices are provided for the connection of dust extrac...

Page 6: ...ous in the hands of untrained users Keep cutting tools sharp and clean Properly maintained cutting tools with sharp cutting edges are less likely to bind and are easier to control Keep handles and grasping surfaces dry clean and free from oil and grease Slippery handles and grasping surfaces do not allow for safe handling and control of the tool in unexpected situations Even if you are operating t...

Page 7: ...ecommended Use only diamond cutting wheels for your power tool Blades with shapes that don t match the backing flange on which they ll be assembled will work in an irregular way causing loss of control of the tool Do not overload your tool use it only for the adequate purpose Using the power tools for purposes that are different from what is indicated in this manual refer Intended Use might lead t...

Page 8: ...o the cutting wheel Do not touch the plug with wet hands Keep bystanders away from water and electricity Keep bystanders a safe distance away from work area Anyone entering the work area must wear personal protective equipment Fragments of work piece or of a broken cutting wheel may fly away and cause injury beyond immediate area of operation Make sure the cutting wheel is not contacting the work ...

Page 9: ...VIEW 1 Base plate 2 Bevel locking bolt 3 Bevel scale plate 4 Cutting wheel 5 Cutting depth locking knob IBL MC25 84 1 2 3 4 5 6 7 8 9 6 Cutting depth guide 7 ON OFF switch 8 Lock on button 9 Carbon brush compartment ...

Page 10: ...n good conditions by performing a quick visual inspection Ensure that you have all the accessories and tools needed for assembly and operation This also includes suitable personal protective equipment 230V 50Hz 1300W 13000 rpm 2 85 Kg 125 mm 38 mm Class II SETUP UNPACKING AND ENSURING WARNING The product must be fully assembled before operation Do not use a product that is only partly assembled or...

Page 11: ...ecisely and fast We can adjust the plate to make angled cuts as well The cutting wheel has a position that gives the best reach to the work piece and improves the efficiency of cutting We can interchange the blades to suit different work pieces The blade is spindle mounted so we can fix and remove it fast refer the assembly section below INTENDED USE PRODUCT FUNCTIONS AND ASSEMBLY To start the too...

Page 12: ... the cutting wheel from the guideline to make an accurate cut ADJUSTING THE CUTTING ANGLE BIVELLING IBL MC25 84 ADJUSTING THE CUTTING DEPTH Loosen the depth locking knob 5 on the depth guide 6 Hold the base plate flat against the edge of the work piece and lift the body of the power tool until the cutting wheel is at the desired depth of cut Using a depth gauge we can determine cutting depth Then ...

Page 13: ...gure below for mounting replacing Place the tool on its side on a flat surface Hold the outer flange with the spanner wrench provided Loosen the hex bolt clockwise with the socket wrench provided Remove the bolt and outer flange Remove the cutting wheel from the inner flange and pull it out Do not touch the blade with your bare hand immediately after cutting it may be extremely hot and could burn ...

Page 14: ...ning the screw and then tightening the assembly with it Connect it tightly on a faucet tap to feed water Adjust the amount of water flow by simply adjusting the regulator IBL MC25 84 INSTALLING WATER PIPE I II III IV I Hex socket bolt II Outer flange III Cutting wheel IV Inner flange Tightening and loosening is based on the direction of rotation marked I Water pipe II Vinyl tube III Adaptor IV Fau...

Page 15: ... prevent the motor from obscuring Since excessive cutting may cause overload of the motor the depth of cut should not be more than 20 mm at a pass When you wish to cut more than 20 mm deep make a couple of passes with progressively deeper settings GENERAL OPERATION NOTE Always switch the product off disconnect the product from the power supply and let the product cool down before performing inspec...

Page 16: ...ust Before and after each use check the product and accessories or attachments for wear and damage Inspecting cutting wheel Check the cutting blade or wheel carefully for cracks or damage before and after each use Continuing to use a dull blade may cause a dangerous kickback and or motor overload Dressing could be suitable or replace with a new blade as soon as it no longer cuts effectively Dressi...

Page 17: ...n carbon brush results in motor trouble Both carbon brushes should be replaced at the same time Use only identical carbon brushes The accessories or attachments included with the tool are recommended only for use with this product The use of any other accessories or attachments might present a risk of injury to persons Only use accessory or attachment for its stated purpose This product does not c...

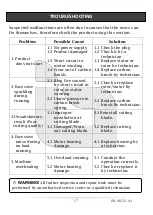
Page 18: ...tor winding 2 2 Under pressure in carbon brush spring 2 1 Check or replace rotor stator by technician 2 2 Replace carbon brush by technician 3 Unsatisfactory result Poor cutting quality 3 1 Improper installation of cutting blade 3 2 Damaged Worn out cutting blade 3 1 Reinstall cutting blade 3 2 Replace cutting blade 4 Excessive noise during no load running 4 1 Motor bearing damage 4 1 Replace bear...

Page 19: ...d appliances you make an important contribution in protecting our environment Waste electrical products should not be disposed of with household waste Please recycle where facilities exist Check with your Local Authority or local store for recycling advice CONTACT US HiTech Machineries Equipments IV 540E Thottumugham P O Aluva Ernakulam Dist Kerala India 683105 Toll Free 1800 103 4090 Whatsapp 91 ...

Reviews: