background image


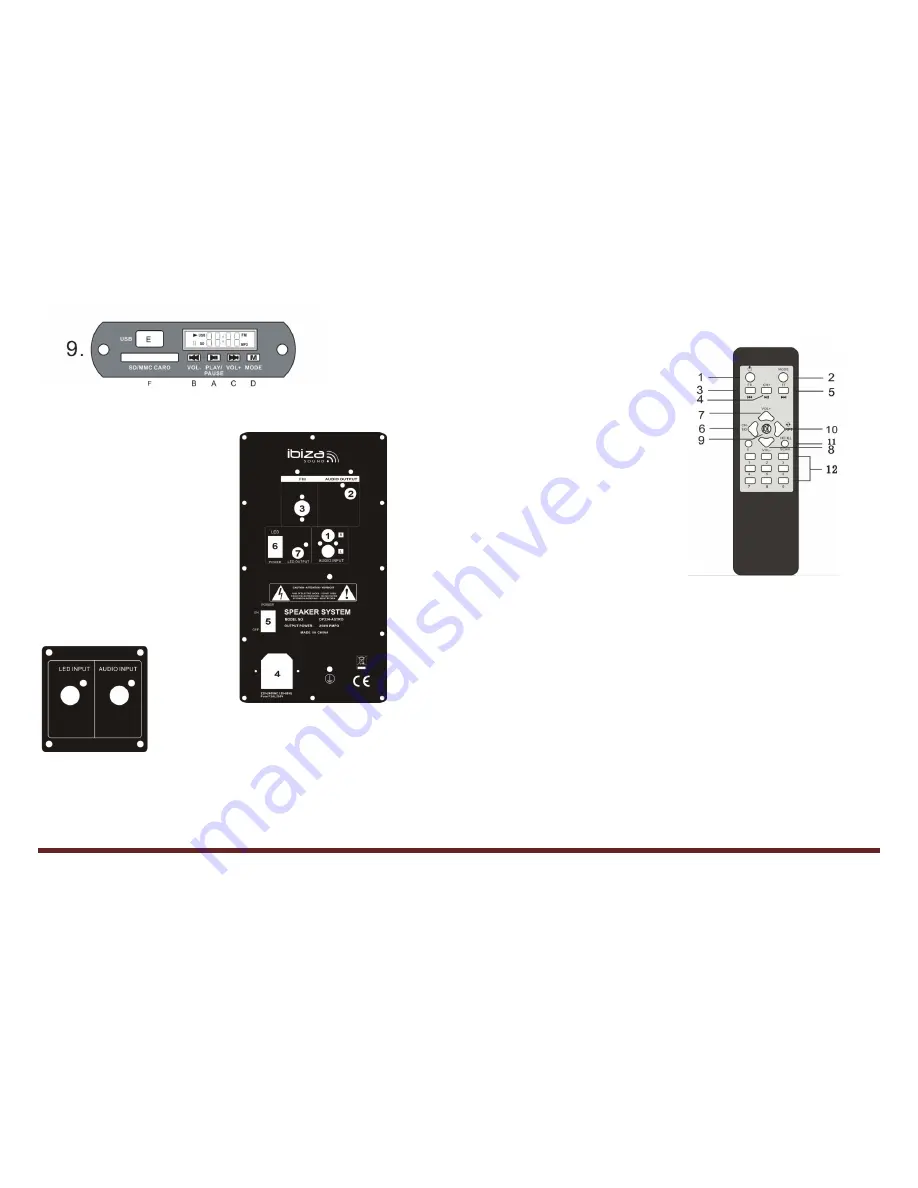
Gniazda i regulacja na tylnym panelu aktywnej kolumny


1 AUDIO INPUT JACK  

2 AUDIO output connector to passive box  

3 FM ANTENNA  

4  AC220-240V 50/60Hz INPUT   

5 POWER SWITCH 

6 LED effect ON/OFF switch 

7 LED OUTPUT connector to passive box 


Rear panel of passive box 


LED INPUT

Connect to the LED OUTPUT socket of the active box 

AUDIO INPUT

: Connect to AUDIO OUTPUT of active box.  

UWAGA

GNIAZDA I REGULACJĄ SĄ TAKIE SAME JAK W MODELU 

DP235-ASTRO


REMOTE CONTROL 


1. 

Standby

 state 

2. 

Mode

 selection 

(USB/AUX/FM/BLUETOOTH) 

3. 

Back


In MP3 mode

: Previous song.  

In FM mode:

 Manual search backwards 

through the channels  

4. 

Play/Pause

 in MP3 mode 

In FM mode

: Next channel  

5. 

Forward


In MP3 mode

: Next song 

In FM mode:

 Manual search forwards 

through the channels  

6. 

CH- /EQ

:  

In MP3 mode

: Change EQ setting  

In FM mode

: Back to the previous channel 

7. 

Vol+

: increases the volume  

8.

 Vol -

: reduces the volume  

9. 

Mute


10. 

RPT

:  Repeat a song in MP3 mode  

11. 

SCAN

: For FM mode, automatic search through the channels. The found channels are 

automatically saved in the system 

12. 

Number buttons 0-9

: Direct selection of the channels that have been saved already in 

the system  


DZIAŁANIE SYSTEMU


1.


Umieść kolumny na stabilnej powierzchni 


2.


Connect the supplied lead to the LED OUTPUT and AUDIO OUTPUT sockets on the rear 

side of the active box to the LED INPUT and AUDIO INPUT sockets on the rear side of the 

passive box.  

3.


Ustaw wszystkie regulatory głośności na wartość minimalną.


4.


Włącz kolumnę aktywną za pomocą przycisku On/Off (5) na tylnej ścianie urządzenia.


5.


Podłącz źródło dźwięku (

1

) do tylnego panelu kolumny aktywnej lub umieść pamięć 

SD/USB w slocie na przednim pnelu kolumny.  

6.


Wybierz źródło odtwarzania dźwięku 

(9D on the box or 2 on remote).  

©Copyright LOTRONIC 2014   |   Manual DP234-ASTRO / DP235-ASTRO 

Page 15 


Summary of Contents for DP234-ASTRO

Page 1: ...ntru de reciclare Adresati va autoritatilor locale sau furnizorului local privind procedura de dezafectare GB ACTIVE SPEAKER SYSTEM DP234 ASTRO DP235 ASTRO Welcome This Owner s Manual contains importa...

Page 2: ...requencies 4 Adjustment of the low frequencies 5 Master volume control 6 Power LED 7 Input Jack for MIC1 8 Input Jack for MIC2 9 Controls for the tracks on the USB or SD input source A Play pause butt...

Page 3: ...rce you can control the functions via the buttons 9 on the front panel of the active box or via the remote control 8 Connect a microphone to the inputs MIC1 or MIC2 and set the volume and the echo lev...

Page 4: ...pas tre g n e en recouvrant les orifices de ventilation avec des objets tels que journaux nappes rideaux etc Aucune source de chaleur ou de flamme nue telle que des bougies allum es ne doit tre plac s...

Page 5: ...En mode MP3 Changement du r glage de l galiseur En mode FM Retour vers la station pr c dente 7 Vol augmente le volume 8 Vol baisse le volume 9 Mute 10 RPT R p tition d un titre en mode MP3 11 SCAN Po...

Page 6: ...htige Informationen Bevor Sie Ihr Lautsprechersystem in Betrieb nehmen lesen Sie folgende wichtige Sicherheitshinweise durch um Ihre Investition in diese Qualit tslautsprecher zu sch tzen Die Kabel so...

Page 7: ...Stromschlag verursachen Regler auf der Frontseite der Aktivbox 1 Lautst rkeregler des Mikrofons 2 Echoregler des Mikrofons 3 Trebleregler 4 Bassregler 5 Allgemeiner Lautst rkeregler 6 Betriebs LED 7 M...

Page 8: ...Sie die Eingangsquelle mit dem Eingangswahlschalter 9D auf der Aktivbox bzw 2 MODE auf der Fernbedienung 7 Wenn Sie eine USB SD Eingangsquelle anschlie en k nnen Sie die Abspielfunktionen mit den Tast...

Page 9: ...ta o antes de substituir um fus vel Substitua sempre com o mesmo tipo de fus vel Retire o fus vel do seu compartimento e substitua por exactamente o mesmo tipo de fus vel Aparafuse o suporte do fus ve...

Page 10: ...ura manual para tr s atrav s dos canais 4 Play Pause no modo MP3 No modo FM Pr ximo canal 5 Seguinte No modo MP3 Pr xima m sica No modo FM manual para a frente da pesquisa atrav s dos canais 6 CH EQ N...

Page 11: ...e informatii importante care va vor ajuta sa exploatati la maxim performantele aparatului Va rugam sa l cititi cu atentie si sa l pastrati pentru referinte ulterioare Informatii importante Inainte de...

Page 12: ...IC2 9 Comenzi pentru piesele de pe sursa USB sau sursa SD de intrare A Buton Play pause In modul FM cautare auomata salvare automata B Apasare scurta Melodia anterioara Apasare lunga reducere volum In...

Page 13: ...SD puteti controla functiile cu ajutorul butoanelor 9 de pe panoul frontal al incintei active 8 Conectati un microfon la intrarile MIC1 sau MIC2 si setati volumul si nivelul ecoului microfonului prin...

Page 14: ...malna odleg o ci wok urz dzenia musz by utrzymywane w celu zapewnienia odpowiedniej wentylacji Wentylacja nie powinna by utrudniona przez zas anianie otwor w wentylacyjnych takimi przedmiotami jak gaz...

Page 15: ...In FM mode Back to the previous channel 7 Vol increases the volume 8 Vol reduces the volume 9 Mute 10 RPT Repeat a song in MP3 mode 11 SCAN For FM mode automatic search through the channels The found...

Page 16: ...handleiding omvat belangrijke informatie om het beste uit uw luidspreker eruit te halen Lees de handleiding aandachtig door en bewaar ze om later nog te kunnen raadplegen Alvorens U begint Belangrijk...

Page 17: ...MIC2 9 Controles voor de bestanden op de USB SD of BLUETOOTH Ingangsbron A Play pauze toets In FM modus automatisch zoeken en opslagen B Kort drukken Laatste song Lang drukken volume verminderen In FM...

Page 18: ...ebruikt kunt U de functies via de toetsen 9 op het front paneel van de actieve box of via de afstandsbediening besturen 8 Sluit een microfoon op de ingangen MIC1 of MIC2 aan en stel het volume en het...

Page 19: ...vijte nosilec nazaj na svoje mesto in ponovno priklju ite napajanje Hlajenje Minimalna razdalja okoli enote mora biti da se zagotovi zadostno prezra evanje Prezra evanje ne sme biti ovirano prekrivanj...

Page 20: ...kladbi v MP3 na inu 11 SCAN Pri na inu FM samodejno iskanje skozi kanale Najdeni kanali se samodejno shranijo v sistem 12 O tevil ene tipke 0 9 Direktna izbira kanalov ki so e shranjeni v sistemu Delo...

Page 21: ...ljuje ES BAFLE SONIDO AMPLIFICADO DP234 ASTRO DP235 ASTRO Bienvenido Este manual contiene informaciones importantes que le ayudaran a aprovechar totalmente sus bafles L alo atentamente y gu rdelo para...

Page 22: ...ioro del equipo en su aspecto exterior Controles en el frontal del bafle principal 1 Control de volumen del micr fono 2 Ajuste del Eco del micro 3 Ajuste del volumen de los agudos 4 Ajuste del volumen...

Page 23: ...ndo a distancia 7 Si usted conecta una fuente de entrada USB SD o Bluetooth usted puede controlar las funciones mediante los botones 9 en el frontal del bafle activo 8 Conecte un micr fono en las entr...

Reviews: