background image

©Copyright Lotronic 2014 

  Manual LC192DMX 


192-CHANNEL DMX CONTROLLER 

COMMANDE DMX A 192 CANAUX 

192-KANAL DMX CONTROLLER 

192-KANAALS DMX CONTROLLER 

192-KANALNI DMX KONTROLER 

CONTROLLER DMX CU 192 CANALE 

CONTROLADOR DMX DE 192 CANALES 

CONTROLADOR DMX DE 192 CANAIS   


Ref. : LC192DMX (Code : 15-1180) 


INSTRUCTION MANUAL 

p.2


MANUEL D’UTILISATION

 p.14


BEDIENUNGSANLEITUNG 

p.26


HANDLEIDING 

p.38


NAVODILA ZA UPORABO 

p.49


MANUAL DE UTILIZARE


p.60


MANUAL DEL USUARIO


p.71


MANUAL DE INSTRUÇÕES


p.83

Summary of Contents for LC192DMX

Page 1: ...TROLLER 192 KANALNI DMX KONTROLER CONTROLLER DMX CU 192 CANALE CONTROLADOR DMX DE 192 CANALES CONTROLADOR DMX DE 192 CANAIS Ref LC192DMX Code 15 1180 INSTRUCTION MANUAL p 2 MANUEL D UTILISATION p 14 B...

Page 2: ...Copyright Lotronic 2014 Manual LC192DMX 2...

Page 3: ...In the event of serious operating problem stop using the unit immediately Never try to repair the unit by yourself Repairs carried out by unskilled people can lead to damage or malfunction Please cont...

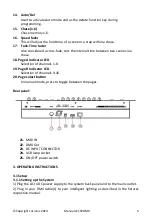
Page 4: ...programming mode 6 Music Bank Copy Used to activate Music mode and as the copy command during programming 7 LCD display Status window displays pertinent operational data 8 Mode indicator LEDs Provides...

Page 5: ...es in a chase 18 Page A Indicator LED Selection of channels 1 8 19 Page B Indicator LED Selection of channels 9 16 20 Page select button In manual mode press to toggle between the pages Rear panel 21...

Page 6: ...h binary configurable device 3 1 3 PAN TILT CHANNEL ASSIGN Because not all intelligent lighting fixtures are alike or share the same control attributes the Controller allows the user to assign the sam...

Page 7: ...light 1 Turn OFF the controller 2 Hold the BLACKOUT and TAPSYNC DISPLAY buttons simultaneously 3 Turn ON the controller 4 Press the TAPSYNC DISPLAY button to toggle between the two modes Either all ch...

Page 8: ...tion FADE and SPEED to any place you need to achieve the effect you want to create 3 Select the SCANNERS you wish to include in your scene 4 Compose a look by moving the sliders 5 Tap MIDI ADD button...

Page 9: ...ler will blink All 8 scenes in a Program bank will be copied CHASE PROGRAMMING A chase is created by using previously created scenes Scenes become steps in a chase and can be arranged in any order you...

Page 10: ...that corresponds to the scene to be copied 5 Press MIDI ADD button to copy the scene All LEDs will blink 3 4 6 EDIT CHASE INSERT SCENE INTO A CHASE 1 Press and hold the PROGRAM button to enter progra...

Page 11: ...insert point of the new scene The display will read the step number 5 Press MIDI ADD button to prepare the insert 6 Use the BANK UP DOWN button to locate the SCENE 7 Press the SCENE button that corre...

Page 12: ...buttons 4 Alternatively you can press a single CHASE button 1 6 or several CHASE buttons in sequence and all selected chases will loop in the order selected 5 You can adjust the time between steps by...

Page 13: ...o 103 Scenes 1 8 in BANK 13 104 to 111 Scenes 1 8 in BANK 14 112 to 119 Scenes 1 8 in BANK 15 120 Chase 1 121 Chase 2 122 Chase 3 123 Chase 4 124 Chase 5 125 Chase 6 126 BLACKOUT 4 Specifications Powe...

Page 14: ...able par l utilisateur D branchez l appareil du secteur en cas de non utilisation prolong e C est appareil n est pas destin un usage domestique V rifiez que l appareil n a subit aucun dommage de trans...

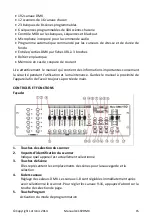
Page 15: ...i contient des informations importantes concernant la s curit pendant l utilisation et la maintenance Gardez le manuel proximit de l appareil afin de l avoir toujours port e de main CONTROLES ET FONCT...

Page 16: ...te entre les valeurs et les pourcentages 12 Blackout R gle la valeur du shutter ou du variateur de tous les appareils sur 0 ce qui teint toutes les lumi res 13 MIDI ADD Contr le des op rations MIDI ou...

Page 17: ...ar appareil C est pourquoi les appareils que vous souhaitez commander avec les touches SCANNER correspondantes doivent avoir des adresses espac es de 16 canaux Utilisez le tableau ci dessous pour l ad...

Page 18: ...REMISE A ZERO DU SYSTEME Attention Cette action remettra le contr leur sur ses r glages d usine et effacera tous les enregistrements et r glages 1 Eteignez l appareil 2 Maintenez les touches BANK UP...

Page 19: ...rammation 1 S lectionnez une parmi les 23 banques au moyen des touches BANK UP et BANK DOWN 2 S lectionnez une touche SCENE 1 8 pour la revoir 3 D placez les faders pour changer les attributs de l app...

Page 20: ...FADE TIME 4 Vous avez galement la possibilit de taper deux fois sur la touche TAPSYNC DISPLAY Le temps entre deux tapotements fixe l intervalle entre les SCENES jusqu 10 minutes 3 3 4 V rification d...

Page 21: ...5 pour ajouter des tapes dans le chase Vous pouvez m moriser jusqu 184 tapes 7 Maintenez la touche PROGRAM appuy e pour m moriser le chase 3 4 2 Lecture d un Chase 1 Appuyez sur la touche CHASE et en...

Page 22: ...des touches BANK UP DOWN 7 Appuyez sur la touche SCENE qui correspond la sc ne ins rer 8 Appuyez sur la touche MIDI ADD pour ins rer la sc ne Toutes les LED clignotent 3 4 7 Effacer une Sc ne dans un...

Page 23: ...ED clignotent 3 5 2 Copie d une sc ne 2 Maintenez la touche PROGRAM appuy e pour entrer en mode de programmation 2 S lectionnez la BANK qui contient la sc ne copier au moyen des touches BANK UP DOWN 3...

Page 24: ...sseront en boucle dans l ordre de leur s lection 5 Vous pouvez ajuster le temps entre les tapes au moyen du curseur SPEED et la dur e de l tape avec le curseur FADE TIME 3 6 3 BLACKOUT Cette touche me...

Page 25: ...s la BANK 14 112 119 Sc nes 1 8 dans la BANK 15 120 Chase 1 121 Chase 2 122 Chase 3 123 Chase 4 124 Chase 5 125 Chase 6 126 BLACKOUT CARACTERISTIQUES TECHNIQUES Alimentation DC 9 12V 500mA Min Entr e...

Page 26: ...el treten Nicht den Erdkontakt vom Stecker abkuppeln Er sch tzt das Ger t bei internem Kurzschluss Ger t vom Netz trennen bevor Anschl sse vorgenommen werden Nicht das Geh use ffnen Es enth lt keine v...

Page 27: ...alter Stellen die Szenen zum Speichern und Anw hlen dar 4 Kanalfader Zur Einstellung der DMX Werte Kan le 1 8 k nnen direkt durch Tastendruck auf den gew nschten Scanner gew hlt werden Zum W hlen der...

Page 28: ...4 Auto Del Aktiviert den Automatikbetrieb und dienst als L schtaste im Programmierbetrieb 15 Chase 1 6 Chase Speicher 1 6 16 Geschwindigkeitsfader Stellt die Haltezeit einer Szene oder eines Schritts...

Page 29: ...DMX Startadresse Einstellung der DIP Schalter 1 1 1 On 2 17 1 5 On 3 33 1 6 On 4 49 1 5 6 On 5 65 1 7 On 6 81 1 5 7 On 7 97 1 6 7 On 8 113 1 5 6 7 On 9 129 1 8 On 10 145 1 5 8 On 11 161 1 6 8 On 12 1...

Page 30: ...edr ckt halten 3 1 5 SCANNER KOPIEREN 1 SCANNER Taste Nr 1 gedr ckt halten 2 W hrend Sie SCANNER Taste Nr 1 gedr ckt halten dr cken Sie auf SCANNER Taste Nr 2 3 Lassen Sie zuerst die SCANNER taste Nr...

Page 31: ...r Chase zu sehen Hinweis Achten Sie darauf dass Sie immer noch im manuellen Betrieb sind 3 3 Programmieren Ein Programm Bank ist eine Folge von verschiedenen Szenen oder Schritten die eine nach der an...

Page 32: ...jede Szene einzeln zu pr fen 3 3 5 PROGRAMM EDITIEREN Die Szenen m ssen manuell ver ndert werden 1 Die PROGRAM Taste dr cken bis die LED blinkt 2 Mit BANK UP DOWN Tasten ggf die Bank wechseln 3 Das ge...

Page 33: ...en der TAPSYNC DISPLAY Taste in einem beliebigen Zeitabstand festlegen 3 4 3 BERPR FEN EINES CHASE 1 Die PROGRAM Taste dr cken bis die LED blinkt 2 Die gew nschte CHASE Taste dr cken 3 Die TAPSYNC DIS...

Page 34: ...splay auf Schrittanzeige umzuschalten 4 Mit den BANK UP DOWN Tasten die Szene Schritt w hlen die Sie l schen m chten 5 Die AUTO DEL Taste dr cken um den Schritt Szene zu l schen 3 4 8 L SCHEN EINES CH...

Page 35: ...chte SCENE Taste dr cken um die Kopie vorzunehmen Alle LEDs blinken 3 5 3 L SCHEN EINER SZENE 1 Die PROGRAM Taste dr cken bis die LED blinkt 2 Mit den BANK UP DOWN Tasten die Bank w hlen die die Szene...

Page 36: ...st Die MIDI Steuerung erfolgt ber NOTE Befehle Alle anderen MIDI Befehle werden ignoriert Um ein Chase zu stoppen stellen Sie das Blackout auf NOTE 1 Die MIDI ADD Taste ca 3 Sekunden lang gedr ckt hal...

Page 37: ...9 12V 500mA Min DMX Ein Ausgang 3 pol XLR Buchse Stecker mit Sperre XLR Stiftbelegung Pin 1 Abschirmung Pin 2 Pin 3 Abmessungen 482x133x82mm Gewicht 2 Kg WICHTIGER HINWEIS Elektroger te geh ren nicht...

Page 38: ...problemen ontkoppel de unit onmiddelijk van het lichtnet Nooit de unit zelfs repareren Alle reparaties moeten van een vakman doergevoerd worden Altijd originele onderdelen gebruiken Nooit op een dimm...

Page 39: ...programeer modus 6 Music Bank Copy Activeert de muziek modus en dient als een kopieer bevel tijdens programmeren 7 LCD display Vertoont informatie over de werking 8 Mode indicatie LED s Toont de werki...

Page 40: ...duur van een scene of een stap in een chase in 17 Fade Time fader Stelt het interval tussen twee scenes in een chase in 18 Page A Indicatie LED Keuze van kanalen 1 8 19 Page B Indicatie LED Keuze van...

Page 41: ...1 5 6 On 5 65 1 7 On 6 81 1 5 7 On 7 97 1 6 7 On 8 113 1 5 6 7 On 9 129 1 8 On 10 145 1 5 8 On 11 161 1 6 8 On 12 177 1 5 6 8 On Zie instructies in de handleiding van uw DMX toestel De boven tabel is...

Page 42: ...kopie te bevestigen 3 1 6 FADE TIME ASSIGN U kunt kiezen of the fade tijd tijdens het scene programma voor alle uitgangskanalen of alleen de pan tilt kanalen geldig is Dit is belangrijk want u vaak go...

Page 43: ...led flitst 3 3 2 EEN SCENE OPSLAAN Een scene is een statische lichttoestand Scenes worden in banken opslaan Er zijn 23 bankgeheugens in de controller en elke bank heeft 8 scene geheugens De controlle...

Page 44: ...es de BANK waarin u het programma wilt kopi ren d m v de BANK UP DOWN toetsen 5 Druk op MUSIC BANK COPY op de kopie uit te voeren Alle leds op de controller flitsen Alle 8 scenes in een bank worden ko...

Page 45: ...ENE NAAR CHASE KOPIEREN 1 Druk de PROGRAM toets totdat de led flitst 2 Kies de gewenste CHASE toets 3 D m v de BANK UP DOWN toetsen kies de BANK die de scene bevat die U wilt kopi ren 4 Druk de SCENE...

Page 46: ...1 Druk de PROGRAM toets totdat de led flitst 2 Kies de gewenste CHASE toets 3 Druk de TAPSYNC DISPLAY toets om de stappen op de display aan te duiden 4 Loop d m v de BANK UP DOWN toetsen door de stap...

Page 47: ...de AUTO DEL toets totdat de AUTO led oplicht 2 Indien geen CHASE toets gedrukt is loopt automatisch een BANK af 3 Wijzig de BANK door indrukken van de BANK UP DOWN toetsen 4 Alternatief kunt U n of m...

Page 48: ...8 in BANK 12 96 tot 103 Scenes 1 8 in BANK 13 104 tot 111 Scenes 1 8 in BANK 14 112 tot 119 Scenes 1 8 in BANK 15 120 Chase 1 121 Chase 2 122 Chase 3 123 Chase 4 124 Chase 5 125 Chase 6 126 BLACKOUT...

Page 49: ...meru resnega problema delovanja prenehajte z uporabo naprave takoj Nikoli ne posku ajte popravljati sami Popravila ki jih izvajajo nekvalificirane osebe lahko povzro ijo po kodbe ali okvare Prosimo da...

Page 50: ...je Uporablja za aktiviranje glasbenega na ina in kot ukaz za kopiranje med programiranjem 7 LCD zaslon Statusno okno prika e ustrezne operativne podatke 8 Indikator LED za na in Dolo a status na in de...

Page 51: ...t Za prilagoditev asa scene ali koraka v chase 17 Fade Time drsnik Dolo anje asovnega traino med dvema scenama v chase 18 Stran A LED trainor Izbor kanalov 1 8 19 Stran B LED trainor Izbor kanalov 9 1...

Page 52: ...6 81 1 5 in 7 On 7 97 1 6 in 7 On 8 113 1 5 6 in 7 On 9 129 1 in 8 On 10 145 1 5 in 8 On 11 161 1 6 in 8 On 12 177 1 5 6 in 8 On Prosimo da preberete priro nik za nastavljanje DMX address za posamezne...

Page 53: ...pe nega kopiranja 3 1 6 FADE TIME DODELITEV Izberete lahko ali je plo a s FADE TIME med izvajanjem scene izvaja na vseh izhodnih kanalih ali samo za kanale gibanja PAN TILT To je pomembno saj pogosto...

Page 54: ...STVARJANJE SCENE Scena je stati na osvetlitev prostora Scene so shranjene v bankah Obstaja spomin 23 Bank na kontrolerju in vsaka banka lahko ima shranjene 8 scen V kontroler lahko shranite 184 scen s...

Page 55: ...snite MIDI ADD gumb za pripravo kopiranja 4 Uporabite BANK UP DOWN da izberite cilj PROGRAM Bank 5 Pritisnite gumb MUSIC BANK COPY za izvedbo kopiranja Vse lu ke na kontrolerju utripnejo Vseh 8 scen v...

Page 56: ...RAM za vstop v na in programiranja 2 Pritisnite gumb za elenega CHASE 3 Izberite BANK ki vsebuje sceno za kopiranje z uporabo gumbov BANK UP DOWN 4 Pritisnite na gumb SCENE za kopiranje ustrezne scene...

Page 57: ...SE 3 Pritisnite TAPSYNC DISPLAY da preklopite na LED zaslonu za prikaz korakov 4 Uporabite gumbe BANK UP DOWN za navigacijo korakov in lociranje to ke za vstavljanje nove scene Zaslon bo prebral tevil...

Page 58: ...mb CHASE pritisnjena kontroler ne bo samodejno zagnal programa BANK 3 Spremenite programe BANK z uporabo gumbov BANK UP DOWN 4 Alternativno lahko s pritiskom na eno tipko Chase 1 6 ali ve CHASE gumbov...

Page 59: ...e 1 8 v BANK 8 64 do 71 Scene 1 8 v BANK 9 72 do 79 Scene 1 8 v BANK 10 80 do 87 Scene 1 8 v BANK 11 88 do 95 Scene 1 8 v BANK 12 96 do 103 Scene 1 8 v BANK 13 104 do 111 Scene 1 8 v BANK 14 112 do 11...

Page 60: ...urantei In caz de probleme de functionare grave opriti imediat utilizarea aparatului Nu incercati sa reparati singuri aparatul Reparatiile efectuate de persoane necalificate pot duce la deteriorarea s...

Page 61: ...5 Buton programare Folosit pentru accesarea modului de programare 6 Copiere Muzica Bank Folosit pentru activarea muzicii si copiere in timpul programarii 7 Ecran LCD Fereastra care afiseaza date despr...

Page 62: ...rata Seteaza intervalul dintre scene dintr o secventa programabila 18 Indicator LED Pagina A Selectare canale 1 8 19 Indicator LED Pagina B Selectare canale 9 16 20 Buton selectare pagina Pe modul man...

Page 63: ...tandard 9 3 1 3 ATRIBUIRE CANALE PAN TILT Deoarece nu toate dispozitivele sunt identice sau detin aceleasi atribute de control dispozitivul de control permite utilizatorului sa atribuie acelasi canal...

Page 64: ...1 Opriti dispozitivul 2 Tineti butoanele BLACKOUT si TAPSYNC DISPLAY apasate simultan 3 Porniti dispozitivul de control 4 Apasati butonul TAPSYNC DISPLAY pentru a comuta intre cele doua moduri toate c...

Page 65: ...4 de scene 1 Apasati butonul PROGRAM pana cand se aprinde LED ul 2 Puteti pozitiona comutatorul FADE si SPEED pe orice pozitie doriti pentru a obtine efectul pe care doriti sa l creati 3 Selectati opt...

Page 66: ...WN pentru a selecta tiparul PROGRAMULUI pe care il veti copia 3 Apasati butonul MIDI ADD pentru a pregati copierea 4 Folositi butoanele BANK UP DOWN pentru a selecta destinatia tiparului de PROGRAM 5...

Page 67: ...asati si tineti apasat butonul PROGRAM pentru a accesa modul programarii 2 Apasati butonul CHASE dorit 3 Selectati optiunea BANK pentru copiere folosind butoanele BANK UP DOWN 4 Apasati butoanele MUSI...

Page 68: ...e urmeaza a fi stearsa 3 Apasati si tineti apasat butonul AUTO DEL si butonul CHASE pentru a sterge secventa programabila Toate LED urile vor palpai 3 4 9 STERGEREA PROGRAMELOR SECVENTEI PROGRAMABILE...

Page 69: ...RE SCENE 1 Apasati si tineti apasat butonul PROGRAM si butonul BANK DOWN in timp ce opriti dispozitivul de control 2 Porniti iar dispozitivul de control 3 6 Redare 3 6 1 FUNCTIONARE PE MODUL SUNETULUI...

Page 70: ...ati si tineti apasat butonul MIDI ADD timp de 3 secunde pentru a salva setarile 4 Pentru a elibera comanda MIDI apasati orice alt buton in afara de butoanele BANK la pasul 2 MIDI NOTE FUNCTII PORNIRE...

Page 71: ...el embalaje para transportar el equipo con seguridad No vierta l quidos ni agua subre el equipo Asegurese de que la tensi n de su enchufe se corresponde con las necesidades t cnicas del equipo No util...

Page 72: ...equipo ha sido comprobado en f brica antes de su env o Presenta las caracter sticas siguientes 192 canales DMX 12 scanner de 16 canales cada uno 23 bancos de 8 escenas programables 6 secuencias progr...

Page 73: ...manual autom tico o controlado por la m sica 9 Bank Up Explorar las escenas Pasos dentro de los bancos y chases en modo ascendente 10 Bank Down Explorar las escenas pasos dentro de los bancos y de lo...

Page 74: ...de corriente 2 Conecte el cable DMX de equipo DMX siguiendo las instrucciones del manual del mismo 3 1 2 Direccionamiento DMX de los equipo El controlador permite controlar hasta 16 canales DMX por e...

Page 75: ...gina 4 Apriete la tecla TAPSYNC DISPLAY para seleccionar PAN TILT 5 Desplace uno de los faders canal 1 8 para seleccionar el canal Tilt apriete la tecla PAGE para conmutar entre las p ginas 6 Apriete...

Page 76: ...varias veces AUTO DEL hasta que el LED MANUAL se ilumine 2 Seleccione un esc ner apretando un bot n SCANNER 3 Desplace los faders para cambiar los atributos Tecla TAPSYNC DISPLAY Apriete para hacer b...

Page 77: ...para confirmar El display indicar el n mero de escena y banco utilizado 3 3 3 LECTURA DE UN PROGRAMA 1 Cambie de banco si es necesario con las teclas BANK UP DOWN 2 Apriete varias veces la teclas AUTO...

Page 78: ...1 Creaci n de un Chase 1 Active el modo PROGRAM 2 Seleccione el bot n CHASE 1 6 que dese programar 3 Cambie de banco BANK si lo necesita para localizar una escena 4 Seleccione su escena dentro del ban...

Page 79: ...o de inserci n de la nueva escena El display indicar el n mero de etapa 5 Apriete en la tecla MIDI ADD para preparar la inserci n 6 Localice la escena mediante las teclas BANK UP DOWN 7 Apriete en la...

Page 80: ...la MIDI ADD para insertar la escena Todos los LED parpadearan 3 5 2 Copia de una escena 1 Mantenga la tecla PROGRAM apretada para entrar en programaci n 2 Seleccione el BANK que contiene la escena a c...

Page 81: ...el orden de la selecci n 5 Puede ajustar el tiempo entre las etapas mediante el cursor SPEED y la duraci n de la etapa mediante el cursor FADE TIME 3 6 3 BLACKOUT Este cursor pone todas las l mparas...

Page 82: ...NK 13 104 111 Escenas 1 8 dentro del BANK 14 112 119 Escenas 1 8 dentro del BANK 15 120 Chase 1 121 Chase 2 122 Chase 3 123 Chase 4 124 Chase 5 125 Chase 6 126 BLACKOUT CARACTERISTICAS T CNICAS Alimen...

Page 83: ...us vel Em caso de problemas s rios de opera o pare de utilizar o aparelho imediatamente Nunca tente reparar o aparelho por si mesmo As repara es efetuadas por pessoas n o qualificadas podem causar dan...

Page 84: ...o de Programa o Usado para entrar no modo de programa o 6 Copias Music Bank Usado para ativar o modo de activa o sonora e o comando de c pia durante a programa o 7 Display LCD A janela de estado mostr...

Page 85: ...1 6 16 Speed fader Ajuste de tempo de espera de uma Scene ou Step dentro de uma Chase 17 Fade Time fader Tamb m considerado como cross fade configura o tempo de intervalo entre duas Scenes numa Chase...

Page 86: ...u Scanner Endere o padr o DMX inicial Configura o dos interruptores DIP bin rios 1 1 1 On 2 17 1 5 On 3 33 1 6 On 4 49 1 5 6 On 5 65 1 7 On 6 81 1 5 7 On 7 97 1 6 7 On 8 113 1 5 6 7 On 9 129 1 8 On 10...

Page 87: ...configura es 1 Desligue o aparelho 2 Mantenha pressionado BANK UP e AUTO DEL 3 Ligue a alimenta o da unidade enquanto mantem pressionado BANK UP e AUTO DEL 3 1 5 COPY SCANNER 1 Mantenha pressionado o...

Page 88: ...evis o CHASE 1 Pressione qualquer um dos 6 bot es de Chase 2 Pressione o bot o TAP DISPLAY para ver o n mero do passo no visor 3 Pressione as teclas BANK UP DOWN rever todas as cenas da persegui o Not...

Page 89: ...GRAMA As Scenes ter o de ser modificada manualmente 1 Mantenha pressionado o bot o PROGRAM at que o LED pisque 2 Use os bot es BANK UP DOWN para alterar bancos PROGRAM 3 Seleccione o equipamento desej...

Page 90: ...ique cada scene passo individualmente usando os bot es BANK UP DOWN 3 4 4 EDITAR UMA CHASE COPIAR BANK PARA UMA CHASE 1 Mantenha pressionado o bot o PROGRAM para entrar no modo de programa o 2 Pressio...

Page 91: ...o AUTO DEL e o respectivo bot o CHASE para apagar a chase Todos os LEDs ir o piscar 3 4 9 APAGAR TODOS OS PROGRAMAS CHASE CUIDADO Este procedimento ir resultar na perda irrevog vel de mem ria dos pass...

Page 92: ...ot o BANK DOWN enquanto liga a energia do controlador 2 Gire o controlador de volta 3 6 Reprodu o 3 6 1 RUNNING IN SOUND MODE 1 Pressione o bot o MUSIC BANK COPY at que o LED MUSIC se acenda 2 Selecci...

Page 93: ...Pressione e segure o bot o MIDI ADD durante 3 segundos para salvar as configura es 4 Para libertar o controlo MIDI pressione qualquer outro bot o excepto os bot es BANK durante o passo 2 NOTA MIDI FUN...

Page 94: ...e pinos XLR Pino 1 Ecr Pino 2 pino 3 Dimens es 482x133x82mm Peso 2 Kg Produtos el ctricos n o dever o ser postos em contentores de lixo caseiros Por favor deposite os em contentores para reciclagem Qu...

Reviews: