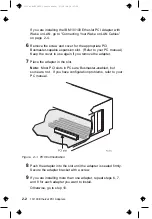
Note: Only one adapter per PC can be connected and used
as a Wake on LAN adapter.
10
Replace the cover on the PC, connect the cables to the
connected devices, connect the signal cables to the
receptacles, and finally, connect the power cord to the outlet.
Note: In the U.K., by law, the power cord must be connected
before the telephone line cable.
11
Connect a twisted-pair Ethernet category 3 or category 5 cable
to the adapter and to your Ethernet outlet. See “Using the
Correct Adapter Cable” for more information.
Notes:
a. If you use the 10/100 EtherJet PCI Adapter with Wake on
LAN and connect the cables as described, the LNK LED
should be lit even if the PC is powered off. This indicates
that the Wake on LAN power cable has been correctly
connected to your adapter.
b. To use Wake on LAN, you must enable the Wake on LAN
function in your system configuration. Refer to your PC
documentation for more information.
12
Switch ON the connected devices and the PC.
13
Step 2 of the Adapter Installation Checklist is now complete.
If you want to run the adapter diagnostics at this point, see
Chapter 4, “Testing Your Adapters and Installing Device Drivers” for
details.
Using the Correct Adapter Cable
To reliably operate your network at 100 Mbps, you must use
category 5 Data Grade cabling with this adapter. Although category
3 or 4 cabling might work initially, it will soon cause data loss. For
more information, see the Hardware Specifications and Cabling topic
on the Diagnostics and Help diskette. (“Help Files” on page 1-6
describes how to access this information.)
Chapter 2. Installing the Adapter Hardware
2-3
Title: ASB3CNTL CreationDate: 07/16/98 18:07:52

