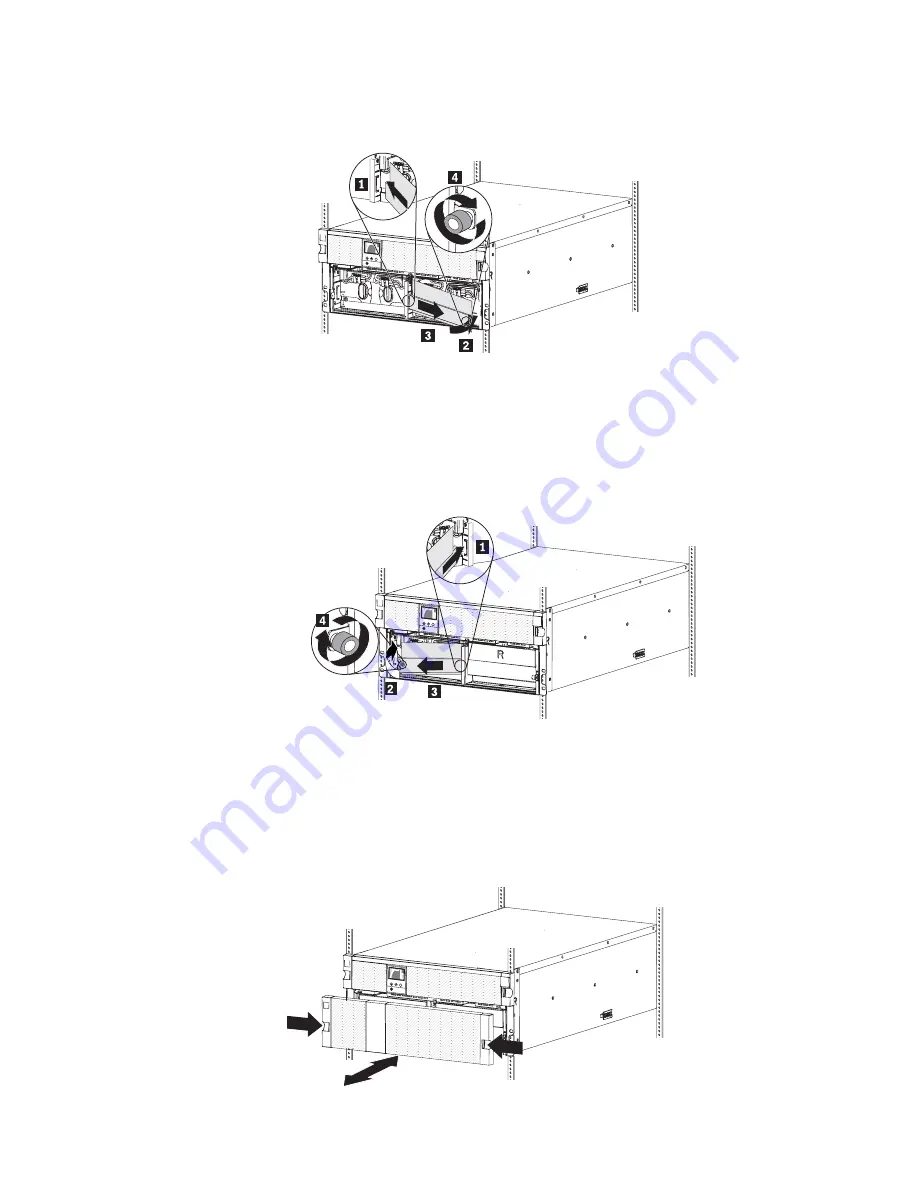
5. Reinstall the right battery retention bracket:
a. Slide the right battery retention bracket to the left and into the slot
1
.
OK
OK
100%
6
min
R
b. Rotate the battery retention bracket toward the UPS
2
. Make sure that the
internal battery connectors are out of the way.
c. Slide the battery retention bracket to the right
3
and tighten the
thumbscrew on the right battery retention bracket
4
.
6. Reinstall the left battery retention bracket:
a. Slide the left battery retention bracket to the right and into the slot
1
.
OK
OK
100%
6
min
L
b. Rotate the battery retention bracket toward the UPS
2
. Make sure that the
internal battery connectors are out of the way.
c. Slide the battery retention bracket to the left
3
and tighten the thumbscrew
on the left battery retention bracket
4
.
7. To attach the UPS lower front bezel, press the two side latches toward each
other, align the bezel underneath the upper bezel, and snap it into place.
OK
OK
100%
6
min
Chapter 2. Installing the uninterruptible power supply
21
Summary of Contents for 11000 VA LCD 5U
Page 2: ......
Page 13: ...Taiwan Class A compliance statement 71 Index 73 Contents xi...
Page 14: ...xii 11000 VA UPS and 11000 VA EBM Installation and Maintenance Guide...
Page 40: ...26 11000 VA UPS and 11000 VA EBM Installation and Maintenance Guide...
Page 56: ...42 11000 VA UPS and 11000 VA EBM Installation and Maintenance Guide...
Page 60: ...46 11000 VA UPS and 11000 VA EBM Installation and Maintenance Guide...
Page 76: ...62 11000 VA UPS and 11000 VA EBM Installation and Maintenance Guide...
Page 86: ...72 11000 VA UPS and 11000 VA EBM Installation and Maintenance Guide...
Page 90: ...76 11000 VA UPS and 11000 VA EBM Installation and Maintenance Guide...
Page 91: ......
Page 92: ...Part Number 60Y1454 Printed in USA 1P P N 60Y1454...


