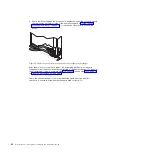
5. Unscrew and retain the valve caps from the air-purging valve and from the
drain valve.
6. Remove the extension hose from the air-purging tool, if it is connected.
7. Place the drain end of the air-purging tool into a container that can hold at
least 11.4 liters (3 gallons) of water.
Air-purging
valve
Drain
valve
Figure 48. Removing the cap from the air-purging valve and drain valve
Hose
Extension hose
Hose
Extension hose
Figure 49. Air-purging tool
58
Rear Door Heat eXchanger V2: Installation and Maintenance Guide
Summary of Contents for 1756
Page 1: ...Rear Door Heat eXchanger V2 Type 1756 Installation and Maintenance Guide ...
Page 2: ......
Page 3: ...Rear Door Heat eXchanger V2 Type 1756 Installation and Maintenance Guide ...
Page 38: ...28 Rear Door Heat eXchanger V2 Installation and Maintenance Guide ...
Page 64: ...54 Rear Door Heat eXchanger V2 Installation and Maintenance Guide ...
Page 90: ...80 Rear Door Heat eXchanger V2 Installation and Maintenance Guide ...
Page 98: ...88 Rear Door Heat eXchanger V2 Installation and Maintenance Guide ...
Page 101: ...website continued support line telephone numbers 79 Index 91 ...
Page 102: ...92 Rear Door Heat eXchanger V2 Installation and Maintenance Guide ...
Page 103: ......
Page 104: ... Part Number 00D2434 Printed in USA 1P P N 00D2434 ...


