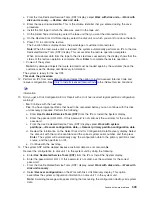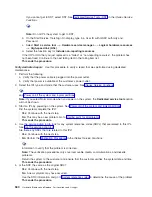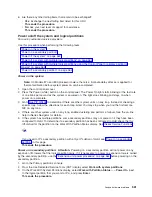
c.
Return
to
the
procedure
that
sent
you
here.
This
ends
the
procedure.
Resume
mirrored
protection:
For
use
by
authorized
service
providers.
Use
this
procedure
to
resume
mirrored
protection
on
suspended
disk
units.
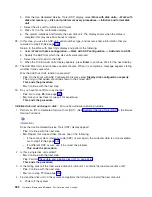
1.
From
the
System
Service
Tools
(SST)
display
or
on
the
Use
Dedicated
Service
Tools
(DST)
display,
select
Work
with
disk
units
—>
Work
with
disk
unit
recovery
—>
Resume
mirrored
protection
.
2.
On
the
Resume
Mirrored
Protection
display,
select
the
disk
unit
that
you
just
replaced.
It
has
a
status
of
suspended.
3.
Is
the
disk
unit
in
an
Independent
Auxiliary
Storage
Pool
(IASP)?
v
Yes
:
The
disk
unit
that
you
selected
will
become
active
when
the
IASP
is
varied
on.
This
ends
the
procedure.
v
No
:
Continue
with
the
next
step.
4.
Are
you
in
SST?
v
Yes
:
The
disk
unit
that
you
selected
will
become
active
when
the
system
is
operational.
This
ends
the
procedure.
v
No
:
Return
to
the
Use
Dedicated
Service
Tools
(DST)
display
and
perform
an
IPL.
The
disk
unit
that
you
selected
will
become
active
during
the
IPL.
This
ends
the
procedure.
Save
data
and
initialize
disk
unit:
For
use
by
authorized
service
providers.
To
complete
this
procedure,
you
may
need
the
latest
set
of
Save
System
(SAVSYS)
or
SAVSTG
tapes
that
were
made
before
the
problem
occurred.
You
will
also
need
three
blank
tapes.
1.
Are
you
exchanging
a
disk
unit
because
a
disk
unit
failure
caused
system
operations
to
stop
completely?
v
Yes
:
Continue
with
the
next
step.
v
No
:
You
may
be
able
to
use
the
Remove
Units
from
Configuration
function
of
DST.
This
function
allows
you
to
move
all
data
from
the
disk
unit
you
want
to
exchange
to
the
other
disk
units
in
the
same
auxiliary
storage
pool
(ASP).
Go
to
step
17
(See
page
2.
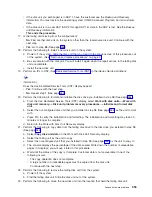
Perform
an
IPL
to
Dedicated
Service
Tools
(DST).
See
in
the
iSeries
Service
Functions
information.
Does
the
Use
Dedicated
Service
Tools
(DST)
display
appear?
v
Yes
:
Continue
with
the
next
step.
v
No
:
Did
any
messages
regarding
missing
disk
units
appear?
–
Yes
:
Ignore
the
messages
and
go
to
step
3
(See
page
–
No
:
Repeat
this
step.
If
the
same
system
reference
code
(SRC)
occurs
again,
the
customer
data
is
not
recoverable.
Go
to
step
5
(See
page
If
a
different
SRC
occurs,
use
it
to
correct
the
problem.
(See
This
ends
the
procedure.
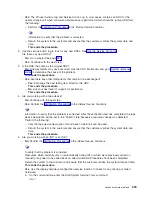
3.
From
the
Use
Dedicated
Service
Tools
(DST)
display,
perform
the
following
to
save
the
customer
data
from
the
failing
disk
unit.
a.
Select
Work
with
disk
units
—>
Work
with
disk
unit
recovery
—>
Save
disk
unit
data
.
b.
On
the
Select
Disk
Unit
Data
to
Save
display,
select
the
disk
unit
from
which
you
want
to
save
the
data.
Record
the
ASP
of
the
disk
unit
that
you
are
saving.
If
the
disk
unit
is
missing,
you
cannot
save
the
customer
data
to
tape
at
this
time.
Go
to
step
5
(See
page
546
Hardware
(Remove
and
Replace;
Part
Locations
and
Listings)
Summary of Contents for 270
Page 2: ......
Page 12: ...x Hardware Remove and Replace Part Locations and Listings...
Page 279: ...Figure 3 CCIN 2881 with pluggable DIMM Analyze hardware problems 267...
Page 281: ...Figure 6 Models 830 SB2 with FC 9074 HSL and SPCN locations Analyze hardware problems 269...
Page 283: ...Figure 1b Model 840 SB3 processor tower dual line cord Analyze hardware problems 271...
Page 294: ...01 gif port and LED locations 282 Hardware Remove and Replace Part Locations and Listings...
Page 295: ...s src rzaq4519 gif locations Analyze hardware problems 283...
Page 483: ...Table 1 Cover assembly FC 5095 Expansion I O Tower Analyze hardware problems 471...
Page 614: ...602 Hardware Remove and Replace Part Locations and Listings...
Page 618: ...606 Hardware Remove and Replace Part Locations and Listings...
Page 621: ......
Page 622: ...Printed in USA SY44 5917 02...


