8. Evenly space the blue sliding guides between the tractors.
S l i d i n g G u i d e s
9. Perform an autoload by pressing Load/Eject, and the form will
automatically move to the load position. For more information,
see “Adjusting the Load Position” on page 1-78.
Note: You can adjust the load position by using the
Micro
↑
, Micro
↓
, or Line Feed keys. If you plan to use the
Document on Demand feature, see “Adjusting the Tear-off
Position” on page 1-76 for more information.
a b c d e f
P l a te n R o d
P l a te n R o d
P l a te n R o d S u r fa c e
F i r s t P r i n t L i n e
1-60
User’s Guide Model 302
Summary of Contents for 4232 Model 302
Page 1: ...4232 Printer Model 302 User s Guide SA24 4386 01 ...
Page 2: ......
Page 3: ...4232 Printer Model 302 User s Guide SA24 4386 01 IBM ...
Page 9: ...Index X 7 Contents vii ...
Page 10: ...viii User s Guide Model 302 ...
Page 54: ...1 32 User s Guide Model 302 ...
Page 86: ...1 64 User s Guide Model 302 ...
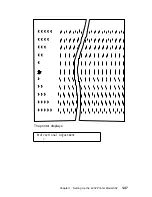
Page 130: ...The printer displays Bidirectional Adjustment 1 108 User s Guide Model 302 ...
Page 166: ...2 24 User s Guide Model 302 ...
Page 185: ... Figure 4 2 Sample Printer Configuration Printout Serial Attached Chapter 4 Tests 4 11 ...
Page 187: ...The printout should look similar to Chapter 4 Tests 4 13 ...
Page 190: ...The sample printout appears as follows 4 16 User s Guide Model 302 ...
Page 192: ...4 18 User s Guide Model 302 ...
Page 200: ...A 8 User s Guide Model 302 ...
Page 248: ...C 12 User s Guide Model 302 ...
Page 250: ...D 2 User s Guide Model 302 ...
Page 270: ......
Page 273: ......
Page 274: ...IBM Part Number 56G9390 Printed in U S A 56G939ð SA24 4386 ð1 ...

