Connecting the cables
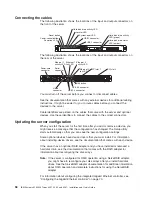
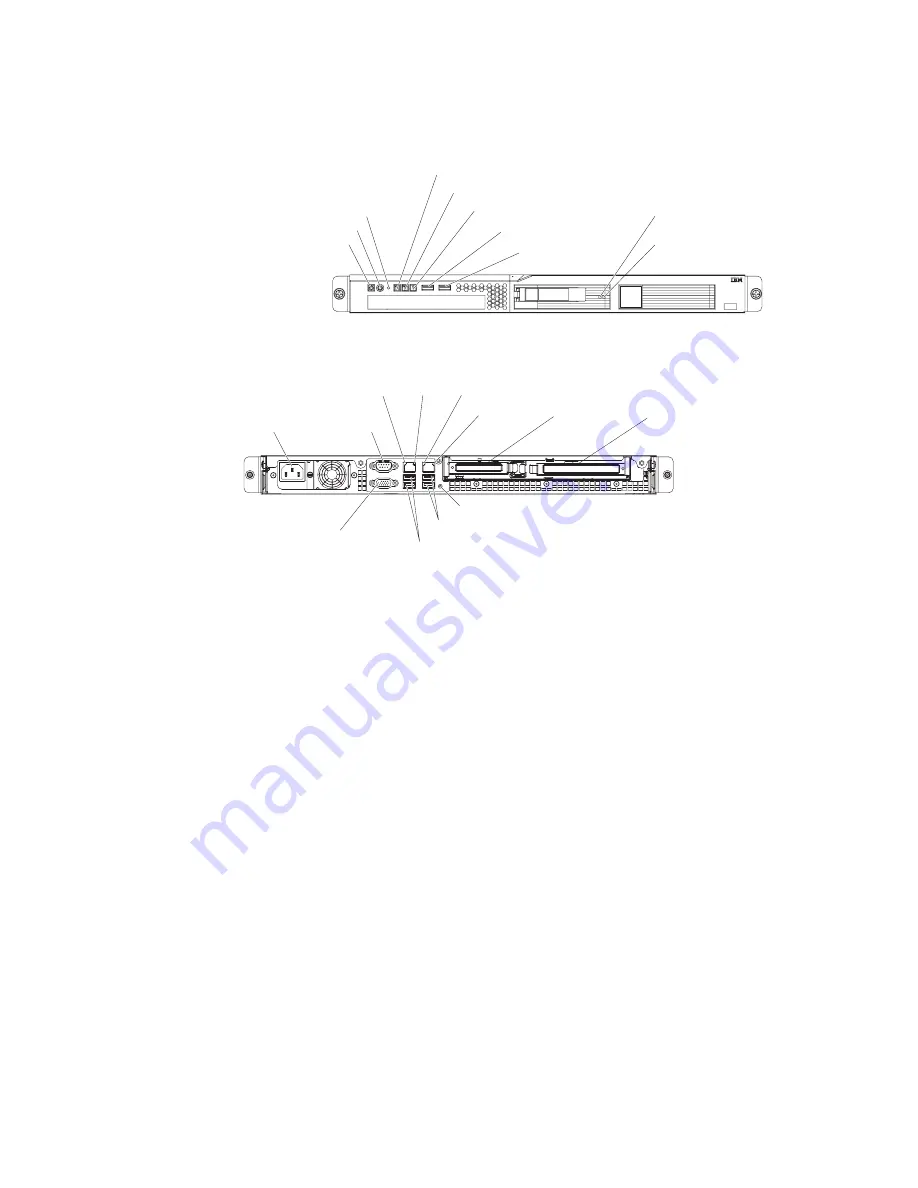
The following illustration shows the locations of the input and output connectors on
the front of the server.
Power-on LED
Power-control button
Reset button
Hard disk drive activity LED
Locator LED
System-error LED
USB 1 connector
USB 2 connector
Hard disk drive status
LED (amber)
Hard disk drive activity
LED (green)
The following illustration shows the locations of the input and output connectors on
the rear of the server.
Power-cord
connector
USB 1-2 connector
USB 3-4 connector
Serial
connector
Video
connector
Ethernet 1
activity LED
Ethernet 1
link LED
Ethernet 2
activity LED
Ethernet 2
link LED
NMI button
PCI slot 1
PCI slot 2
You must turn off the server before you connect or disconnect cables.
See the documentation that comes with any external devices for additional cabling
instructions. It might be easier for you to route cables before you connect the
devices to the server.
Cable identifiers are printed on the cables that come with the server and optional
devices. Use these identifiers to connect the cables to the correct connectors.
Updating the server configuration
When you start the server for the first time after you add or remove a device, you
might receive a message that the configuration has changed. The Setup utility
starts automatically so that you can save the new configuration settings.
Some optional devices have device drivers that you must install. For information
about installing device drivers, see the documentation that comes with each device.
If the server has an optional RAID adapter and you have installed or removed a
hard disk drive, see the documentation that comes with the RAID adapter for
information about reconfiguring the disk arrays.
Note:
If the server is configured for RAID operation using a ServeRAID adapter,
you might have to reconfigure your disk arrays after you install hard disk
drives. See the ServeRAID adapter documentation for additional information
about RAID operation and complete instructions for using the ServeRAID
adapter.
For information about configuring the integrated Gigabit Ethernet controller, see
“Configuring the Gigabit Ethernet controller” on page 70.
56
IBM System x3250 M3 Types 4251, 4252, and 4261: Installation and User’s Guide
Summary of Contents for 4251
Page 1: ...IBM System x3250 M3 Types 4251 4252 and 4261 Installation and User s Guide ...
Page 2: ......
Page 3: ...IBM System x3250 M3 Types 4251 4252 and 4261 Installation and User s Guide ...
Page 7: ...Index 85 Contents v ...
Page 8: ...vi IBM System x3250 M3 Types 4251 4252 and 4261 Installation and User s Guide ...
Page 34: ...18 IBM System x3250 M3 Types 4251 4252 and 4261 Installation and User s Guide ...
Page 100: ...84 IBM System x3250 M3 Types 4251 4252 and 4261 Installation and User s Guide ...
Page 105: ......
Page 106: ... Part Number 81Y6118 Printed in USA 1P P N 81Y6118 ...

