background image

13

1

4

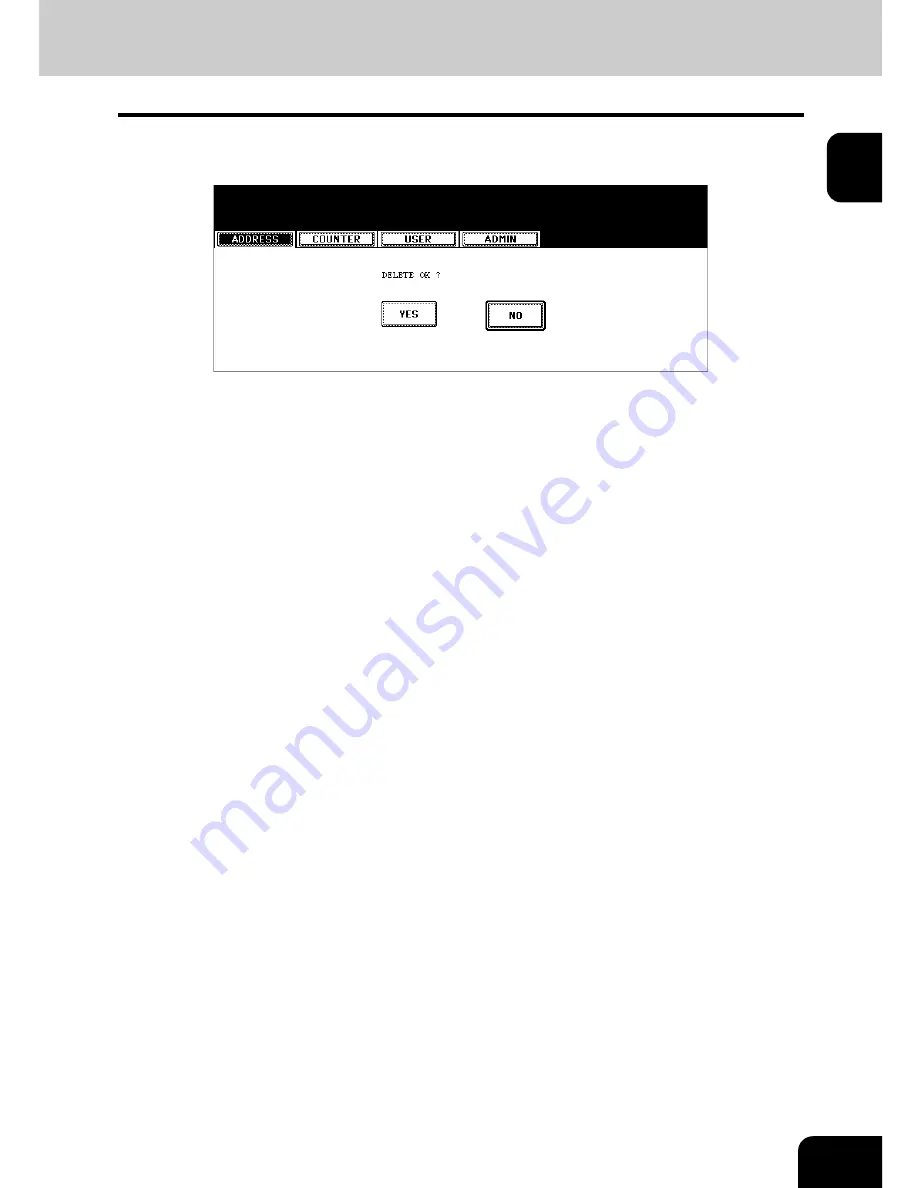
Press the [YES] button to delete the contact, or the [NO] button to 
cancel deleting.

• When you press the [YES] button, the selected contact is deleted.

Summary of Contents for 4530-N01

Page 1: ...User Functions Guide Océ im4530 im3530 User s Guide ...

Page 2: ... the US and other countries Apple AppleTalk Macintosh Mac TrueType and LaserWriter are trademarks of Apple Computer Inc in the US and other countries Postscript is a trademark of Adobe Systems Incorporated Netscape is a trademark of Netscape Communications Corporation IBM AT and AIX are trademarks of International Business Machines Corporation NOVELL NetWare and NDS are trademarks of Novell Inc Ot...

Page 3: ...ling Department Code 48 Resetting All Department Counters 49 Deleting All Department Codes 50 Registering a New Department Code 51 Editing the Department Code 54 Deleting the Department Code 58 Resetting the Counter of Each Department 60 Setting Output Limitations for All Departments 62 3 SETTING ITEMS USER 63 1 SETTING GENERAL FUNCTIONS 64 Setting the Auto Clear Mode 64 Changing the Display Langu...

Page 4: ...IONS 137 Setting the Scan to E mail Message Properties 137 Setting the Scan to E mail Fragmentation 138 8 SETTING INTERNET FAX FUNCTIONS 139 Setting the Internet Fax Message Properties 139 Setting the Internet Fax Fragmentation 140 Setting the Internet Fax Body String Transmission 141 9 SETTING LIST REPORT 142 Setting the Transmission Reception Journal 142 Setting the Communication Report 144 Sett...

Page 5: ...according to the following three levels of warning Before reading this Operator s Manual you should fully understand the meaning and importance of these signal words Warning Indicates a potentially hazardous situation which if not avoided could result in death serious injury or serious damage or fire in the equipment or surrounding assets Caution Indicates a potentially hazardous situation which i...

Page 6: ...y To send them via Fax optional FAX board is required To send them vial E mail optional printer scan ner kit or scanner kit is required Electronic sorting improves copying productivity Comes with rich editing functions such as trimming masking and mirror Loading the page memory and hard disk as standard equipment enables 2 in 1 4 in 1 Electronic sort ing and magazine sorting etc A fixing system th...

Page 7: ...About Managing Contacts in Address Book 6 Registering Contacts 7 Editing Contacts 10 Deleting Contacts 12 Searching Contacts 14 2 MANAGING GROUPS 18 About Managing Groups in Address Book 18 Creating New Group 19 Editing Groups 22 Deleting Groups 28 Searching Groups 30 ...

Page 8: ...mission type ECM Quality transmission Line select and subaddress settings You can register the E mail addresses in the Address Book however you can use them to specify the destinations for Scan to E mail or Internet Fax only when the Scanner Kit is installed or when the Printer Scanner Kit is installed You can register the fax numbers in the Address Book however you can use them to specify the des...

Page 9: ...Functions menu 2 Press the ADDRESS button and then press the ADDRESS BOOK button on the touch panel The ADDRESS BOOK screen is displayed 3 Press undefined button that you want to register new contact and press the ENTRY button The ADDRESS BOOK REGISTRATION screen is displayed If the touch panel does not display an undefined contact press the Next button to display the next screen ...

Page 10: ...ontact E MAIL Enter the E mail address of the contact CORP Enter the company name of the contact DEPT Enter the department name of the contact KEYWORD Enter the keyword of the contact This keyword can be used to search for this contact You must at least enter either the FIRST NAME or LAST NAME button and either the FAX NO or E MAIL button to register the contact When you press each button the inpu...

Page 11: ... the Quality TX or OFF button to disable the Quality TX LINE SELECT Select the line to be used for the fax transmission Press the LINE1 button to use the Line 1 or LINE2 button to use Line 2 The LINE2 button can be selected only when the optional 2nd line board is installed SUB Enter the mailbox number if you want to send originals to the mailbox in the remote fax SID Enter the password to input a...

Page 12: ...ess the ADDRESS button and then press the ADDRESS BOOK button on the touch panel The ADDRESS BOOK screen is displayed 3 Press the contact that you want to edit and press the EDIT button The ADDRESS BOOK EDIT screen is displayed If the touch panel does not display the contact that you want to edit press the Next button to display the next screen You can quickly search for the contact that you want ...

Page 13: ...he OPTION button to specify the default settings for a fax transmission This is available only when the optional fax unit is installed 6 Specify the items as you required For the description of each item see the Step 6 in the procedure of Registering Contacts in the previous sec tion 7 Press the ENTER button to save option settings 8 Press the ENTER button to save the contact The contact is edited...

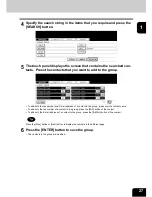
Page 14: ... the control panel to enter the User Functions menu 2 Press the ADDRESS button and then press the ADDRESS BOOK button on the touch panel The ADDRESS BOOK screen is displayed 3 Press the contact that you want to delete and press the DELETE but ton The delete confirmation screen is displayed If the touch panel does not display the contact that you want to delete press the Next button to display the ...

Page 15: ...13 1 4 Press the YES button to delete the contact or the NO button to cancel deleting When you press the YES button the selected contact is deleted ...

Page 16: ...search for the contacts by entering an ID number or the search strings Searching a Contact by ID Number 1 Press the USER FUNCTIONS button on the control panel to enter the User Functions menu 2 Press the ADDRESS button and then press the ADDRESS BOOK button on the touch panel The ADDRESS BOOK screen is displayed 3 Press the KNOWN ID button The KNOWN ID screen is displayed 4 Enter the ID Number usi...

Page 17: ...ntact See Editing Contacts for the instruction to edit the contact P 10 Searching Contacts by Entering Search String 1 Press the USER FUNCTIONS button on the control panel to enter the User Functions menu 2 Press the ADDRESS button and then press the ADDRESS BOOK button on the touch panel The ADDRESS BOOK screen is displayed 3 Press the SEARCH ADDRESS button The SEARCH ADDRESS screen is displayed ...

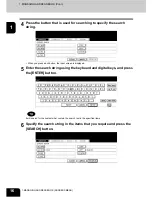
Page 18: ...e search string When you press each button the input screen is displayed 5 Enter the search string using the keyboard and digital keys and press the ENTER button It will search for the contacts that contain the search text in the specified items 6 Specify the search string in the items that you require and press the SEARCH button ...

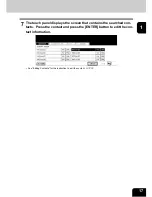
Page 19: ...touch panel displays the screen that contains the searched con tacts Press the contact and press the ENTER button to edit the con tact information See Editing Contacts for the instruction to edit the contact P 10 ...

Page 20: ...s one destination If you select the contact that contains both fax number and E mail address it results in two destinations in the group You can register the E mail addresses in the Groups however you can use them to specify the desti nations for Scan to E mail or Internet Fax only when the Scanner Kit is installed or when the Printer Scanner Kit is installed You can register the fax numbers in th...

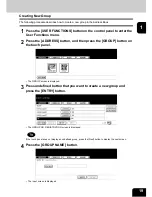
Page 21: ...s the ADDRESS button and then press the GROUP button on the touch panel The GROUP screen is displayed 3 Press undefined button that you want to create a new group and press the ENTRY button The GROUP NO REGISTRATION screen is displayed If the touch panel does not display an undefined group press the Next button to display the next screen 4 Press the GROUP NAME button The input screen is displayed ...

Page 22: ...yed 7 Select the contacts that you want to add to the group and then press the ENTER button To add or remove the contacts by selecting each contacts manually see Adding or Removing Contacts P 24 To add the contacts by searching them with the ID number see Adding Contacts by Searching with ID Num ber P 25 To add the contacts by searching them with search string see Adding Contacts by Searching with...

Page 23: ...21 1 8 New Group is created and appears on the touch panel ...

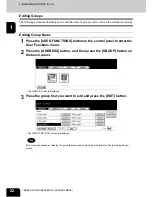
Page 24: ... the USER FUNCTIONS button on the control panel to enter the User Functions menu 2 Press the ADDRESS button and then press the GROUP button on the touch panel The GROUP screen is displayed 3 Press the group that you want to edit and press the EDIT button The GROUP NO EDIT screen is displayed If the touch panel does not display the group that you want to edit press the Next button to display the ne...

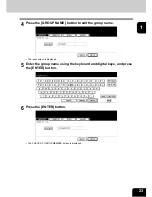
Page 25: ...P NAME button to edit the group name The input screen is displayed 5 Enter the group name using the keyboard and digital keys and press the ENTER button 6 Press the ENTER button The CHECK OF GROUP MEMBER screen is displayed ...

Page 26: ...press the ENTER key to save the set tings Adding or Removing Contacts 1 Press the contacts that are not highlighted to add to the group or press the highlighted contacts to remove from the group To add both the fax number and E mail address of a contact to the group press over the contact name To add only the fax number of a contact to the group press the FAX button of the contact To add only the ...

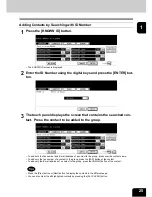
Page 27: ...t to be added to the group To add both the fax number and E mail address of a contact to the group press over the contact name To add only the fax number of a contact to the group press the FAX button of the contact To add only the E mail address of a contact to the group press the E MAIL button of the contact Press the Prev button or Next button to display the contacts in the different page You c...

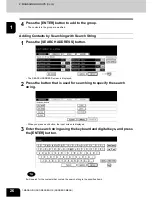
Page 28: ...ch String 1 Press the SEARCH ADDRESS button The SEARCH ADDRESS screen is displayed 2 Press the button that is used for searching to specify the search string When you press each button the input screen is displayed 3 Enter the search string using the keyboard and digital keys and press the ENTER button It will search for the contacts that contain the search string in the specified items ...

Page 29: ...e fax number and E mail address of a contact to the group press over the contact name To add only the fax number of a contact to the group press the FAX button of the contact To add only the E mail address of a contact to the group press the E MAIL button of the contact Press the Prev button or Next button to display the contacts in the different page 6 Press the ENTER button to save the group The...

Page 30: ...n the control panel to enter the User Functions menu 2 Press the ADDRESS button and then press the GROUP button on the touch panel The GROUP screen is displayed 3 Press the group that you want to delete and press the DELETE but ton The delete confirmation screen is displayed If the touch panel does not display the group that you want to delete press the Next button to display the next screen ...

Page 31: ...29 1 4 Press the YES button to delete the contact or NO button to cancel deleting When you press the YES button the selected group is deleted ...

Page 32: ...can search for the groups by entering the ID number or the search string Searching a Group by ID Number 1 Press the USER FUNCTIONS button on the control panel to enter the User Functions menu 2 Press the ADDRESS button and then press the GROUP button on the touch panel The GROUP screen is displayed 3 Press the KNOWN ID button The KNOWN ID screen is displayed 4 Enter the ID Number using the digital...

Page 33: ...Editing Groups for the instruction to edit the group P 22 Searching Groups by Group Name 1 Press the USER FUNCTIONS button on the control panel to enter the User Functions menu 2 Press the ADDRESS button and then press the GROUP button on the touch panel The GROUP screen is displayed 3 Press the SEARCH GROUP button The SEARCH GROUP screen is displayed ...

Page 34: ... GROUP NAME button to specify the search string The input screen is displayed 5 Enter the search string using the keyboard and digital keys and press the ENTER button It will search for the groups that contain the search string in the group name field 6 Press the SEARCH button ...

Page 35: ... The touch panel displays the screen that contains the searched groups Press the group and press the ENTER button to edit the group information See Editing Groups for the instruction to edit the contact P 22 ...

Page 36: ...ontacts that are added in the group 1 Press the USER FUNCTIONS button on the control panel to enter the User Functions menu 2 Press the ADDRESS button and then press the GROUP button on the touch panel The GROUP screen is displayed 3 Press the CONTENTS button of the group that you want to confirm the members 4 The contacts added to the group are displayed ...

Page 37: ...Code 41 Displaying Fax Communication Counter for Department Code 43 4 MANAGING DEPARTMENT CODE 45 Logging On As Administrator 45 Printing Department Codes List 47 Enabling Department Code 48 Resetting All Department Counters 49 Deleting All Department Codes 50 Registering a New Department Code 51 Editing the Department Code 54 Deleting the Department Code 58 Resetting the Counter of Each Departmen...

Page 38: ... by fax receptions Printer Counter indicates the number of sheets that have been printed by print operations and E mail receptions Internet Fax receptions List Counter indicates the number of sheets that have been printed by system page print opera tions 1 Press the USER FUNCTIONS button on the control panel to enter the User Functions menu 2 Press the COUNTER button and then press the TOTAL COUNT...

Page 39: ...mber of originals that has been scanned by fax and Internet Fax trans missions Network Counter indicates the number of originals that has been scanned by scan operations 1 Press the USER FUNCTIONS button on the control panel to enter the User Functions menu 2 Press the COUNTER button and then press the TOTAL COUNTER button on the touch panel The TOTAL COUNTER menu is displayed 3 Press the SCAN COU...

Page 40: ... counter list 1 Press the USER FUNCTIONS button on the control panel to enter the User Functions menu 2 Press the COUNTER button and then press the PRINT OUT TOTAL COUNTER button on the touch panel The total counter list is printed For an output example of the total counter list see Total Counter List P 154 ...

Page 41: ...printed by copy operations Fax Counter indicates the number of sheets that has been printed by polling operations Printer Counter indicates the number of sheets that has been printed by print operations List Counter indicates the number of sheets that has been printed by system page print operations 1 Press the USER FUNCTIONS button on the control panel to enter the User Functions menu 2 Press the...

Page 42: ...40 2 MANAGING COUNTERS COUNTER MENU 3 DEPARTMENT COUNTER Cont 2 4 Press the PRINT COUNTER button 5 The Print Counter for the specified department code is displayed ...

Page 43: ...of originals that has been scanned by copy operations Fax Counter indicates the number of originals that has been scanned by fax and Internet Fax trans missions Network Counter indicates the number of originals that has been scanned by scan operations 1 Press the USER FUNCTIONS button on the control panel to enter the User Functions menu 2 Press the COUNTER button and then press the DEPARTMENT COU...

Page 44: ...42 2 MANAGING COUNTERS COUNTER MENU 3 DEPARTMENT COUNTER Cont 2 4 Press the SCAN COUNTER button 5 The Scan Counter for the specified department code is displayed ...

Page 45: ...ENT CODE The fax communication counter contains following counters Transmit indicates the number of pages that are sent by Fax transmissions Reception indicates the number of pages that are received by polling operations 1 Press the USER FUNCTIONS button on the control panel to enter the User Functions menu 2 Press the COUNTER button and then press the DEPARTMENT COUNTER button on the touch panel ...

Page 46: ...44 2 MANAGING COUNTERS COUNTER MENU 3 DEPARTMENT COUNTER Cont 2 4 Press the FAX COMMUNICATION button 5 The Fax Communication Counter for the specified department code is displayed ...

Page 47: ...ormed by an authorized administrator in your place If the User Management Setting is enabled and you login with the user name that has the Account Man ager privilege you do not have to enter the administrator password to display the DEPARTMENT MAN AGEMENT menu 1 Press the USER FUNCTIONS button on the control panel to enter the User Functions menu 2 Press the COUNTER button and then press the DEPAR...

Page 48: ...tinue the operation that you want P 47 Printing Department Codes List P 48 Enabling Department Code P 49 Resetting All Department Counters P 50 Deleting All Department Codes P 51 Registering a New Department Code P 54 Editing the Department Code P 58 Deleting the Department Code P 60 Resetting the Counter of Each Department P 62 Setting Output Limitations for All Departments ...

Page 49: ...ounters for each department code 1 In the DEPT MANAGEMENT menu press the PRINT OUT DEPARTMENT CODES button Printing begins For the procedure to display the screen above see Logging On As Administrator P 45 For an output example of the department code list see Department Code List P 155 ...

Page 50: ...istering a New Department Code Using Printer Utility you can also configure the Department Code Enforcement setting that sets whether the invalid jobs which a department code is not specified or invalid department code is speci fied will be printed or stored in the invalid job list when the department management is enabled For instructions on how to set the Department Code Enforcement see Printer ...

Page 51: ...s function clears only the department counters You cannot clear the total counter 1 In the DEPT MANAGEMENT menu press the RESET ALL COUNTERS button The clear confirmation screen is displayed For the procedure to display the screen above see Logging On As Administrator P 45 2 Press the YES button to clear all department counters or NO button to cancel clearing ...

Page 52: ...ETE ALL button will be available after registering a department code P 51 Registering a New Department Code 1 In the DEPT MANAGEMENT menu press the DELETE ALL button The delete confirmation screen is displayed For the procedure to display the screen above see Logging On As Administrator P 45 2 Press the YES button to delete all department codes or NO button to cancel deleting ...

Page 53: ...ode 1 In the DEPT MANAGEMENT menu press the DEPARTMENT REGISTRATION button The DEPARTMENT CODE screen is displayed For the procedure to display the screen above see Logging On As Administrator P 45 2 Press the undefined department code and press the CHANGE button The input screen is displayed If the touch panel does not display an undefined department code press the Next button to display the next...

Page 54: ...he code asterisks appear in the New Code field If you want to clear the code to retype it press the CLEAR button on the Control Panel After pressing the SET button the Retype New Code field is highlighted The department code must be the 5 digit code except 00000 5 Enter the 5 digit code again in the Retype New Code field using the digital keys and then press the SET button to set the entry If you ...

Page 55: ... the output limitation for this department code When you select the ON but ton press the Limitation field and enter the maximum number of the outputs for this department code using the digital keys You can enter up to 99999999 If you do not set the output limitation for outputs press the OFF button If you enter 0 for the limitation it will disable printing any copies or prints using this departmen...

Page 56: ... The DEPARTMENT CODE screen is displayed For the procedure to display the screen above see Logging On As Administrator P 45 2 Press the department button that you want to edit and press the CHANGE button The message This department code is already registered Do you wish to replace this code is displayed If the touch panel does not display the department code that you want to edit press the Next bu...

Page 57: ...NT CODE screen is displayed 5 Enter current department code in the Current Code field using the digital keys and then press the SET button to set the entry If you enter the code asterisks appear in the Current Code field If you want to clear the code to retype it press the CLEAR button on the Control Panel After pressing the SET button the New Code field is highlighted ...

Page 58: ...rtment code must be the 5 digit code except 00000 If you want to return to the Current Code field to retype it press the RESET button 7 Enter new 5 digit code again in the Retype New Code field using the digital keys and then press the SET button to set the entry If you enter the code asterisks appear in the Retype New Code field If you want to clear the code to retype it press the CLEAR button on...

Page 59: ... the Limitation field and enter the maximum number of the outputs for this department code using the digital keys You can enter up to 99999999 If you do not set the output limitation for outputs press the OFF button If you enter 0 for the limitation it will disable printing any copies or prints using this department code 10Press the ENTER button The department code is edited ...

Page 60: ...PARTMENT REGISTRATION button The DEPARTMENT CODE screen is displayed For the procedure to display the screen above see Logging On As Administrator P 45 2 Press the department button that you want to delete and press the DELETE button The delete confirmation screen is displayed If the touch panel does not display the department code that you want to delete press the Next button to display the next ...

Page 61: ...59 2 3 Press the YES button to delete the department code or NO button to cancel deleting When you press the YES button the department code is deleted ...

Page 62: ...RTMENT REGISTRATION button The DEPARTMENT CODE screen is displayed For the procedure to display the screen above see Logging On As Administrator P 45 2 Press the department button that you want to reset the counter and press the RESET COUNTERS button The clear confirmation screen is displayed If the touch panel does not display the department code that you want to clear the counter press the Next ...

Page 63: ...61 2 3 Press the YES button to clear the counter of the department code or NO button to cancel clearing the counter When you press the YES button the counter of the department code is cleared ...

Page 64: ...d will be set to 0 If you want to change the limitation setting for each department code change the limitation setting by editing a department code P 54 Editing the Department Code 1 In the DEPT MANAGEMENT menu press the ALL LIMIT button The ALL LIMIT screen is displayed For the procedure to display the screen above see Logging On As Administrator P 45 2 Press the ON button to disable the copies p...

Page 65: ...5 Setting the Reversed Display Mode 66 2 SETTING COPY FUNCTIONS 68 3 SETTING FAX FUNCTIONS 69 4 SETTING SCAN FUNCTIONS 71 5 PRINTING LISTS 73 Printing the Address Book List 73 Printing the Group Numbers List 74 Printing the Function List User 75 6 CHECKING E MAIL 76 7 SETTING DRAWER 77 8 TURN OFF THE POWER SHUT DOWN 78 ...

Page 66: ...button and then press the GENERAL button on the touch panel The GENERAL menu is displayed 3 Press the AUTO CLEAR button The AUTO CLEAR screen is displayed 4 Press the button that indicates the desired time in seconds The Auto Clear mode has been set to selected time If you want to disable the Auto Clear mode press the NO LIMIT button Even if the NO LIMIT button is selected the screen will be clear...

Page 67: ... button on the control panel to enter the User Functions menu 2 Press the USER button and then press the GENERAL button on the touch panel The GENERAL menu is displayed 3 Press the CHANGE LANGUAGE button The CHANGE LANGUAGE screen is displayed 4 Press the desired language button The touch panel is displayed in the selected language ...

Page 68: ...rtion will be white Changing to the Reversed Display mode helps you to display the touch panel more clearly where it is too bright to see the touch panel 1 Press the USER FUNCTIONS button on the control panel to enter the User Functions menu 2 Press the USER button and then press the GENERAL button on the touch panel The GENERAL menu is displayed 3 Press the REVERSED DISPLAY button The REVERSED DI...

Page 69: ...67 3 4 Press the ON button to enable the Reversed Display or OFF button to disable the Reversed Display When you select the ON button the touch panel is displayed in the Reversed Display mode ...

Page 70: ...n press the desired mode button In the IMAGE DIRECTION option press the desired mode button When this is enabled the portrait originals that are placed in R direction can be detected as portrait original and perform the duplex copy correctly This is usually enabled only when you want to perform duplex copy from the large size of portrait originals such as A3 or LD size portrait originals In the BY...

Page 71: ...ODE option press the desired mode button In the EXPOSURE option press light or dark buttons to specify the default exposure manually or press the AUTO button to select auto mode for the default exposure mode In the TX TYPE option press the desired mode button MEMORY TX Press this to set the Memory TX mode as default transmission mode that will send after scanning and saving all originals in the me...

Page 72: ...int a reception header RTI on received faxes to clearly identify the time date and page count of received faxes OFF Press this not to print a reception header RTI on received faxes In the ECM option specify whether the ECM is enabled or disabled as default setting ON Press this to enable the ECM Error Correction Mode to automatically re send any portion of the doc ument affected by phone line nois...

Page 73: ...e In the SINGLE 2 SIDE SCAN option press the desired mode button SINGLE Press this to set single page scan as default scan mode BOOK Press this to set book scan mode as default scan mode This enables to scan both side of originals in the same direction TABLET Press this to set tablet scan mode as default scan mode This enables to scan front page in the general direction and scan back page rotated ...

Page 74: ...s you require In the EXPOSURE option press light or dark buttons to specify the default exposure for scans manually or press the AUTO button to select auto mode for the default exposure mode for scans 6 Press the ENTER button The default settings for each mode are changed as you specified ...

Page 75: ...3 Press the ADDRESS BOOK button The ADDRESS BOOK menu is displayed 4 Press the ID SORT button to print it as sorted by the ID number or NAME SORT button to print it as sorted by the last name When the department management is disabled the address book list is printed When the department management is enabled the screen to input the department code is displayed Enter the department code using the d...

Page 76: ...e USER button and then press the LIST button on the touch panel The LIST menu is displayed 3 Press the GROUP NUMBERS button When the department management is disabled the group numbers list is printed When the department management is enabled the screen to input the department code is displayed Enter the department code using the digital keys and press the ENTER button to print the group numbers l...

Page 77: ...tton and then press the LIST button on the touch panel The LIST menu is displayed 3 Press the FUNCTION button When the department management is disabled the function list is printed When the department management is enabled the screen to input the department code is displayed Enter the department code using the digital keys and press the ENTER button to print the function list For an output exampl...

Page 78: ...rver 1 Press the USER FUNCTIONS button on the control panel to enter the User Functions menu 2 Press the USER button and then press the CHECK E MAIL button on the touch panel This equipment starts communicating to the POP3 server If new E mail to this machine is on the POP3 server it will be automatically printed after retrieving the E mail data from the POP3 server If new E mail of the Offramp Ga...

Page 79: ...r the User Functions menu 2 Press the USER button and then press the DRAWER button on the touch panel 3 Press the drawer portion in the illustration to highlight the drawer where you want to change the paper size and paper type then press the desired paper size button and paper type button The paper size in the selected drawer changes to the selected paper size ...

Page 80: ...be sure that the following 3 conditions are satisfied No jobs are left in the printing job list The ERROR lamp is not blinking No PCs access the equipment via network 1 Press the USER FUNCTIONS button on the control panel to enter the User Functions menu 2 Press the USER button and then press the SHUTDOWN button on the touch panel 3 Processing job will be deleted Are you sure you want to shutdown ...

Page 81: ...79 3 4 Shutdown in progress appears on the screen and then the equip ment is shut down The power switch automatically returns to the OFF position ...

Page 82: ...3 80 3 SETTING ITEMS USER ...

Page 83: ...P and SNMP Network Service 118 4 SETTING COPY FUNCTIONS 120 5 SETTING FAX FUNCTIONS 122 Setting the Terminal ID 122 Setting the Fax Initial Setup 125 Setting the Line 2 Mode 127 Setting the RX Printing 130 Setting the Recovery Transmission 134 6 SETTING FILE FUNCTIONS 136 7 SETTING E MAIL FUNCTIONS 137 Setting the Scan to E mail Message Properties 137 Setting the Scan to E mail Fragmentation 138 8...

Page 84: ...N button The ADMINISTRATOR PASSWORD screen is displayed 3 Press the PASSWORD button The input screen is displayed 4 Enter the administrator password and press the ENTER button The ADMIN menu is displayed If the administrator password has not been changed before enter the default administrator password 123456 If you enter the incorrect password continuously three times the equipment cannot be opera...

Page 85: ... PRINTING LISTS There is also the WIRELESS SETTINGS button in the ADMIN menu This button will be available only when the optional Wireless LAN Module is installed For the instructions on how to operate the WIRELESS SET TINGS please refer to the cm4530300 Operator s Manual for Wireless LAN There is also the Bluetooth SETTINGS button in the ADMIN menu This button will be available only when the opti...

Page 86: ...ed To display the ADMIN menu see 1 ENTERING TO ADMIN MENU P 82 2 Press the DEVICE INFORMATION button The DEVICE INFORMATION screen is displayed 3 Press each button on the touch panel to enter following items LOCATION Press this button to enter the location where this device is located SERVICE PHONE NUMBER Press this button to enter the service call number CONTACT INFORMATION Press this button to e...

Page 87: ...n the input screen is displayed Enter the value using the keyboard and digital keys and press the ENTER button to set the entry To enter the SERVICE PHONE NUMBER enter the number using only the digital keys 4 Press the ENTER button ...

Page 88: ... events that you want to be notified using the Printer Utility web utility For instruc tions on how to specify the events for the notification please refer to Printer Utility Guide To enable this function there must be a SMTP server in your network In addition the settings to enable the Internet Fax transmission on this equipment must be configured correctly 1 Press the GENERAL button in the ADMIN...

Page 89: ...otification message will be sent as required When you enable the notification you must enter at least one E mail address 5 After entering the E mail addresses that you require press the ON button of the E mail address that you want to enable the notification To disable the notification for an E mail address press the OFF button You can select only the ON button of which an E mail address is entere...

Page 90: ...istrator password must be alphanumeric charac ters of 6 or more and 10 or less 1 Press the GENERAL button in the ADMIN menu The GENERAL menu is displayed To display the ADMIN menu see 1 ENTERING TO ADMIN MENU P 82 2 Press the PASSWORD SETUP button The PASSWORD SETUP screen is displayed 3 Press the OLD PASSWORD button The input screen is displayed ...

Page 91: ...ield 5 Same as OLD PASSWORD press the NEW PASSWORD and RETYPE NEW PASSWORD buttons and enter the new password You can enter alphanumeric characters of 6 or more and 10 or less for the administrator s password You can not enter any symbol characters You cannot leave these fields blank to set no administrator password You must set the administrator password 6 Press the ENTER button at the bottom of ...

Page 92: ...hange the clock to and from the daylight saving system at the touch of a button 1 Press the GENERAL button in the ADMIN menu The GENERAL menu is displayed To display the ADMIN menu see 1 ENTERING TO ADMIN MENU P 82 2 Press the CLOCK button The CLOCK menu is displayed 3 Press the DATE TIME button If you want to change the date format only skip to step 10 When you press the DATE TIME button the DATE...

Page 93: ...a number The numbers corresponding to the days of week as following 1 Sun 2 Mon 3 Tue 4 Wed 5 Thu 6 Fri 7 Sat 5 To enable the daylight saving system press the button The daylight saving button is highlighted 6 Press the ENTER button Returns you to the CLOCK menu 7 Press the DATE FORMAT button The DATE FORMAT screen is displayed 8 Press the desired date format button ...

Page 94: ... those specified times You can turn on the power simply pressing the START button on the control panel when the device is OFF mode by the weekly timer If you leave the device for a while after the latest operation it will automat ically return to OFF mode again by the weekly timer When the power switch is turned off the weekly timer does not work 1 Press the GENERAL button in the ADMIN menu The GE...

Page 95: ...button and complete the operation 5 Press the Sun or Sat buttons to switch the days of the week Then in the ON field enter the time that the device will automatically turn on the power using the digital keys and press the SET button to set the entry If you want to clear entered time to retype it press the CLEAR button on the Control Panel After pressing the SET button the OFF field will be highlig...

Page 96: ...y If you want to clear entered time to retype it press the CLEAR button on the Control Panel If you want to return to the OFF field to retype it press the RESET button If you want this equipment not to be turned ON enter the same time in both ON and OFF field If you want to disable the Weekly Timer enter 00 00 for the ON time and 24 00 for the OFF time 7 Press the ENTER button at the bottom of the...

Page 97: ...s cut off at standby if it is left inactive for a certain period of time 1 Press the GENERAL button in the ADMIN menu The GENERAL menu is displayed To display the ADMIN menu see 1 ENTERING TO ADMIN MENU P 82 2 Press the ENERGY SAVER button The ENERGY SAVER menu is displayed 3 Press the AUTO POWER SAVE button The AUTO POWER SAVE screen is displayed ...

Page 98: ...ITEMS ADMIN 2 SETTING GENERAL FUNCTIONS Cont 4 4 Press the desired period of time in minutes that this equipment waits before the Automatic Power Save mode is activated The Auto Power Save mode setting is completed ...

Page 99: ...nds by with the mini mum power consumption 1 Press the GENERAL button in the ADMIN menu The GENERAL menu is displayed To display the ADMIN menu see 1 ENTERING TO ADMIN MENU P 82 2 Press the ENERGY SAVER button The ENERGY SAVER menu is displayed 3 Press the SLEEP AUTO SHUT OFF button The SLEEP AUTO SHUT OFF screen is displayed ...

Page 100: ...TEMS ADMIN 2 SETTING GENERAL FUNCTIONS Cont 4 4 Press the desired period of time in minutes that this equipment waits before the Sleep Auto Shut Off Mode is activated The Sleep Auto Shut Off Mode setting is completed ...

Page 101: ...e you open the drawer 1 Press the GENERAL button The GENERAL menu is displayed To display the ADMIN menu see 1 ENTERING TO ADMIN MENU P 82 2 Press the DRAWER SET POP UP button The DRAWER SET POP UP screen is displayed 3 Press the ENALBE button to enable the Drawer Set Pop Up or press the DISABLE button to disable the Drawer Set Pop Up ...

Page 102: ...erver if the network supports the DHCP If the network does not support the DHCP this equipment will assign the appropriate IP address using the Auto IP addressing P 100 Setting the TCP IP for Auto IP and DHCP Server When you assign the TCP IP using the DHCP server only If your local area network has been configured with the DHCP server and you do not want to enable the Auto IP addressing you can s...

Page 103: ...ss the DYNAMIC button in the ADDRESS MODE option 4 Press the ENTER button Returns you to the NETWORK menu 5 Continue to another network setting if required then press the APPLY NOW button This equipment starts initializing the network interface card to apply the changes ...

Page 104: ... Press the NETWORK button in the ADMIN menu The NETWORK menu is displayed To display the ADMIN menu see 1 ENTERING TO ADMIN MENU P 82 2 Press the TCP IP button The TCP IP screen is displayed 3 Press the NO AUTO IP button in the ADDRESS MODE option 4 Press the ENTER button Returns you to the NETWORK menu ...

Page 105: ...t starts initializing the network interface card to apply the changes Setting the TCP IP for Static IP Address 1 Press the NETWORK button in the ADMIN menu The NETWORK menu is displayed To display the ADMIN menu see 1 ENTERING TO ADMIN MENU P 82 2 Press the TCP IP button The TCP IP screen is displayed ...

Page 106: ... and enter the IP address of this device using the digital keys Enter also the subnet mask and default gateway as required 5 Press the ENTER button Returns you to the NETWORK menu 6 Continue to another network setting if required then press the APPLY NOW button This equipment starts initializing the network interface card to apply the changes ...

Page 107: ...ING TO ADMIN MENU P 82 2 Press the IPX SPX button The IPX SPX screen is displayed 3 Specify the following items as required ENABLE IPX SPX Press the ENABLE button to enable the IPX SPX protocol or DISABLE button to dis able the IPX SPX protocol FRAME TYPE Press the AUTO button to automatically detect the appropriate frame type or press other specific frame type button If you do not know the frame ...

Page 108: ...G ITEMS ADMIN 3 SETTING NETWORK FUNCTIONS Cont 4 5 Continue to another network setting if required then press the APPLY NOW button This equipment starts initializing the network interface card to apply the changes ...

Page 109: ...iguration to be connected This must be set when you use the NetWare file server for Novell printing 1 Press the NETWORK button in the ADMIN menu The NETWORK menu is displayed To display the ADMIN menu see 1 ENTERING TO ADMIN MENU P 82 2 Press the NETWARE button The NETWARE screen is displayed ...

Page 110: ...t the NetWare file server in NDS mode TREE Press this to enter the NDS tree This must be entered when you connect the NetWare file server in NDS mode SEARCH ROOT Press this to enter the NetWare file server name It is recommended to enter this when you connect the NetWare file server in bindery mode When you press each button the input screen is displayed Enter the value using the keyboard and digi...

Page 111: ...o allow the SMB communication across the segments you must specify the WINS server address so that this equipment will be visible from the different segment This must be enabled for SMB printing Save as file to the network folder using SMB and sharing the FILE_SHARE folder that is the local folder of this equipment in the network 1 Press the NETWORK button in the ADMIN menu The NETWORK menu is dis...

Page 112: ...Y Press this button and enter the IP address of the secondary WINS server using the digital keys if required When you press the NetBIOS NAME button the input screen is displayed Enter the value using the keyboard and digital keys and press the ENTER button to set the entry If this equipment is configured to logon the domain in the SMB Session of Printer Utility administrator mode but workgroup is ...

Page 113: ...111 4 4 Continue to another network setting if required then press the APPLY NOW button This equipment starts initializing the network interface card to apply the changes ...

Page 114: ... ADMIN menu see 1 ENTERING TO ADMIN MENU P 82 2 Press the APPLETALK button The APPLETALK screen is displayed 3 Specify following items as required ENABLE APPLETALK Press the ENABLE button to enable the AppleTalk or DISABLE button to disable the AppleTalk DEVICE NAME Press this to enter the AppleTalk name of this equipment DESIRED ZONE Press this to enter the AppleTalk zone name this equipment join...

Page 115: ...value using the keyboard and digital keys and press the ENTER button to set the entry 4 Press the ENTER button Returns you to the NETWORK menu 5 Continue to another network setting if required then press the APPLY NOW button This equipment starts initializing the network interface card to apply the changes ...

Page 116: ...ervice that provides the web based utility on this equipment such as Printer Utility and e Filing web utility The HTTP network server service also must be enabled for IPP printing 1 Press the NETWORK button in the ADMIN menu The NETWORK menu is displayed To display the ADMIN menu see 1 ENTERING TO ADMIN MENU P 82 2 Press the HTTP button The HTTP screen is displayed ...

Page 117: ...80 if you are not sure changing this port number ENABLE SSL Press the ENABLE button to enable the SSL for accessing the administration pages in Printer Utility and e Filing web utility or DISABLE button to disable the SSL for accessing the administration pages in Printer Utility and e Filing web utility When this is enabled the data transferred between the equip ment and client computers will be e...

Page 118: ... TO ADMIN MENU P 82 2 Press the ETHERNET button The ETHERNET screen is displayed 3 Press the AUTO button to automatically detect the appropriate eth ernet speed or press other specific ethernet speed button When you select a specific ethernet speed you must select the same ethernet speed as set in the connected network If you do not know the ethernet speed that must be used select the AUTO button ...

Page 119: ... the ENTER button Returns you to the NETWORK menu 5 Continue to another network setting if required then press the APPLY NOW button This equipment starts initializing the network interface card to apply the changes ...

Page 120: ...tory service and then this equipment can search for the contacts in the LDAP server To add the LDAP directory service you must operate using Printer Utility For more information about registering the directory service please see the Printer Utility Guide When the LDAP network service is disabled it is not possible to obtain the user s e mail address as From Address from the LDAP server during the ...

Page 121: ...essing the SNMP READ COM MUNITY button When you press this button the QWERTY Type Keyboard screen is displayed Enter the value using the key board and digital keys and press the ENTER button to set the entry 5 Press the ENTER button Returns you to the NETWORK menu 6 Continue to another network setting if required then press the APPLY NOW button This equipment starts initializing the network interf...

Page 122: ...g inals are set in the Automatic Document Feeder When the OFF button is selected the initial setting of the 2 Sided mode will be 1 1 SIMPLEX when originals are set in the Automatic Document Feeder When the 1 2 button is selected the initial setting of the 2 Sided mode will be 1 2 DUPLEX when origi nals are set in the Automatic Document Feeder When the 2 2 button is selected the initial setting of ...

Page 123: ...IRECTION When this is set to ON this equipment will rotate the image and print on the different direction of paper if the correct direction of paper is not set When this is set to OFF this equipment will display a message to set the correct paper SUSPEND PRINTING IF STAPLER EMPTY When this is set to ON this equipment quit the job with sta pling when the stapler empty occurs When this is set to OFF...

Page 124: ...ormation is sent and printed about 5 mm from the top edge of the original In compliance with FCC regulations your company s name facsimile telephone number and date time are added at the top of all transmitted documents This feature enables remote parties to easily identify your documents and the time of transmission 1 Press the FAX button in the ADMIN menu The FAX menu is displayed To display the...

Page 125: ...yed Enter the name using the keyboard and digital keys and press the ENTER button to set the entry When you press the FAX NUMBER or LINE2 NUMBER button the message to ask you whether adding the international code is displayed Press the YES button if you want to add the international code or the NO button if you do not want to add the international code When you press the YES button the input scree...

Page 126: ...124 4 SETTING ITEMS ADMIN 5 SETTING FAX FUNCTIONS Cont 4 4 Press the ENTER button Returns you to the FAX menu ...

Page 127: ...completion tone is the ringer tone which is heard when original printing has been completed It can be heard when all originals have been printed out Dial type Line 1 Line 2 DP MF not available for the European version There are two types of telephone lines Dial pulse lines DP and multi frequency lines MF Change the telephone line setting to match the type of the line you are using for example when...

Page 128: ...e When the User Management Setting is enabled only the AUTO button can be selected for the RX MODE option 4 Press the Next button to display the next screen 5 Specify following items as required DIAL TYPE Press the MF button to select the Multi frequency mode or DP button to select the Dial Pulse mode for the line 1 DIAL TYPE LINE2 Press the MF button to select the Multi frequency mode or DP butto...

Page 129: ...n the LINE SELECT when you register remote fax numbers into the address If you want the 2nd line to have priority in the initial setting ask your service technician When the optional 2nd line board is installed its operation can be selected from the following Transmission Reception Both transmission and reception are available all the time Reception only 24 hours The 2nd line is always standing by...

Page 130: ...e procedure depending on how you set the Line 2 mode P 128 Transmission and Reception TX RX P 128 Reception Only 24HR P 129 Reception Only TIMER Transmission and Reception TX RX 1 Press the TX RX button 2 Press the ENTER button Reception Only 24HR 1 Press the RX ONLY 24HR button Making the 2nd line standby for the reception all the time ...

Page 131: ...ss the RX ONLY TIMER button Using the 2nd line for reception only during the specified period Enter the START time and END time using the digital keys Pressing the arrow buttons moves the cursor Time is displayed in the 24 hour system 2 Press the ENTER button ...

Page 132: ...its length exceeds the paper printing area For detail of DISCARD setting contact your service technician RX Reduction Printing ON OFF ON default setting If the received original is longer than the recording paper it will be vertically reduced to 90 to fit on the recording paper OFF The received original is printed on two sheets of paper if its length exceeds the paper printing area Only drawers ca...

Page 133: ...it is installed This printer setting determines whether or not to print received originals on both sides of sheet Duplex printing is available only if the received originals are the same size When the system runs out of paper during duplex printing the rest of the documents is printed on both sides of another size of paper 1 Press the FAX button in the ADMIN menu The FAX menu is displayed To displ...

Page 134: ...ed original size Received LD LG LT A3 A4 or B4 sized originals are printed so that they can be bound alone the long edge of direction Received ST A5 or B5 sized originals are printed so that they can be bound alone the short edge of direction Setting the Rotate Sort The Rotate Sort function is available only when the optional Fax unit is installed The printer setting determines whether or not to o...

Page 135: ...t printing the rest of the documents is printed on the remaining paper 1 Press the FAX button in the ADMIN menu The FAX menu is displayed To display the ADMIN menu see 1 ENTERING TO ADMIN MENU P 82 2 Press the RX PRINT button 3 Press the ON button of the ROTATE SORT and then press the ENTER button The registered items can be confirmed in the function list P 149 ...

Page 136: ...ecify how long a document will be remained in the memory after failing the redial attempts You can retransmit the document held in the memory For instructions on how to send the recovery trans mission see the Operator s Manual For Facsimile Function 1 Press the FAX button in the ADMIN menu The FAX menu is displayed To display the ADMIN menu see 1 ENTERING TO ADMIN MENU P 82 2 Press the RECOVERY TX...

Page 137: ...he ENTER button The document holding time can be changed by the 1 hour When the Recovery transmission is enabled the RECOVERY TX button will be grayed icon You can disable the Recovery transmission by pressing the RECOVERY TX button again and the button turns to the normal icon ...

Page 138: ...button in the ADMIN menu The FILE menu is displayed To display the ADMIN menu see 1 ENTERING TO ADMIN MENU P 82 2 Press the ON button to enable the storage maintenance or OFF button to disable the storage maintenance When you press the ON button the Storage Maintenance field will be highlighted Continue to next step to enter the number of days When you press the OFF button skip to step 4 3 Press t...

Page 139: ...AIL screen is displayed To display the ADMIN menu see 1 ENTERING TO ADMIN MENU P 82 2 Press each button to enter the E mail properties FROM ADDRESS Press this to enter the E mail address of this equipment FROM NAME Press this to enter the identification name of this equipment BODY Press this to enter the body message You must enter the FROM ADDRESS button to enable Scan to E mail When you press ea...

Page 140: ...errors caused by the network traffic problems The E MAIL button in the ADMIN menu will be available only when the Scanner Kit is installed or when the Printer Scanner Kit is installed 1 Press the E MAIL button in the ADMIN menu The E MAIL screen is displayed To display the ADMIN menu see 1 ENTERING TO ADMIN MENU P 82 2 Press desired fragment size button and press the ENTER button Press the NONE bu...

Page 141: ...enu The INTERNET FAX screen is displayed To display the ADMIN menu see 1 ENTERING TO ADMIN MENU P 82 2 Press each button to enter the Internet Fax properties FROM ADDRESS Press this to enter the E mail address of this equipment FROM NAME Press this to enter the identification name of this equipment BODY Press this to enter the body message You must enter the FROM ADDRESS button to enable Internet ...

Page 142: ...used by the network traffic problems The INTERNET FAX button in the ADMIN menu will be available only when the Scanner Kit is installed or when the Printer Scanner Kit is installed 1 Press the INTERNET FAX button in the ADMIN menu The INTERNET FAX screen is displayed To display the ADMIN menu see 1 ENTERING TO ADMIN MENU P 82 2 Press desired fragment size button and press the ENTER button Press th...

Page 143: ... available only when the Scanner Kit is installed or when the Printer Scanner Kit is installed 1 Press the INTERNET FAX button in the ADMIN menu The INTERNET FAX screen is displayed To display the ADMIN menu see 1 ENTERING TO ADMIN MENU P 82 2 Press the ENABLE button to enable the body string transmission or DISABLE button to disable the body string transmission 3 Press the ENTER button ...

Page 144: ...and the number of transactions appears in the journal list The Transmission Reception Journal settings will be available only when the Printer Kit and Scanner Kit is installed when the Printer Scanner Kit is installed or when the optional Fax unit is installed 1 Press the LIST REPORT button in the ADMIN menu The LIST REPORT screen is displayed To display the ADMIN menu see 1 ENTERING TO ADMIN MENU...

Page 145: ...tomatically When you enable this the transmission and reception journals will be printed when specified numbers of trans missions are completed TX JOURNAL Press the number button to specify the number of transmissions will be printed on a trans mission journal RX JOURNAL Press the number button to specify the number of receptions will be printed on a reception journal 5 Press the ENTER button ...

Page 146: ... communication report for each transmission type separately The Communication Report setting will be available only when the Printer Kit and Scanner Kit is installed when the Printer Scanner Kit is installed or when the optional Fax unit is installed 1 Press the LIST REPORT button in the ADMIN menu The LIST REPORT screen is displayed To display the ADMIN menu see 1 ENTERING TO ADMIN MENU P 82 2 Pr...

Page 147: ...ss this to print the communication report only when an error occurs DIRECT TX and POLLING are available only when the optional Fax unit is installed 5 When you press the ALWAYS or ON ERROR button for MEMORY TX or MULTI TX the PRINT 1st PAGE IMAGE message is dis played Press the YES button to print the communication report with the first page image or press the NO button to print the com munication...

Page 148: ... only when the optional Fax unit is installed 7 When you press the ALWAYS or ON ERROR button for each trans mission type the PRINT 1st PAGE IMAGE message is displayed Press the YES button to print the communication report with the first page image or press the NO button to print the communication report without the page image Returns you to the COMM REPORT screen 8 Press the ENTER button ...

Page 149: ...smission from an originator as a relay hub Local Reserving a document to a mailbox within this equipment locally Remote Reserving a document to a mailbox within this equipment remotely from another facsimile 1 Press the LIST REPORT button in the ADMIN menu The LIST REPORT screen is displayed To display the ADMIN menu see 1 ENTERING TO ADMIN MENU P 82 2 Press the REPORT SETTING button The REPORT SE...

Page 150: ...print the reception list when receiving a relay transmission from an originator LOCAL Select the ON button to print the reception list when reserving a document to a mailbox within the machine locally REMOTE Select the ON button to print the reception list when receiving a document to a mailbox within the machine remotely from another facsimile 5 Press the ENTER button ...

Page 151: ... configuration page PS3 font list and PCL font list can be printed only when the Printer Kit the Printer Scanner Kit or optional Fax unit is installed 1 Press the LIST REPORT button in the ADMIN menu The LIST screen is displayed To display the ADMIN menu see 1 ENTERING TO ADMIN MENU P 82 2 Press the LIST button The LIST screen is displayed 3 Press the button that you want to print Selected list is...

Page 152: ... this equipment will feed the same size of paper from the different drawer if the specified drawer becomes empty PAPER OF DIFFERENT DIRECTION When the ON button is selected this equipment will feed the same size of paper that is set in a different direction if the specified drawer becomes empty SUSPEND PRINTING IF STAPLER EMPTY Select the ON button to enable suspending printing if stapler empty oc...

Page 153: ...d For the instructions on how to operate the WIRELESS SETTINGS please refer to the cm4530300 Operator s Manual for Wireless LAN There is also the Bluetooth SETTINGS button in the ADMIN menu This button will be available only when the optional Bluetooth Module is installed For the instructions on how to operate the Bluetooth SETTINGS please refer to the cm4530310 Operator s Manual for Bluetooth ...

Page 154: ...4 152 4 SETTING ITEMS ADMIN ...

Page 155: ...DIX 1 LIST PRINT FORMAT 154 Total Counter List 154 Department Code List 155 Address Book List 156 Function List User 158 NIC Configuration Page 159 Function List Administrator 160 PS3 Font List 175 PCL Font List 176 ...

Page 156: ...l Counter List TOTAL COUNTER LIST TIME 10 09 05 20 47 S N 0987654321 PRINT COUNTER COPY SMALL 99999 LARGE TOTAL 99999 199998 FAX 99999 99999 199998 PRINTER 99999 99999 199998 LIST 99999 99999 199998 TOTAL 399996 399996 799992 SCAN COUNTER FAX 99999 COPY 99999 NETWORK 99999 TOTAL 299997 ...

Page 157: ...MALL 99999 LARGE 99999 199998 RECEPTION 99999 99999 199998 SCAN COUNTER SMALL LARGE COPY 99999 99999 199998 FAX 99999 99999 199998 NETWORK 99999 99999 199998 DEPT NO PRINT COUNTER DEPARTMENT D 2 00002 FAX COMMUNICATION COPY SMALL 99999 399996 LARGE 99999 399996 199998 FAX 99999 99999 199998 PRINT 99999 99999 199998 LIST 99999 99999 199998 799992 TOTAL LIMIT TRANSMIT SMALL 99999 LARGE 99999 199998 ...

Page 158: ... ifax com 003 USER01 OFF MEMORY OFF 0 00000000003 user03 ifax com 004 USER01 OFF MEMORY OFF 0 00000000004 user04 ifax com 005 USER01 OFF MEMORY OFF 0 00000000005 user05 ifax com 006 USER01 OFF MEMORY OFF 0 00000000006 user06 ifax com 007 USER01 OFF MEMORY OFF 0 00000000007 user07 ifax com 008 USER01 OFF MEMORY OFF 0 00000000008 user08 ifax com 009 USER01 OFF MEMORY OFF 0 00000000009 user09 ifax co...

Page 159: ...5 20 47 FAX NO 1 99999999999 FAX NO 2 99999999990 NAME MFP_00000236 NO NAME ADDRESS BOOK 001 GROUP01 001 007 014 019 001 008 014 019 002 008 015 020 003 009 015 020 004 009 016 005 010 016 005 010 017 006 011 017 006 012 018 007 013 018 003 GROUP03 005 005 006 006 007 009 002 GROUP02 005 007 009 015 060 065 ...

Page 160: ...OTO IMAGE DIRECTION DISABLE BYPASS FEED PLAIN 2IN1 4IN1 WRITE LATERALLY MAGAZINE SORT OPEN FROM LEFT BOOK 2 OPEN FROM LEFT SCAN ROTATION 0 SINGLE 2 SIDE SCAN SINGLE RESOLUTION 200dpi ORIGINAL MODE TEXT EXPOSURE AUTO BACKGROUND ADJUSTMENT 0 FAX FAX ROM VERSION F562 A05 RESOLUTION STANDARD ORIGINAL MODE TEXT EXPOSURE AUTO TX TYPE MEMORY TX RTI OFF ECM ON INITIAL SETUP MONITOR VOLUME COMPLETION VOLUM...

Page 161: ...s Mode Static IP IP Address 10 10 70 105 Subnet Mask 255 255 255 0 Default Gateway 10 10 70 1 Primary DNS Server 0 0 0 0 DNS Name Host Name Primary WINS Server 0 0 0 0 NetBios Name MFP_00C67861 IPP Network Information enabled IPP without SSL http 169 254 204 215 631 Print IPP with SSL https 169 254 204 215 443 Print AppleTalk Network Information enabled AppleTalk Printer Name MFP_00C67861 AppleTal...

Page 162: ...YES GENERAL TOTAL COUNTER 9999 MAIN PAGE MEMORY SIZE 256 MB 64 MB DRAWER DRAWER 1 LT DRAWER 2 A3 DRAWER 3 A4 R DRAWER 4 B5 AUTO CLEAR 45 ENERGY SAVER WEEKLY TIMER ON OFF TIMER SUNDAY 00 00 24 00 TIMER MONDAY 00 00 24 00 TIMER TUESDAY 00 00 24 00 TIMER WEDNESDAY 00 00 24 00 TIMER THURSDAY 00 00 24 00 TIMER FRIDAY 00 00 24 00 TIMER SATURDAY 00 00 24 00 AUTO POWER SAVE 15 SLEEP MODE 60 COPY EXPOSURE ...

Page 163: ...leep auto shut off mode in minutes NO 1 DRAWER 3 is printed only when the Drawer 3 4 is installed 2 DRAWER 4 is printed only when the Drawer 3 4 is installed 3 LARGE CAPACITY FEEDER is printed only when the LCF is installed COPY Function Description User EXPOSURE Shows the default exposure setting for copy YES ORIGINAL MODE Shows the default original mode for copy YES IMAGE DIRECTION Shows whether...

Page 164: ...RIGINAL MODE Shows the default original mode for scans YES JPEG COMPRESS Shows the default JPEG compression set ting YES EXPOSURE Shows the default exposure setting for scans YES FAX Function Description User FAX ROM VERSION Shows the ROM version of the Fax unit YES RESOLUTION Shows the default resolution setting for a fax Internet Fax transmission YES ORIGINAL MODE Shows the default original mode...

Page 165: ...RD Shows whether the discard function is enabled or disabled NO RX PRINT REDUCTION Shows whether the reduction is enabled or disabled NO RX PRINT DUPLEX PRINT 1 Shows whether the duplex print is enabled or disabled NO RX PRINT ROTATE SORT 1 Shows whether the rotate sort is enabled or disabled NO RECOVERY TX STORED TIME 1 Shows how many hours that a recovery transmission job is to be stored NO FAX ...

Page 166: ...he body string transmission is enabled or disabled NO FROM ADDRESS Shows the sender s E mail address that applies to an Internet Fax transmission NO FROM NAME Shows the sender s name that applies to an Internet Fax transmission NO INTERNET FAX RECEIVED FORWARD AGENT1 Shows the agent type if the Internet Fax Received Forward is registered NO INTERNET FAX RECEIVED FORWARD AGENT2 Shows the agent type...

Page 167: ...fter reserving a document to a mailbox within the equipment remotely from another facsimile NO RECEPTION LIST RELAY STATION Shows whether a reception list will be printed or not after receiving a relay trans mission from an originator as a relay hub NO 1 These are printed only when the optional Fax unit is installed PRINTER E FILING Function Description User AUTOMATIC CHANGE OF PAPER SOURCE Shows ...

Page 168: ...E Shows the EAP user name to be used for authentication NO TRANSMIT RATE Mbps Shows the transmission rate NO TRANSMIT POWER Shows the transmission power NO BLUETOOTH SETTINGS Function Description User BLUETOOTH Shows whether the Bluetooth function is enabled or disabled NO BLUETOOTH NAME Shows the Bluetooth name of this equip ment NO DEVICE ADDRESS Shows the device address of this equip ment NO AL...

Page 169: ...ING NETWORK IPX SPX Function Description User ENABLE IPX SPX Shows whether the IPX SPX protocol is enabled or disabled NO FRAME TYPE Shows the frame type to be selected NO NETWORK SETTING NETWORK APPLETALK Function Description User ENABLE APPLE TALK Shows whether the AppleTalk protocol is enabled or disabled NO DEVICE NAME Shows the AppleTalk device name NO DESIRED ZONE Shows the AppleTalk zone NO...

Page 170: ...e of this equip ment NO LOGON Shows the logon setting NO WORKGROUP Shows the workgroup of this equipment NO DOMAIN Shows the domain name of this equipment NO PRIMARY DOMAIN CONTROLLER Shows the primary domain controller address if it has been set NO BACKUP DOMAIN CONTROLLER Shows the backup domain controller address if it has been set NO LOGON USER NAME Shows the logon user name of this equip ment...

Page 171: ...e of this equipment for Bonjour NO NETWORK SETTING NETWORK SERVICE HTTP NETWORK SERVICE Function Description User ENABLE HTTP SERVER Shows whether the HTTP network service is enabled or disabled NO PRIMARY PORT NUMBER Shows the primary port number for the HTTP network service NO SECONDARY PORT NUMBER Shows the secondary port number for the HTTP network service NO ENABLE SSL Shows whether the SSL f...

Page 172: ... for receiving the Internet Fax using the SMTP protocol NO ENABLE OFFRAMP GATEWAY Shows whether the offramp gateway is enabled or disabled NO ENABLE OFFRAMP SECURITY Shows whether the offramp security is enabled or disabled NO ENABLE OFFRAMP PRINT Shows whether the offramp print is enabled or disabled NO E MAIL ADDRESS Shows the E mail address of this equipment if the SMTP server is enabled and it...

Page 173: ...service is enabled or disabled NO DEFAULT PORT NUMBER Shows the default port number to be used for receiving data using FTP NO ENABLE SSL Shows whether the SSL for the FTP server network service is enabled or disabled NO SSL PORT NUMBER Shows the SSL port number to be used for accessing the equipment using FTP NO NETWORK SETTING NETWORK SERVICE SNMP NETWORK SERVICE Function Description User ENABLE...

Page 174: ...SETTING PRINT SERVICE SETTING RAW TCP PRINT Function Description User ENABLE RAW TCP Shows whether Raw TCP printing is enabled or disabled NO PORT NUMBER Shows the port number to be used for Raw TCP printing NO NETWORK SETTING PRINT SERVICE SETTING LPD PRINT Function Description User ENABLE LPD Shows whether LPR printing is enabled or disabled NO PORT NUMBER Shows the port number to be used for LP...

Page 175: ...unction Description User ENABLE FTP PRINT Shows whether FTP printing is enabled or disabled NO PRINT USER NAME Shows the user name for FTP printing NO PRINT PASSWORD Shows the password for FTP printing NO PORT NUMBER Shows the port number to be used for FTP printing NO NETWORK SETTING PRINT SERVICE SETTING NETWARE PRINT Function Description User LOGIN NAME Shows the login name for NetWare file ser...

Page 176: ...R FORWARD Shows whether an E mail error message will be sent or not NO E MAIL ERROR TRANSFER ADDRESS Shows the E mail address where an E mail error message will be sent if it has been set NO ENABLE PARTIAL E MAIL Shows whether the equipment allows print ing an E mail job that partially received NO PARTIAL WAIT TIME Shows how long the equipment will wait for receiving data of a partial E mail job b...

Page 177: ...175 5 PS3 Font List An output example of the PS3 Font List im4530 Series ...

Page 178: ...176 5 APPENDIX 1 LIST PRINT FORMAT Cont 5 PCL Font List An output example of the PCL Font List im4530 Series ...

Page 179: ...iting 10 Registering 7 Searching 14 CONTEXT 108 CORP 8 COUNTER MENU 35 D Date and Time 90 DATE FORMAT 91 DATE TIME 90 Daylight Saving System 91 DELETE ALL 50 DEMO PAGE PRINT 149 Department Code Deleting 50 58 Editing 54 Enabling 48 Printing 47 Registering 51 Resetting All Counters 49 Resetting Counter 60 Department Code List 155 DEPARTMENT COUNTER 39 DEPARTMENT MANAGEMENT 45 48 DEPARTMENT REGISTRA...

Page 180: ...148 LOCATION 84 LOGON 110 M MAXIMUM COPIES 120 MEMORY TX 145 Message Properties 137 139 MONITOR VOLUME 126 MULTI TX 145 N NAME SORT 73 NetBIOS NAME 110 NETWARE 107 NetWare Settings 107 NIC CONFIGURATION PAGE 149 NIC Configuration Page 159 NO AUTO IP 102 NOTIFICATION 86 O ORIGINAL MODE 68 69 71 OTHER 119 Output Limitations 62 P PAPER OF DIFFERENT DIRECTION 121 150 PASSWORD SETUP 88 PCL FONT LIST 14...

Page 181: ...9 SINGLE 2 SIDE SCAN 71 SLEEP AUTO SHUT OFF 97 SMB 109 SMB PROTOCOL 110 SNMP READ COMMUNITY 119 SORT MODE PRIORITY 120 STATIC 104 Static IP Address 103 Storage Maintenance 136 SUB 9 SUBNET MASK 104 SUSPEND PRINTING IF STAPLER EMPTY 121 150 T TCP IP 101 102 103 TCP IP Protocol 100 TERMINAL ID 122 Terminal ID 122 Tip 3 TOTAL COUNTER 36 Total Counter List 154 Transmission Journal 142 TREE 108 TTI 70 ...

Page 182: ...180 INDEX Cont ...

Page 183: ...Printed in China im4530 3530 ...

Page 184: ...Printing for Professionals Océ Imagistics Inc 100 Oakview Drive Trumbull CT 06611 Océ Imagistics Inc 2006 Printed in China ...

Reviews: