v
Keep the CD-RW drive in its antistatic bag until you are ready to install the
drive in your computer. Limit your movement. Movement can cause static
electricity buildup.
v
Do not force insertion of the power cable. Doing so might damage the connector
or the drive.
Product views
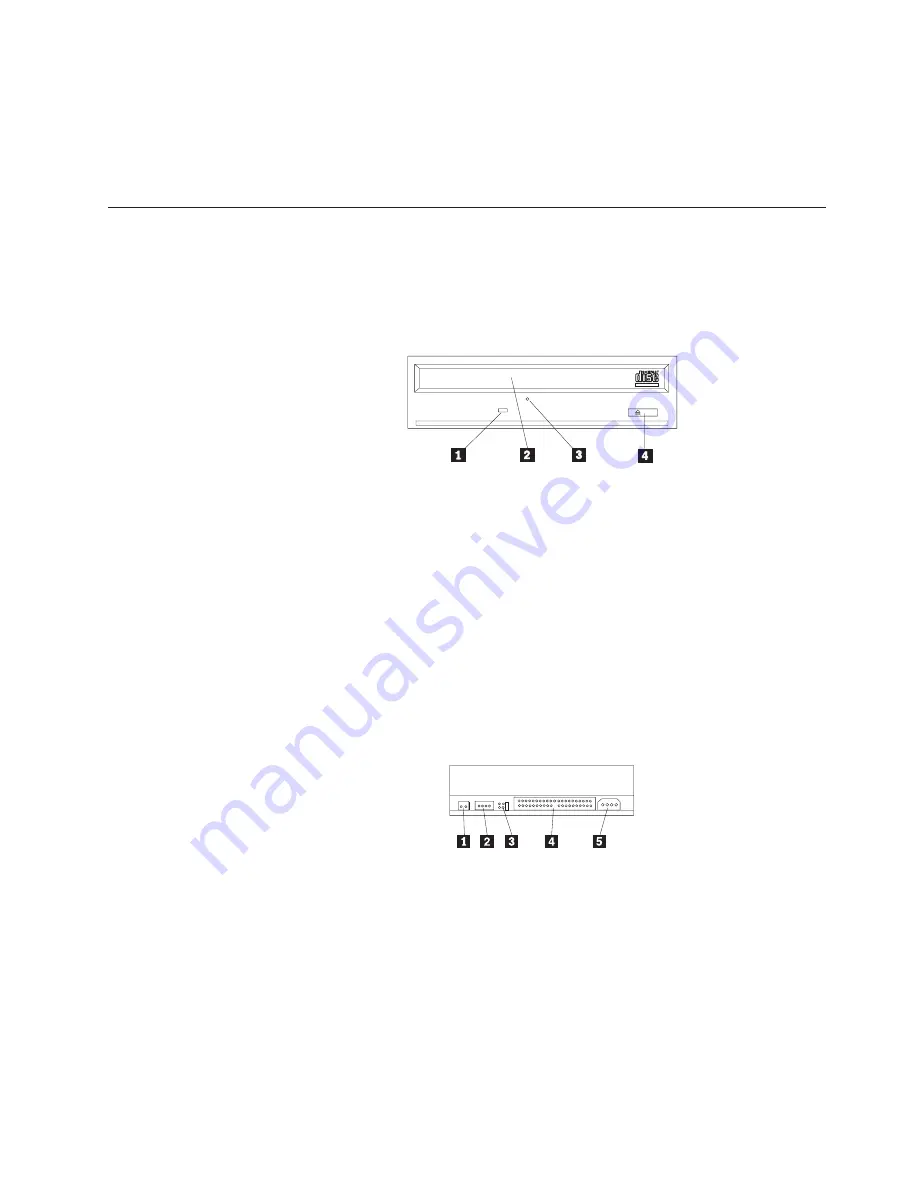
The following sections illustrate the front and back views of the CD-RW drive.
Front view of the drive
Refer to the following illustration to identify parts that might be referred to in the
installation instructions.
ReWriteable
H
iSpeed
Note:
Front bezel design might be different (varies by supplier).
1
Busy indicator
: This light comes on when the drive reads from, writes to, or
plays a CD.
2
CD tray
: Use this tray to load and unload a CD.
3
Manual-eject hole
: This hole provides access to the eject mechanism to remove
a CD from the drive when normal ejection procedures do not work.
4
Eject/Load button
: When pushed, this button opens or closes the CD tray.
Back view of the drive
Refer to the following illustration to identify parts that might be referred to in the
installation instructions.
1
Reserved
2
Audio-out connector
: Use this connector to attach the CD-RW drive to a sound
adapter.
3
Configuration pins
: These pins are used to set the drive configuration.
4
IDE connector
: Use this connector to attach the CD-RW drive to the IDE cable.
5
DC-power connector
: Use this connector to attach the CD-RW drive to the
computer power supply cable.
Installation and user’s guide
3
Summary of Contents for 48X/32X/48X
Page 1: ...48X 32X 48X Max CD RW Drive User s Guide...
Page 2: ......
Page 3: ...48X 32X 48X Max CD RW Drive User s Guide...
Page 6: ...iv 48X 32X 48X Max CD RW Drive User s Guide...
Page 8: ...vi 48X 32X 48X Max CD RW Drive User s Guide...
Page 10: ...viii 48X 32X 48X Max CD RW Drive User s Guide...
Page 52: ...42 48X 32X 48X Max CD RW Drive User s Guide...
Page 58: ...48 48X 32X 48X Max CD RW Drive User s Guide...
Page 59: ......
Page 60: ...Part Number 22P7046 Printed in U S A 1P P N 22P7046...


