


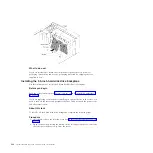
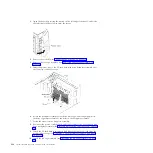


10.
Position the bottom of the USB cable and light path diagnostics assembly
mounting bracket into the opening and rotate the top of the bracket toward
the server until it clicks into place.
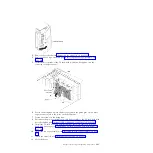
11.
Install the USB cable and light path diagnostics assembly (see “Installing the
USB cable and light path diagnostics assembly” on page 267).
12.
Connect the USB cable to the system board (see “System-board internal
connectors” on page 27 and “Internal cable routing and connectors” on page
186).
13.
Install the fan cage assembly (see “Installing the fan cage assembly” on page
306).
14.
Install the air baffle (see “Installing the air baffle” on page 211).
15.
Install the bezel (see “Installing the bezel” on page 208).
16.
Install and lock the left-side cover (see “Installing the left-side cover” on page
205).
What to do next
If you have replaced a component or installed an optional device in the server, you
need to reconnect the power cords and all external cables, and turn on the server
and peripheral devices.
Removing the 2.5-inch hard disk drive backplane
Use this information to remove the 2.5-inch hard disk drive backplane.
Before you begin
Read the safety information in “Safety” on page vii and “Installation guidelines”
on page 34.
If you are replacing a component or installing an optional device in the server, you
need to turn off the server and peripheral devices, and disconnect the power cords
and all external cables.
About this task
To remove a 2.5-inch hard disk drive backplane, complete the following steps.
Procedure
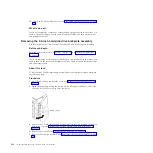
1.
Unlock and remove the left-side cover (see “Removing the left-side cover” on
page 39).
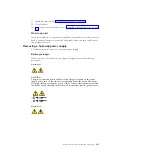
2.
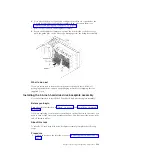
Open the bezel by pressing the button on the left edge of the bezel, and rotate
the left side of the bezel away from the server.
Chapter 6. Removing and replacing components
275
Summary of Contents for 7383
Page 1: ...System x3500 M4 Type 7383 Installation and Service Guide ...
Page 2: ......
Page 3: ...System x3500 M4 Type 7383 Installation and Service Guide ...
Page 8: ...vi System x3500 M4 Type 7383 Installation and Service Guide ...
Page 42: ...24 System x3500 M4 Type 7383 Installation and Service Guide ...
Page 200: ...182 System x3500 M4 Type 7383 Installation and Service Guide ...
Page 360: ...342 System x3500 M4 Type 7383 Installation and Service Guide ...
Page 416: ...398 System x3500 M4 Type 7383 Installation and Service Guide ...
Page 470: ...452 System x3500 M4 Type 7383 Installation and Service Guide ...
Page 479: ...Taiwan Class A compliance statement Notices 461 ...
Page 480: ...462 System x3500 M4 Type 7383 Installation and Service Guide ...
Page 487: ......
Page 488: ... Part Number 46W8192 Printed in USA 1P P N 46W8192 ...


