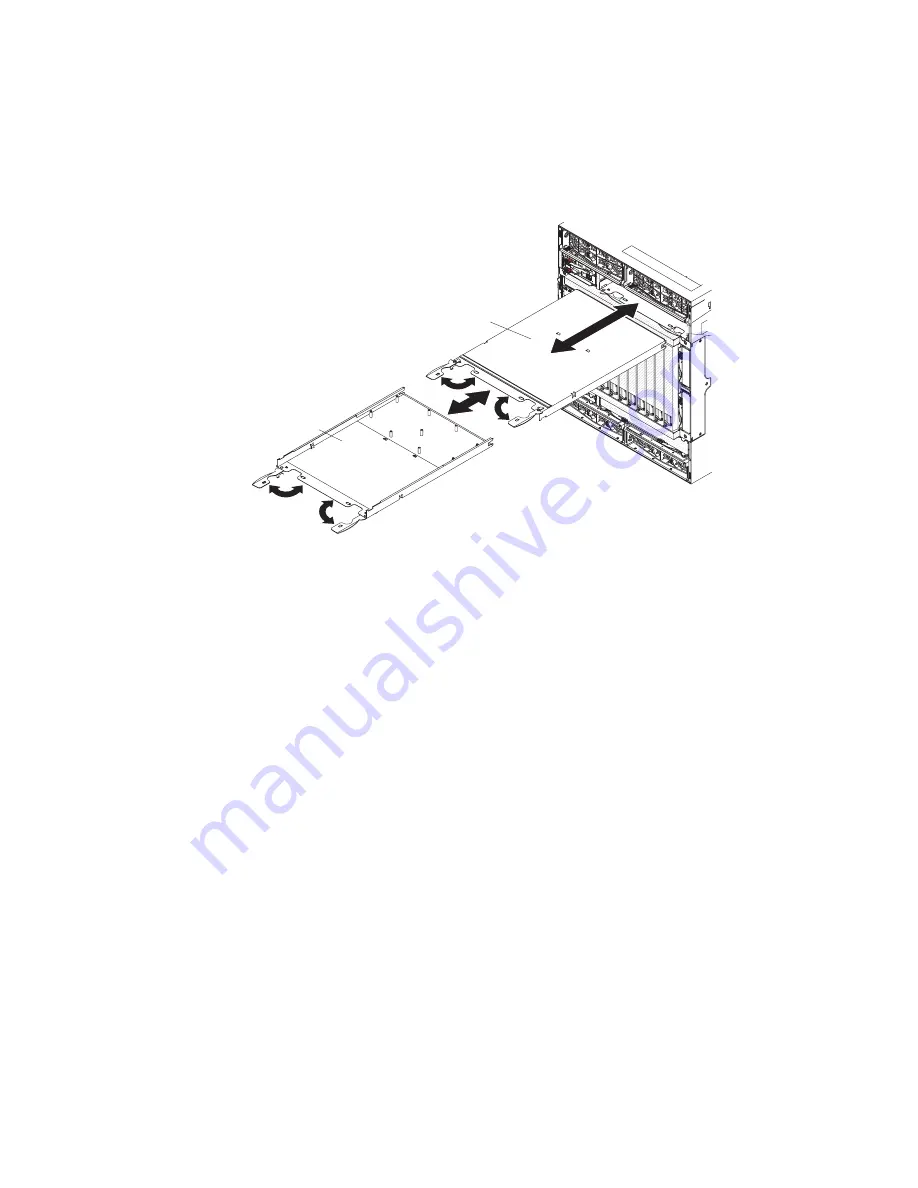
Installing
a
high-speed
I/O-module
interposer
tray
Note:
Before
you
install
a
new
high-speed
I/O-module
interposer,
read
the
documentation
that
comes
with
the
interposer
for
detailed
instructions.
To
install
a
high-speed
I/O-module
interposer
or
tray,
complete
the
following
steps.
High-speed
interposer tray
(lower)
High-speed
interposer tray
(upper)
High-speed
I/O bay 7
High-speed
I/O bay 8
1.
Read
the
safety
information
that
begins
on
page
vii
and
“Installation
guidelines”
on
page
26.
2.
Remove
the
high-speed
module
or
filler,
if
one
is
installed
(see
“Removing
a
high-speed
I/O
module”
on
page
35).
3.
Make
sure
that
the
release
handles
are
in
the
open
position.
4.
Slide
the
interposer
into
the
module
bay
until
it
stops.
5.
Push
the
interposer-tray
release
handles
to
the
closed
position.
6.
Install
an
I/O
module
or
filler
(see
“Installing
a
high-speed
I/O
module”
on
page
55).
54
BladeCenter
HT
Type
8740
and
8750:
Installation
and
User’s
Guide
Summary of Contents for 87401RU
Page 3: ...BladeCenter HT Type 8740 and 8750 Installation and User s Guide...
Page 8: ...vi BladeCenter HT Type 8740 and 8750 Installation and User s Guide...
Page 82: ...66 BladeCenter HT Type 8740 and 8750 Installation and User s Guide...
Page 92: ...76 BladeCenter HT Type 8740 and 8750 Installation and User s Guide...
Page 108: ...92 BladeCenter HT Type 8740 and 8750 Installation and User s Guide...
Page 109: ......
Page 110: ...Part Number 44R5188 Printed in USA 1P P N 44R5188...


