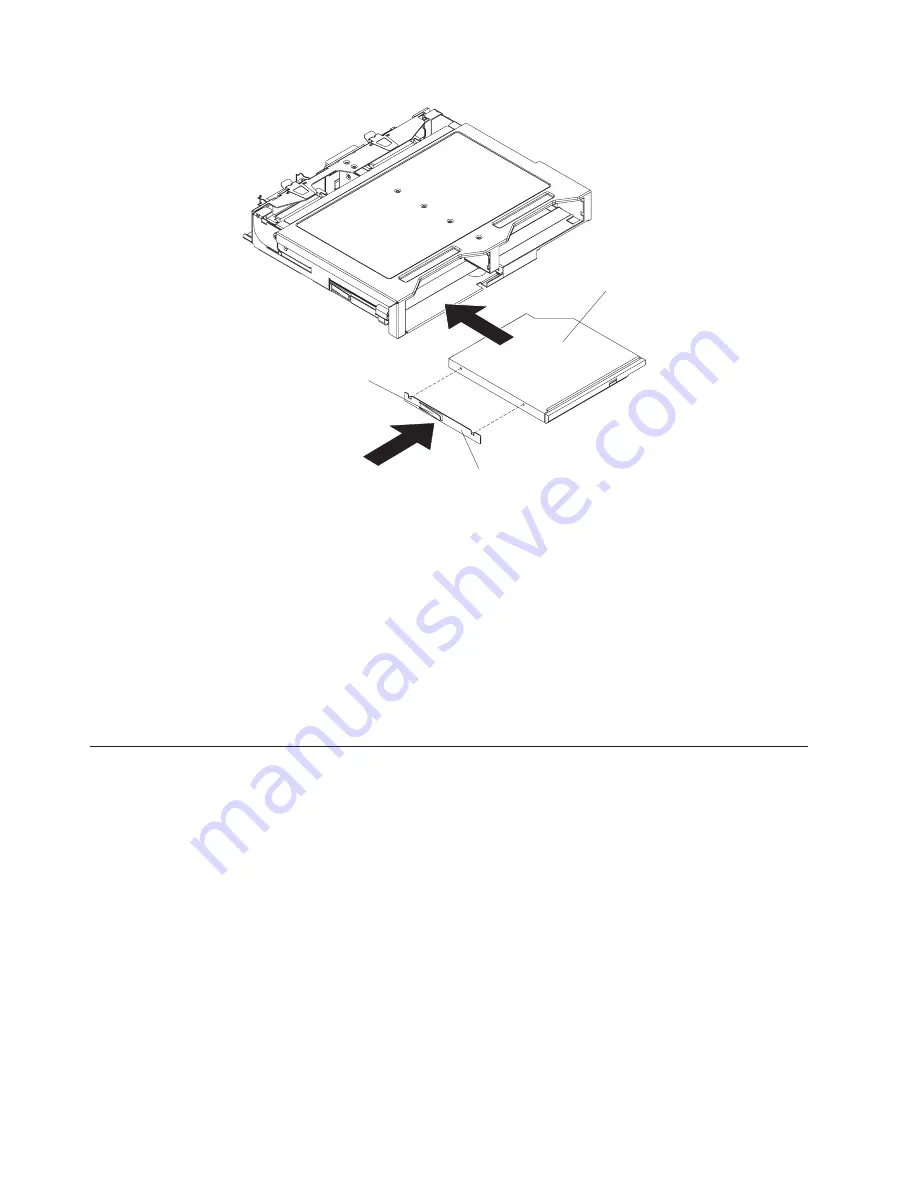
4.
Mount
the
DVD-ROM
retention
clip
on
the
DVD-ROM
drive
or
DVD-ROM
blank
bezel
that
you
are
installing.
5.
Slide
the
DVD-ROM
drive
or
DVD-ROM
blank
bezel
with
the
attached
mounting
bracket
into
the
drive
cage,
pushing
it
into
the
cage
until
the
retention
clip
engages.
6.
Reinstall
the
previously
removed
hard
disk
drive
in
the
3.5-inch
hard
drive
cage
(see
“Hard
disk
drives”
on
page
26).
7.
If
you
have
other
options
to
install
or
remove,
do
so
now.
8.
Go
to
“Completing
the
installation”
on
page
47.
Memory
modules
This
section
provides
information
on
the
types
of
memory
modules
the
server
supports,
and
describes
how
to
install
memory
modules.
Memory
module
considerations
This
section
contains
information
that
you
must
consider
when
installing
DIMMs:
v
The
server
supports
up
to
eight
PC3200
DDR
II
ECC
Registered
SDRAM
DIMMs
in
sizes
ranging
from
256
MB
to
2
GB.
The
minimum
memory
size
is
512
MB.
The
maximum
supported
memory
size
is
16
GB.
v
The
server
supports
256
MB,
512
MB,
1
GB,
and
2
GB
DIMMs.
See
the
ServerProven
®
list
at
http://www.ibm.com/servers/eserver/serverproven/compat/
us/
for
a
list
of
memory
modules
that
the
server
supports.
v
The
server
comes
with
one
pair
of
DIMMs
installed
in
DIMM
slots
1
and
2
on
the
system
board.
The
server
comes
with
either
512
MB
(two
256
MB
DIMM)
for
the
2.8GHz
models
or
1GB
(two
512MB
DIMM)
for
all
other
models.
v
The
server
uses
interleaved
DIMMs;
you
must
add,
remove,
or
replace
DIMMs
in
pairs.
Each
pair
must
be
of
the
same
type,
capacity,
and
speed.
DVD-ROM drive
DVD-ROM drive
retention clip
Release latch
Figure
24.
Installing
an
internal
DVD-ROM
drive
32
xSeries
336
Type
1879
and
Type
8837:
Hardware
Maintenance
Manual
and
Troubleshooting
Guide
Summary of Contents for 88371RU
Page 1: ...xSeries 336 Type 1879 and Type 8837 Hardware Maintenance Manual and Troubleshooting Guide...
Page 2: ......
Page 3: ...xSeries 336 Type 1879 and Type 8837 Hardware Maintenance Manual and Troubleshooting Guide...
Page 15: ...Server on off 8 to 80 Shipment 5 to 100 Chapter 1 General information 5...
Page 22: ...12 xSeries 336 Type 1879 and Type 8837 Hardware Maintenance Manual and Troubleshooting Guide...
Page 24: ...14 xSeries 336 Type 1879 and Type 8837 Hardware Maintenance Manual and Troubleshooting Guide...
Page 92: ...82 xSeries 336 Type 1879 and Type 8837 Hardware Maintenance Manual and Troubleshooting Guide...
Page 149: ...Appendix B Safety information 139...
Page 150: ...140 xSeries 336 Type 1879 and Type 8837 Hardware Maintenance Manual and Troubleshooting Guide...
Page 151: ...Appendix B Safety information 141...
Page 152: ...142 xSeries 336 Type 1879 and Type 8837 Hardware Maintenance Manual and Troubleshooting Guide...
Page 153: ...Appendix B Safety information 143...
Page 154: ...144 xSeries 336 Type 1879 and Type 8837 Hardware Maintenance Manual and Troubleshooting Guide...
Page 155: ...Appendix B Safety information 145...
Page 165: ...Appendix B Safety information 155...
Page 166: ...156 xSeries 336 Type 1879 and Type 8837 Hardware Maintenance Manual and Troubleshooting Guide...
Page 167: ...Appendix B Safety information 157...
Page 168: ...158 xSeries 336 Type 1879 and Type 8837 Hardware Maintenance Manual and Troubleshooting Guide...
Page 172: ...162 xSeries 336 Type 1879 and Type 8837 Hardware Maintenance Manual and Troubleshooting Guide...
Page 185: ......
Page 186: ...Part Number 25K8109 1P P N 25K8109...


