


7.
Click
Next
.
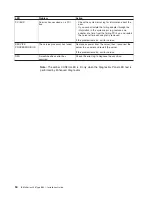
The
“Configuration
summary”
window
opens.
8.
Review
the
information
that
is
displayed
in
the
“Configuration
summary”
window.
To
change
the
configuration,
click
Back
.
9.
Click
Apply
;
then,
click
Yes
when
asked
if
you
want
to
apply
the
new
configuration.
The
configuration
is
saved
in
the
controller
and
in
the
physical
drives.
10.
Exit
from
the
ServeRAID
Manager
program,
and
remove
the
CD
from
the
CD-ROM
drive.
11.
Restart
the
server.
Using
the
PXE
boot
agent
utility
program
The
Preboot
Execution
Environment
(PXE)
boot
agent
utility
program
is
part
of
the
BIOS
code.
You
can
use
it
to
specify
the
startup
order
of
devices
and
enable
or
disable
operating-system
wake-up
support.
Note:
The
server
does
not
support
changing
the
network
boot
protocol
or
specifying
the
startup
order
of
devices
through
the
PXE
boot
agent
utility
program.
Complete
the
following
steps
to
start
the
PXE
boot
agent
utility
program:
1.
Turn
on
the
server.
2.
When
the
Initializing
Intel
(R)
Boot
Agent
Version
X.X.XX
PXE
2.0
Build
XXX
(WfM
2.0)
prompt
appears,
press
Ctrl+S.
You
have
2
seconds
(by
default)
to
press
Ctrl+S
after
the
prompt
appears.
If
the
prompt
does
not
appear,
use
the
Configuration/Setup
Utility
program
to
enable
the
Ethernet
PXE/DHCP
option.
3.
Use
the
arrow
keys
and
press
Enter
to
select
a
choice
from
the
menu.
4.
Follow
the
instructions
on
the
screen
to
change
the
settings
of
the
selected
items;
then,
press
Enter.
Figure
3.
“Configuration
summary”
window
40
IBM
xSeries
236
Type
8841:
Installation
Guide
Summary of Contents for 8841 - eServer xSeries 236
Page 3: ...IBM xSeries 236 Type 8841 Installation Guide...
Page 7: ...Japanese Voluntary Control Council for Interference VCCI statement 80 Index 81 Contents v...
Page 8: ...vi IBM xSeries 236 Type 8841 Installation Guide...
Page 56: ...42 IBM xSeries 236 Type 8841 Installation Guide...
Page 98: ...84 IBM xSeries 236 Type 8841 Installation Guide...
Page 99: ......
Page 100: ...Part Number 31R1188 Printed in USA 1P P N 31R1188...


