background image

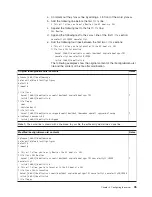
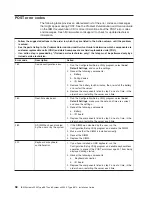
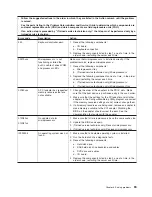
POST


error


codes


The


following


table


provides


an


abbreviated


list


of


the


error


codes


and


messages


that


might


appear


during


POST.


See


the


Problem


Determination


and


Service


Guide


on


the


IBM


Documentation


CD


for


more


information


about


the


POST


error


codes


and


messages.


See


http://www.ibm.com/support/


to


check


for


updated


technical


information.


v


Follow


the


suggested


actions


in


the


order


in


which


they


are


listed


in


the


Action


column


until


the


problem


is


solved.


v


See


the


parts


listing


in


the


Problem


Determination


and


Service


Guide


to


determine


which


components


are


customer


replaceable


units


(CRU)


and


which


components


are


field


replaceable


units


(FRU).


v


If


an


action


step


is


preceded


by


“(Trained


service


technician


only),”


that


step


must


be


performed


only


by


a


trained


service


technician.


Error


code


Description


Action


162


Device


configuration


error.


1.


Run


the


Configuration/Setup


Utility


program,


select


Load


Default


Settings

,


and


save


the


settings.


2.


Reseat


the


following


components:


a.


Battery


b.


Failing


device


c.


I/O


board

3.


Remove


the


battery


for


60


minutes;


then,


reinstall


the


battery


and


restart


the


server.


4.


Replace


the


components


listed


in


step


2


one


at


a


time,


in


the


order


shown,


restarting


the


server


each


time.


163


Real-time


clock


error.


1.


Run


the


Configuration/Setup


Utility


program,


select


Load


Default


Settings

,


make


sure


the


date


and


time


are


correct,


and


save


the


settings.


2.


Reseat


the


following


components:


a.


Battery


b.


I/O


board

3.


Replace


the


components


listed


in


step


2


one


at


a


time,


in


the


order


shown,


restarting


the


server


each


time.


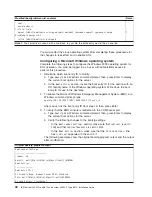
289


A


DIMM


has


been


disabled


by


the


user


or


by


the


system.


1.


If


the


DIMM


was


disabled


by


the


user,


run


the


Configuration/Setup


Utility


program


and


enable


the


DIMM.


2.


Make


sure


that


the


DIMM


is


installed


correctly.


3.


Reseat


the


DIMM.


4.


Replace


the


DIMM.


301


Keyboard


or


keyboard


controller


error.


1.


If


you


have


installed


a


USB


keyboard,


run


the


Configuration/Setup


Utility


program


and


enable


keyboardless


operation


to


prevent


the


POST


error


message


301


from


being


displayed


during


startup.


2.


Reseat


the


following


components:


a.


Keyboard


connection


b.


I/O


board

3.


Replace


the


components


listed


in


step


2


one


at


a


time,


in


the


order


shown,


restarting


the


server


each


time.


58


IBM


System


x3950


Type


8872


and


System


x3950


E


Type


8874:


Installation


Guide

Summary of Contents for 88728AU - System x3950 - 8872 Datacenter High Availability

Page 1: ...register and profile your server Go to the Web for instructions http www ibm com support No Yes Yes No Welcome Thank you for buying an IBM System x server This server contains information for setting...

Page 2: ...that all optional devices you installed are on the ServerProven list at http www ibm com servers eserver serverproven compat us Is the server working correctly Is the problem solved Hardware or softwa...

Page 3: ...IBM System x3950 Type 8872 and System x3950 E Type 8874 Installation Guide...

Page 4: ...e 83 and the Warranty and Support Information document on the IBM Documentation CD Fourth Edition April 2006 Copyright International Business Machines Corporation 2006 All rights reserved US Governmen...

Page 5: ...ols connectors LEDs and power 31 Front view 31 Rear view 33 Server power features 34 Turning on the server 35 Turning off the server 35 Chapter 4 Configuring the server 37 Using the ServerGuide Setup...

Page 6: ...Before you call 81 Using the documentation 81 Getting help and information from the World Wide Web 82 Software service and support 82 Hardware service and support 82 Notices 83 Edition notice 83 Trade...

Page 7: ...alleert eerst de veiligheidsvoorschriften Ennen kuin asennat t m n tuotteen lue turvaohjeet kohdasta Safety Information Avant d installer ce produit lisez les consignes de s curit Vor der Installation...

Page 8: ...he caution or danger statement in the IBM Safety Information book For example if a caution statement begins with a number 1 translations for that caution statement appear in the IBM Safety Information...

Page 9: ...quipment when there is evidence of fire water or structural damage v Disconnect the attached power cords telecommunications systems networks and modems before you open the device covers unless instruc...

Page 10: ...ION When laser products such as CD ROMs DVD drives fiber optic devices or transmitters are installed note the following v Do not remove the covers Removing the covers of the laser product could result...

Page 11: ...power control button on the device and the power switch on the power supply do not turn off the electrical current supplied to the device The device also might have more than one power cord To remove...

Page 12: ...els are present inside any component that has this label attached There are no serviceable parts inside these components If you suspect a problem with one of these parts contact a service technician S...

Page 13: ...cal updates might be available to provide additional information that is not included in the server documentation These updates are available from the IBM Web site Complete the following steps to chec...

Page 14: ...00 MHz microprocessor v 32 MB of RAM v Adobe Acrobat Reader 3 0 or later or xpdf which comes with Linux operating systems Acrobat Reader software is included on the CD and you can install it when you...

Page 15: ...of the most occurrences Click a document to view it and press Crtl F to use the Acrobat search function or Alt F to use the xpdf search function within the document Click Help for detailed informatio...

Page 16: ...er and type of optional features installed and the power management optional features in use 3 These levels were measured in controlled acoustical environments according to the procedures specified by...

Page 17: ...anagement controller v IBM EXA 32 Chipset with integrated memory and I O controller v Service processor support for Remote Supervisor Adapter II SlimLine v Light path diagnostics v Three Universal Ser...

Page 18: ...points on hot swap components See the instructions for removing or installing a specific hot swap component for any additional procedures that you might have to perform before you remove or install t...

Page 19: ...r of properly grounded electrical outlets for the server monitor and other devices v Back up all important data before you make changes to disk drives v Have a small flat blade screwdriver available v...

Page 20: ...powered on might cause the server to halt which could result in the loss of data To avoid this potential problem always use an electrostatic discharge wrist strap or other grounding system when workin...

Page 21: ...hile the device is still in its static protective package touch it to an unpainted metal part on the outside of the server for at least 2 seconds This drains static electricity from the package and fr...

Page 22: ...er panel from one of the empty hot swap bays 3 Make sure that the tray handle is open then install the hard disk drive into the hot swap bay Notes 1 When you turn on the server check the hard disk dri...

Page 23: ...v There must be at least one memory card with one pair of DIMMs installed for the server to operate v When you install additional DIMMs on a memory card be sure to install them in pairs All the DIMM...

Page 24: ...ates that a DIMM or memory card has failed Memory Port Power LED When this LED is off it indicates that power is removed from the port and that you can remove the memory card to replace a failed memor...

Page 25: ...e DIMM connectors facing up Attention To avoid breaking the DIMM retaining clips or damaging the DIMM connectors open and close the clips gently 5 Open the retaining clip on each end of the DIMM conne...

Page 26: ...east one pair of DIMMs installed before being installed in the server You can hot add one memory card to each of the memory power buses provided your operating system supports that function At least o...

Page 27: ...ver operates properly v Install the microprocessors in the order shown in the following illustration 1 2 3 4 To install an additional microprocessor complete the following steps 1 Read the safety info...

Page 28: ...y a Open the microprocessor tray release latch Microprocessor tray lever Microprocessor tray lever Microprocessor tray retention latch both sides of tray Air baffle Microprocessor tray release latch b...

Page 29: ...R O N T F R O N T 7 Remove the microprocessor baffle from a microprocessor socket and store it for future use If you remove a microprocessor you must install a microprocessor baffle to prevent the ser...

Page 30: ...croprocessor connector Microprocessor 13 Close the microprocessor release lever to secure the microprocessor 14 Remove the heat sink from its package and remove the cover from the bottom of the heat s...

Page 31: ...ting of the SAS cables is required v The blue handle that comes with the adapter is required to install the adapter v In multi node configurations only two nodes can contain a ServeRAID 8i adapter The...

Page 32: ...adapter for instructions for setting jumpers or switches and for cabling Note Route adapter cables before you install the adapter 5 Install the adapter a Open the blue adapter guide by lifting the fro...

Page 33: ...for complete rack installation and removal instructions 4 Connect the cables and power cords See Connecting the cables for more information Connecting the cables You must turn off the server see Turn...

Page 34: ...r on LED USB connector Hard disk drive activity LED Information LED System error LED Locator LED Release latch Updating the server configuration When you start the server for the first time after you...

Page 35: ...sor firmware go to http www ibm com support 2 Make sure that each System x3950 E node contains a minimum of one microprocessor and one memory card with one pair of DIMMs 3 Make sure that each micropro...

Page 36: ...ted to port 2 on node 1 then connect the opposite end of the cable to port 2 of node 2 Next route the cable through the node 2 cable management arm 5 Route any remaining cables through the cable manag...

Page 37: ...cable through the node 2 cable management arm Use a 2 3 m 7 6 foot SMP Expansion cable for this connection b Connect one end of an SMP Expansion cable to port 2 on node 2 then route the cable through...

Page 38: ...e cable to port 3 of node 4 Next route the cable through the node 4 cable management arm 7 Route any remaining cables through the cable management arms 8 Secure the cables in the cable management arms...

Page 39: ...m SMP Expansion cable 2 9 m SMP Expansion cable 3 Connect the SMP Expansion cables to node 1 a Connect one end of an SMP Expansion cable to port 1 on node 1 then route the cable through the node 1 ca...

Page 40: ...de 3 then route the cable through the node 3 cable management arm Use a 2 3 m 7 6 foot SMP Expansion cable for this connection 6 Connect the SMP Expansion cables to node 4 a Locate the SMP Expansion c...

Page 41: ...to port 3 on node 7 then route the cable through the node 7 cable management arm Use a 2 3 m 7 6 foot SMP Expansion cable for this connection 10 Connect the SMP Expansion cables to node 8 a Locate the...

Page 42: ...30 IBM System x3950 Type 8872 and System x3950 E Type 8874 Installation Guide...

Page 43: ...ED On some server models each hot swap hard disk drive has an activity LED When this LED is flashing it indicates that the drive is in use Operator information panel This panel contains controls and L...

Page 44: ...t remotely by the system administrator to aid in visually locating the server In multi node configurations when this LED flashes during startup it indicates that the server is the primary node When th...

Page 45: ...ctor When this LED is lit it indicates that there is an active connection on the Ethernet port USB 2 connector Connect a USB device to this connector System serial connector Connect a 9 pin serial dev...

Page 46: ...ere is an active connection on the Ethernet port Power supply connector Connect the power cord to this connector SMP Expansion Port 1 link LED When this LED is lit it indicates that there is an active...

Page 47: ...visor Adapter II SlimLine the systems management software can turn on the server v If your operating system supports the Wake on LAN feature the Wake on LAN feature can turn on the server Turning off...

Page 48: ...hold the power control button for more than 4 seconds to turn off the server v If the server is installed in a static partition pressing the power control button on the primary node in the partition...

Page 49: ...s and help you install the operating system For information about the supported operating system versions see the label on the CD If the ServerGuide Setup and Installation CD did not come with the ser...

Page 50: ...ds to control the server power view system information and identify the server You can also save one or more commands as a text file and run the file as a script v Serial over LAN Establish a Serial o...

Page 51: ...tion e Select Start Options then set Planar Ethernet PXE DHCP to one of the following settings v Disabled v Planar Ethernet 2 If you set Planar Ethernet PXE DHCP to Planar Ethernet 2 you must also set...

Page 52: ...yS1 LILO configuration If you are using LILO complete the following steps 1 Modify the etc lilo conf file a Add the following text to the end of the first default linux line Monitor b Comment out the...

Page 53: ...nstall boot boot b message boot message linear image boot vmlinuz 2 4 9 e 12smp label linux initrd boot initrd 2 4 9 e 12smp img read only root dev hda6 image boot vmlinuz 2 4 9 e 12 label linux up in...

Page 54: ...ystem starts a LILO boot prompt is displayed instead of the graphical user interface Press Tab at this prompt to install all of the boot options that are listed To load the operating system in interac...

Page 55: ...ed by anaconda Note that you do not have to rerun grub after making changes to this file NOTICE You have a boot partition This means that all kernel and initrd paths are relative to boot eg root hd0 0...

Page 56: ...e 12 img You must restart the Linux operating system after completing these procedures for the changes to take effect and to enable SOL SUSE SLES 8 0 configuration Note This procedure is based on a de...

Page 57: ...olor white blue black light gray default 0 timeout 8 title linux kernel hd0 1 boot vmlinuz root dev hda2 acpi oldboot vga 791 1 initrd hd0 1 boot initrd title floppy root chainloader 1 title failsafe...

Page 58: ...down the boot entry ID for use in the next step 2 To enable the Microsoft Windows Emergency Management System EMS at a Windows command prompt type bootcfg EMS ON PORT COM1 BAUD 19200 ID boot_id where...

Page 59: ...re for the changes to take effect and to enable SOL Installing the OSA SMBridge management utility program Complete the following steps to install the OSA SMBridge management utility program on a serv...

Page 60: ...the following directories etc init d SMBridge etc smbridge cfg usr sbin smbridged var log smbridge License txt var log smbridge Readme txt The utility starts automatically when the server is started...

Page 61: ...utility program provides the following remote management capabilities v CLI command line interface mode Use CLI mode to remotely perform power management and system identification control functions ov...

Page 62: ...ser s Guide on the IBM Documentation CD If your server comes with an operating system installed such as Microsoft Windows 2000 Datacenter Server see the software documentation that comes with the serv...

Page 63: ...e The code and firmware levels must be the same for all nodes v When you set up the nodes for scalable partitions for the first time you must first log on and configure the service processor in each n...

Page 64: ...is step if you are cabling the configuration or changing the host name Use the Create Partition page to identify the nodes A page similar to the one in the following illustration is displayed a In the...

Page 65: ...r attached to the primary node b In the On merge failure attempt partial merge field select if POST should attempt a partial merge if one error is detected during full merge You can view the merge sta...

Page 66: ...scalable partition A page similar to the one in the following illustration is displayed Deleting a scalable partition To delete the scalable partition complete the following steps 1 Log in to the Rem...

Page 67: ...shown in the drop down list follow the instructions on the Web page to download the latest version 2 Install the IBM Director program 3 Download and install any applicable updates or interim fixes for...

Page 68: ...56 IBM System x3950 Type 8872 and System x3950 E Type 8874 Installation Guide...

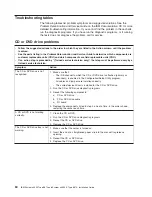
Page 69: ...oting tables These tables list problem symptoms and steps to correct the problems See Troubleshooting tables on page 60 for more information v Diagnostic programs and error messages The system diagnos...

Page 70: ...or 60 minutes then reinstall the battery and restart the server 4 Replace the components listed in step 2 one at a time in the order shown restarting the server each time 163 Real time clock error 1 R...

Page 71: ...essor x b Trained service technician only Microprocessor tray 00180xxx A PCI adapter has requested memory resources that are not available 1 Change the order of the adapters in the PCI X slots Make su...

Page 72: ...service technician Symptom Action The CD or DVD drive is not recognized 1 Make sure that v The IDE channel to which the CD or DVD drive is attached primary or secondary is enabled in the Configuration...

Page 73: ...ld replaceable units FRU v If an action step is preceded by Trained service technician only that step must be performed only by a trained service technician Symptom Action Not all drives are recognize...

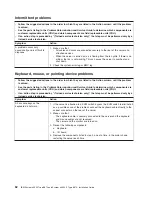
Page 74: ...the suggested actions in the order in which they are listed in the Action column until the problem is solved v See the parts listing in the Problem Determination and Service Guide to determine which...

Page 75: ...b I O board 4 Replace the components listed in step 3 one at a time in the order shown restarting the server each time USB keyboard mouse or pointing device problems v Follow the suggested actions in...

Page 76: ...work 1 Make sure that v The mouse or pointing device USB cable is securely connected to the server the keyboard and mouse or pointing device cables are not reversed and the device drivers are installe...

Page 77: ...memory v If you changed the memory you updated the memory configuration in the Configuration Setup Utility program v All banks of memory are enabled The server might have automatically disabled a mem...

Page 78: ...oprocessor has failed isolate the error by testing with one microprocessor at a time 6 Replace the following components one at a time in the order shown restarting the server each time a Trained servi...

Page 79: ...at v The server is powered on v The monitor cables are connected correctly v The monitor is turned on and the brightness and contrast controls are adjusted correctly v Make sure that no beep codes sou...

Page 80: ...reen images If this happens turn off the monitor Attention Moving a color monitor while it is turned on might cause screen discoloration Move the device and the monitor at least 305 mm 12 in apart and...

Page 81: ...alled correctly v You have not loosened any other installed devices or cables v You updated the configuration information in the Configuration Setup Utility program Whenever memory or any other device...

Page 82: ...or information panel power control button by using the force power on jumper if the server starts reseat the operator information panel If the problem remains replace the operator information panel 2...

Page 83: ...operating system suspect the I O board The server unexpectedly shuts down and the LEDs on the operator information panel are not lit See the Problem Determination and Service Guide on the IBM Document...

Page 84: ...st be performed only by a trained service technician Symptom Action The ServerGuide Setup and Installation CD will not start v Make sure that the server supports the ServerGuide program and has a star...

Page 85: ...oftware for a description of the messages and suggested solutions to the problem 3 Contact your place of purchase of the software Universal Serial Bus USB port device problems v Follow the suggested a...

Page 86: ...by a lit information LED or system error LED on the operator information panel on the front of the server If one or both of these LEDs are lit one or more LEDs elsewhere in the server might also be li...

Page 87: ...he server which gives an overview of internal components that correspond to the LEDs on the light path diagnostics panel This information and the information in Light path diagnostics panel on page 77...

Page 88: ...1 1 2 2 4 4 3 3 The following illustration shows the LEDs on the PCI X board PCI attention LEDs PCI power LEDs Power good LED Remind button You can use the remind button on the light path diagnostics...

Page 89: ...following components a Power supply b Trained service technician only Power backplane 4 Remove optional devices 5 Replace the components listed in step 3 one at a time in the order shown restarting th...

Page 90: ...ce technician only Failing microprocessor b Microprocessor tray 4 Replace the following components one at a time in the order shown restarting the server each time a Trained service technician only Fa...

Page 91: ...ing system Note The PCI or MEM LED might also be lit 1 See the BMC log and the system error log 2 If the PCI LED is lit follow the instructions for that LED 3 If the MEM LED is lit follow the instruct...

Page 92: ...Remove optional devices 4 Use 220 V ac instead of 110 V ac TEMP A system temperature or component has exceeded specifications Note A fan LED might also be lit 1 See the BMC log or the system error log...

Page 93: ...device drivers or to submit a request for information You can solve many problems without outside assistance by following the troubleshooting procedures that IBM provides in the online help or in the...

Page 94: ...For information about which products are supported by Support Line in your country or region see http www ibm com services sl products For more information about Support Line and other IBM services se...

Page 95: ...ANY KIND EITHER EXPRESS OR IMPLIED INCLUDING BUT NOT LIMITED TO THE IMPLIED WARRANTIES OF NON INFRINGEMENT MERCHANTABILITY OR FITNESS FOR A PARTICULAR PURPOSE Some states do not allow disclaimer of e...

Page 96: ...nd logos are trademarks of Sun Microsystems Inc in the United States other countries or both Adaptec and HostRAID are trademarks of Adaptec Inc in the United States other countries or both Linux is a...

Page 97: ...e may differ from its retail version if available and may not include user manuals or all program functionality Product recycling and disposal This unit must be recycled or discarded according to appl...

Page 98: ...E on the environment and human health due to the potential presence of hazardous substances in EEE For proper collection and treatment contact your local IBM representative Battery return program This...

Page 99: ...may not cause harmful interference and 2 this device must accept any interference received including interference that may cause undesired operation Industry Canada Class A emission compliance stateme...

Page 100: ...t Attention This is a Class A product In a domestic environment this product may cause radio interference in which case the user may be required to take adequate measures Taiwanese Class A warning sta...

Page 101: ...installing 10 drives 5 DVD drive problems 60 E electrical input 5 electronic emission Class A notice 87 environment 5 error messages POST 58 error symptoms CD ROM drive DVD ROM drive 60 general 61 ha...

Page 102: ...38 installing 47 P PCI BRD LED 80 pointing device problems 64 POST error messages 58 power LED 32 power problems 70 power requirement 5 power supply 5 power control button 31 power control button shie...

Page 103: ...T temperature 5 trademarks 84 troubleshooting chart 60 turning off the server 35 turning on the server 35 U United States electronic emission Class A notice 87 United States FCC Class A notice 87 Univ...

Page 104: ...92 IBM System x3950 Type 8872 and System x3950 E Type 8874 Installation Guide...

Page 105: ......

Page 106: ...Part Number 31R1855 Printed in USA 1P P N 31R1855...

Reviews: