Updating
the
server
configuration
When
you
start
the
server
for
the
first
time
after
you
add
or
remove
an
internal
option
or
external
SAS
or
SCSI
device,
you
might
receive
a
message
that
the
configuration
has
changed.
The
Configuration/Setup
Utility
program
starts
automatically
so
that
you
can
save
the
new
configuration
settings.
For
more
information,
see
“Using
the
Configuration/Setup
Utility
program”
on
page
58.
Some
options
have
device
drivers
that
you
must
install.
For
information
about
installing
device
drivers,
see
the
documentation
that
comes
with
each
option.
If
more
than
one
microprocessor
is
installed,
the
server
can
operate
as
a
symmetric
multiprocessing
(SMP)
server.
You
might
have
to
upgrade
the
operating
system
to
support
SMP.
For
more
information,
see
“Using
the
ServerGuide
Setup
and
Installation
CD”
on
page
63
and
the
operating-system
documentation.
If
the
server
has
an
optional
RAID
adapter
and
you
have
installed
or
removed
a
hard
disk
drive,
see
the
documentation
that
comes
with
the
RAID
adapter
for
information
about
reconfiguring
the
disk
arrays.
For
information
about
configuring
the
integrated
Gigabit
Ethernet
controller,
see
“Configuring
the
Gigabit
Ethernet
controller”
on
page
66.
SMP
Expansion
cabling
The
cabling
information
in
this
section
is
for
multi-node
configurations
that
consist
of
two,
four,
or
eight
servers,
for
up
to
32-way
operation.
A
node
is
a
server
that
is
interconnected
with
other
servers
or
nodes
through
the
SMP
Expansion
Ports
to
share
system
resources.
To
configure
and
cable
a
multi-node
configuration,
complete
the
following
steps:
1.
Update
the
BIOS
code
and
the
service
processor
firmware.
To
download
the
most
current
level
of
BIOS
code
and
service
processor
firmware,
go
to
http://www.ibm.com/servers/eserver/support/xseries/index.html.
2.
Make
sure
that
each
System
x3950
E
node
contains
a
minimum
of
one
microprocessor
and
one
memory
card
with
one
pair
of
DIMMs.
3.
Make
sure
that
each
microprocessor
in
the
multi-node
configuration
is
the
same
cache
size
and
type,
and
the
same
clock
speed.
4.
Make
sure
that
the
service
processor
on
each
node
is
configured
and
connected
to
the
network.
See
the
Remote
Supervisor
Adapter
II
SlimLine
and
Remote
Supervisor
Adapter
II
User’s
Guide
for
more
information.
5.
Cable
the
configuration,
using
the
instructions
in
this
section.
6.
Configure
the
scalable
partition.
See
“Using
the
Scalable
Partition
Web
Interface”
on
page
81.
7.
Press
the
power-control
button
on
the
primary
node
to
turn
on
the
multi-node
configuration
manually.
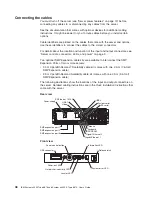
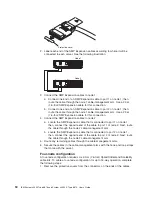
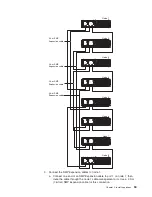
Two-node
configuration
A
two-node
configuration
requires
two
2.3-m
(7.6-foot)
XpandOnDemand
Scalability
cable
kits.
To
cable
a
two-node
configuration
for
up
to
8-way
operation,
complete
the
following
steps:
1.
Remove
the
protective
covers
from
the
connectors
on
the
ends
of
the
cables.
Chapter
2.
Installing
options
49
Summary of Contents for 88743RU - System x3950 E
Page 1: ...IBM System x3950 Type 8878 and System x3950 E Type 8879 User s Guide...
Page 2: ......
Page 3: ...IBM System x3950 Type 8878 and System x3950 E Type 8879 User s Guide...
Page 68: ...56 IBM System x3950 Type 8878 and System x3950 E Type 8879 User s Guide...
Page 98: ...86 IBM System x3950 Type 8878 and System x3950 E Type 8879 User s Guide...
Page 100: ...88 IBM System x3950 Type 8878 and System x3950 E Type 8879 User s Guide...
Page 109: ......
Page 110: ...Part Number 31R1871 Printed in USA 1P P N 31R1871...

