background image

Summary of Contents for 9348

Page 1: ...9348 Service Information...

Page 2: ...for readers comments is provided at the back of this publication If the form has been removed address your commentsto Attn Department245 IBMCorporation 3605 Highway 52 N Rochester MN 55901 7899 USA Wh...

Page 3: ...the deviceto a system disconnect all power cords if possible from the existingsystem before connectingthe signal cable to that device DANGER To prevent a possibleelectricalshock from touchingtwo surfa...

Page 4: ...you any license to these patents You can send license inquiries in writing to the IBM Director of Commer cial Relations IBM Corporation Purchase NY 10577 The following terms denoted by an asterisk int...

Page 5: ...e English is not the indigenous language It is assumed that the service representative using this manual has a basic under standing of the 9348 tape unit How This Manual Is Arranged This manual contai...

Page 6: ...Related Printed Information See the 9348 manual CustomerInformation SA21 9567 for informationon operating the tape unit i 9348 Service Information...

Page 7: ...Introduction 3 1 Placing the 9348 in the Service Position 3 1 Placing the 9348 in the Operating Position 3 9 Card and Battery Removal 3 15 Card and Battery Installation 3 20 Connector Board Removal an...

Page 8: ...3 Chapter 5 Safety InspectionGuide 5 1 Getting Ready 5 1 Safety Conditions 5 1 Safety Education 5 1 Chemicals 5 1 Performing the Inspection 5 2 Reference Information 5 2 Covers 5 2 Fuse 5 2 Slide Stop...

Page 9: ...ests B 16 AppendixC Logs C 1 Display and Clear Logs C I Clear Logs C I Display Logs C I Error Log Information INFO 0 C I Viewing the Error Log C I Clearing the Error Log C 2 2 Present Error Rate C 2 3...

Page 10: ...X 9348 Service Information...

Page 11: ...1 18 Buffer Controller ReferenceCodes 1 19 Interface Controller ReferenceCodes 1 20 3xx Tape Unit Controller Diagnostic Reference Codes 1 22 04xx Buffer Controller ReferenceCodes 1 25 06xx Interface...

Page 12: ...i i 9348Service Information...

Page 13: ...go to No Response Service Check on page 1 35 If you have a reference code that is not in Reference Codes on page 1 2 go to reference code FFD7on page 1 29 If the operator or the system report excessiv...

Page 14: ...be checked visually for bent pins or other damage when a read write card controller card or buffer card is listed as a FRU The connector card is not always listed as a FRU Sometimes a low percent FRU...

Page 15: ...if the doors are closed correctly The word DOOR will appear in the display if either the door or the top cover is opened If DOOR appears in the display when the door and top cover are closed exchange...

Page 16: ...c int code The command received from the system by the tape unitcontained an illegal parameter Ask the operator to correct the commandand to attempt the operationagain If the commandwas correct and th...

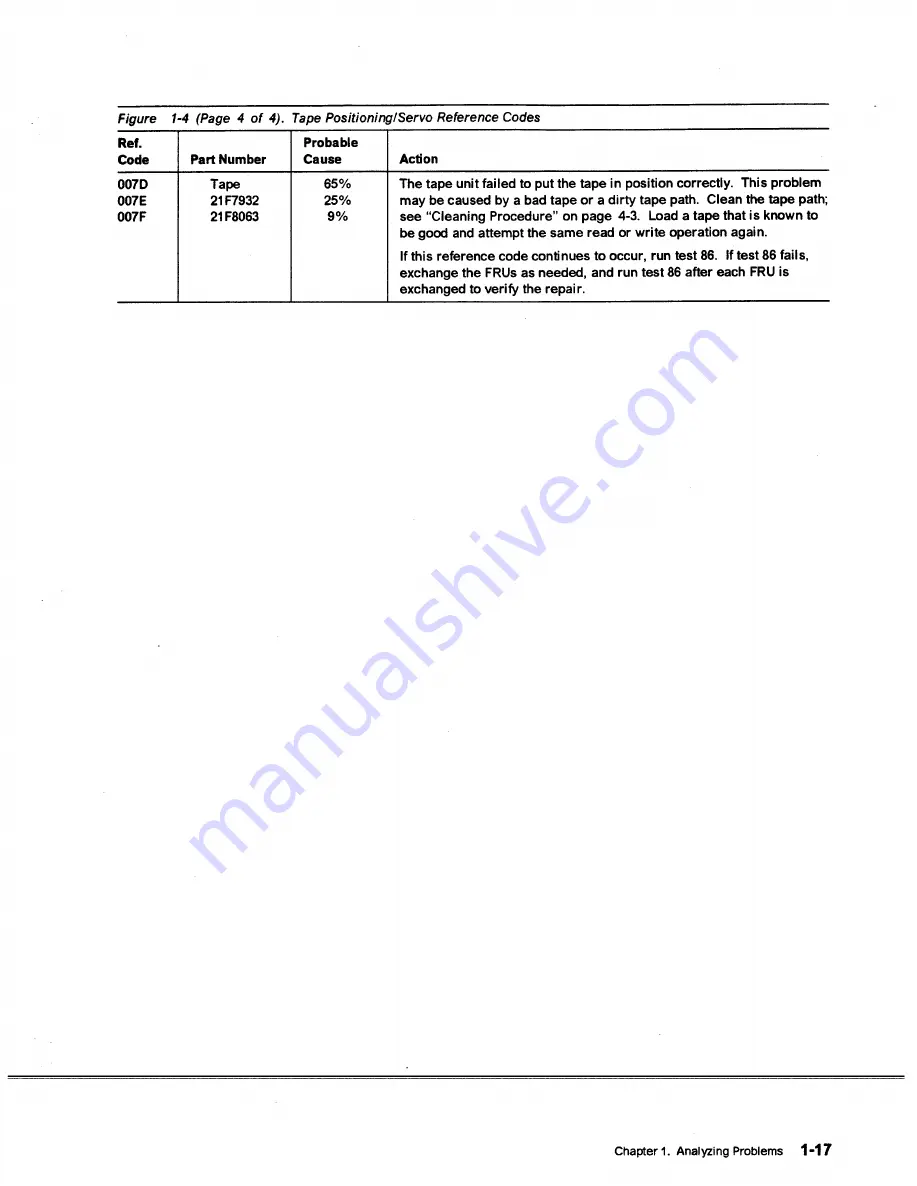
Page 17: ...e operation again If this referencecodecontinues to occur exchange the FRUs as needed Attempt the test again after each FRUis exchanged to verify the repair If the referencecode continues to occur con...

Page 18: ...ues to occur clean the head again and run the diagnostics again If you continue to get one of these reference codes exchange the FRUs as needed and run test 2 after each FRU is exchanged to verify the...

Page 19: ...the operation again or run test 2 to verify the repair If this referencecode continues to occur exchange the FRUs as needed and run test 2 after each FRU is exchanged to verify the repair Tape 21F7923...

Page 20: ...operation again or run test 2 to verify the repair If this referencecode continues to occur exchange the FRUs as needed and run test 2 after each FRU is exchanged to verify the repair The tape unit de...

Page 21: ...continues to occur exchange the FRUs as needed and run test 0 after each FRU is exchanged to verify the repair Tape 21F7933 21F7923 Three or more tracks were in error during a write operation This pro...

Page 22: ...used by a badtape or a dirty tape path Clean the tape path see Cleaning Procedure on page 4 3 Load a tape that is known to be good and attemptthe oper ation again or run test 12 with parameterA set to...

Page 23: ...an the tape path see Cleaning Procedure on page 4 3 Load a tape that is known to be good and attempt the operation again or run test 12 with parameter A set to 0 to verify the repair If this reference...

Page 24: ...rence code continues to occur exchange the FRUs as needed and run test 2 after each FRU is exchanged to verify the repair Tape 21F7923 21F7933 A 6250 density identification ID detect 0053 or verify 00...

Page 25: ...3 Load a tape that is known to be good and attempt the oper ation again or run test 62 with parameter A set to 12 to verify the repair If this reference code continues to occur exchange the FRUs as ne...

Page 26: ...5 4 Action The tape unit has lost tape tension The tape may not have an end of tape EOT marker If the tape has run off the supply reel manually pass the tape back through the tape path and wind it ar...

Page 27: ...he referencecode continues to occur exchange the remaining FRUs as needed and run test 89 after each FRU is exchangedto verify the repair If the supply hub is good and the referencecode continues to o...

Page 28: ...either the door or the top cover is opened If DOOR appears in the display when the door and top cover are closed exchange the FRUs as needed and run test 88 after each FRUis exchanged to verify the r...

Page 29: ...y tape path Clean the tape path see Cleaning Procedure on page 4 3 Load a tape that is known to be good and attemptthe same read or write operation again If this reference code continues to occur run...

Page 30: ...thcorrectly and the referencecode continues to occur run test 89 Iftest 89 fails exchange FRU21F7930 and run test 89 to verify the repair If test 89 did not fail and the refer ence code continues to o...

Page 31: ...requested exchange the FRU and attempt the operation again to verify the repair If the reference code continues to occur contact your next level of support 99 Tape 21F7932 21F7923 21F8063 Configurati...

Page 32: ...e unit has receiveda command byte compare This is an illegal command This is a programproblem beyond the unit inter face If the referencecode continuesto occur contact your next level of support Cance...

Page 33: ...problembeyondthe unit interface If the referencecode continues to occur contact your next level of support O O D C O O D D O O D E Controller 56F0080 cable Terminator tic int code The data written to...

Page 34: ...ode continuesto occur exchange the FRU and run test 45 to verify the repair Run test 2 If this reference code continues to occur exchange the FRUs as needed and run test 2 after each FRU is exchanged...

Page 35: ...76 fails exchange the remaining FRUs as needed and run test 76 after each FRU is exchanged to verify the repair I A takeup motor loop error has occurred Run test 80 If this referencecode continues to...

Page 36: ...or 21F7945 is connectedcorrectly Runtest 91 to raise the supply hub 21F7950 clamps and test 92 to retract them If the supply hub turns the motor is good If the clamps come up the hub lock solenoid 56F...

Page 37: ...21F8030 is the 9348 011and 9348 012 interface card I A direct access storage test error has occurred Run test 43 If this referencecode continues to occur exchange the FRUand run test 43 to verify the...

Page 38: ...efectiveconfigurationtape Attempt the operation again with a configurationtape that is knownto be good If this referencecode continues to occur exchange the FRUand attemptthe operationagain to verify...

Page 39: ...Runtests 140 and 141 If either of these tests fail exchange the FRU and run the tests again to verify the repair repair A direct accessstorage battery powered test error has occurred Power the tape of...

Page 40: ...Us as needed and run test 61 after each FRU is exchanged to verify the repair Action A multiprocessorerror has occurred Run tests 61 and 62 If either of these tests fail exchange the FRUs as needed an...

Page 41: ...does not come on successfully continue this procedure with the next FRU until the problem is corrected A referencecode that is not listed was sent from the tape unit to the system Run test 0 If a lis...

Page 42: ...3 15 Connector Board Removal and Installation on page 3 26 Card and Battery Removal on page 3 15 Card and Battery Removal on page 3 15 MotorIPower Card Removal on page 3 42 Interface Card Removal on...

Page 43: ...rd I This controllercard is located in the system See your system information Service Procedure See Rear on page 2 5 for location See Chapter 6 Parts Catalog on page 6 1 Part Number 79x3795 or 70F9671...

Page 44: ...the referencecode This status may be causedby a bad tape that adheres to the head cleaner block or guide rollers The tape did not load Clean the tape path See Cleaning Procedure on page 4 3 and attemp...

Page 45: ...ow in the order shown Power on the tape unit after each FRUis exchanged If the power comes on successfully the problem has beencorrected and this procedure is complete If the power does not come on su...

Page 46: ...of tape EOT EOT The tape unit is waiting at or beyondthe end of tape EOT Loading The tape is loading Rewind The tape is rewinding Unload The tape is unloading Reading The tape unit is readingfrom tape...

Page 47: ...espond to control panel commands The display lights are not on and the cooling fan is not working Is the Power switch on the control panel set to the On position Yes No 1 Set the Power switch to the O...

Page 48: ...cedure Check the fuse see Fuse Removal and Installation on page 3 110 Was the fuse blown or missing No Yes 1 Exchange or install the fuse Notes 1 If the fuse blows again make sure it is installed righ...

Page 49: ...in the service position see Placingthe 9348 in the Service Position on page 3 1 Ensurethat all connectionsto the motor power drive card are con nectedtightly otorfPower Card Connectors Chapter I Anal...

Page 50: ...cethe tape unit inthe oper ating position see Placing the 9348 inthe Operating Position on page 3 9 Insertthe CE test tape and run sequence test 2 see Running Diagnostic Tests on page A 5 Doesthe prob...

Page 51: ...tape unit and to a power outlet on the rack Note If there is a circuit breaker next to the power outlet on the rack ensure that it is set to the I on position Yes No 1 Connect the power cable to the r...

Page 52: ...ack of the tape unit look at the voltage printed on the fuse module receptacle Measure the ac voltage between pins 1and 2 on the rack power outlet Is the correct ac voltage present Yes No 1 See the ra...

Page 53: ...angerousvoltage being measured RSFTDWS Measure the ac voltage at the end of the ac power cable that con nectsto the tape unit measurethe two outside pins as shown Is the ac voltage present Yes No 1 If...

Page 54: ...SFTDWS At the back of the tape unit look at the voltage printed on the fuse module receptacle Measurethe ac voltage at the power outlet Is the correct ac voltage present Yes No 1 See the rack document...

Page 55: ...wer cable This ends the procedure 18 DANGER Ensurethat you complete the following step An electrical outlet that is not correctly wired could place hazardousvoltage on the metal partsof the system or...

Page 56: ...witch 1 21F7914 MotorIPowercard 1 21F7927 Controller card 1 2 1F8063 Transformer 1 21F7951 Did exchanging one of the failing items correct the problem Yes No 1 Contact your next level of support Place...

Page 57: ...Chapter 2 Part Locations Locations Control Panel A001 No Tape DO01 Not Permitted DO02 Not Permitted E033 Dld Not Load E044 No BOT Marker I E055 Reel Inverted F777 Check Copyright IBM Corp 1989 1992...

Page 58: ...Front Front Door Tape Movement Status Indicator DisT Power Switch I I I Front Panel Control Panel 2 2 9348 Service Information...

Page 59: ...Cable Carrier Take Up Speed Bracket Enclosure Reel Locking Tape in Path Clamps Sensors supply Hub Chapter 2 Part Locations 2 3...

Page 60: ...Bottom Supply Motor Control Reel Motor Card Hub Cable pever o t o o w e r CoolingFan Transformer Card Take up Reel Motor RH3B069 2 2 4 9348 Service Information...

Page 61: ...Rear Terminating Main AC Connector CableCarrier Bracket Chapter 2 Part Locations 2 5...

Page 62: ...Table top Unit Enclosure Cover Cover ReleaseLatch 2 6 9348 Service Information...

Page 63: ...nit also apply to the table top unit The following special tools are needed to service the tape unit Handle PN 1650840 Four inch extension PN 6431952 Kit 7 TORX bits PN 39F8407 Placing the 9348 in the...

Page 64: ...ed could place hazardousvoltage on the metal partsof the system or the products that attachto the system RSfTDO18 Set the ac power switch on the rear of the tape unit to the 0 off position Disconnect...

Page 65: ...sition 5 CAUTION Whenthe unit is extended its weight can turn over a rack that is not steady Before you pullthe unit out of the rack ensurethat a rack stabilizer is attachedto the bottomfront of the r...

Page 66: ...e tape unit forward until the locking tabs lock inthe front hole Removethe two TORX T25 cable carrier bracket screws Remove the cable carrier bracket so that when the tape unit is pivoted it does nott...

Page 67: ...ethe lifting handles will jam against the slides Ensure that nothing is loose on top of the tape unit the card cover must be fastened in place or removed Pull the slide latch on both sides to releaset...

Page 68: ...Set the slide latch so that the tape unit is in the position shown approximatelyvertical Removethe two TORX T25 screws from the bottom cover and remove the bottom cover 3 6 9348 Service Information...

Page 69: ...ition or in one position between the hori zontal and vertical position Turn the tape unit on its left side by lifting on its right side One person can lift the tape unit in this manner CAUTION The tab...

Page 70: ...en open the top cover Tab Slot Cover Prop Enclosure Cover Release Latch Left Side RH3B134 1 Remove the two TORX T25 cover mounting screws from the bottom cover and then remove the cover Cover Mounting...

Page 71: ...n a table top unit No Yes 1 Go to step 8 Place the bottom cover on the tape unit and installthe two TORX T25 screws Pull the slide latch from the notch to loosen the tape unit Pivotthe front panel bac...

Page 72: ...Installthe two TORX T15 pivot locking screws on each side of the slides Usingtwo TORX T25 screws attachthe cable carrier bracket 3 10 9348 Service Information...

Page 73: ...tape unit over the lock pushbuttons Ifthe 9348 stops before it is completely in the rack press the lock pushbuttonagain and pushthe unit into the rack until it fastens in place CAUTION Ensurethat you...

Page 74: ...Note If you are working on a rack mounted unit go to step 11 Bottom Cover Align the screw holes in the bottom cover with those in the unit and then install the two TORX T25 cover mounting screws Feet...

Page 75: ...sure over Release Latch Enclosure Cove Left Side RHSBl34 1 Turn the table unit on its base by carefully lowering the right side One person may lower the tape unit in this manner CAUTION The table top...

Page 76: ...ct the power cable and the signal cable Set the ac power switch on the rear of the tape unit to the I on position Set the Power switch on the control panel to the On position 3 14 9348 Service Informa...

Page 77: ...Card and Battery Removal Set the Power switch on the control panel to the Off position Set the ac Power switch on the rear ofthe tape unit to the 0 off position Chapter 3 Service Procedures 3 15...

Page 78: ...ethan one unit at a time The rack can turn over if you pull out morethan one unit at a time Pull the release lever located under the front panel as shown Then pull the 9348 out of the rack until the s...

Page 79: ...blade screwdriver to loosenthe screws if necessary 6 Remove the cards as needed Disconnectthe read and write cables from the readlwrite card before removing the card The cards can only be installed i...

Page 80: ......

Page 81: ...egreesCelsius 212 degrees Fahrenheit R S F T C Z If you want to exchange the battery on the buffer card remove the battery from the receptacle Note Some buffer cards may have the battery soldered in p...

Page 82: ...ttery pmtect tab located betweenthe battery and the battery clip Then measurethe voltage on the battery The voltage should be between 2 5 V and 3 0 V Do not usethe battery if the voltage is below 2 5...

Page 83: ...of the tape unit are ReadANrite card Controller card Buffer card Note When inserting the read write card hold the cable connec tors to the side to prevent damagingthe card Ifthe readlwrite card is be...

Page 84: ...Place the card cover over the top of the card enclosure with the screws offset toward the tape path Tighten the screws 3 22 9348 Service Information...

Page 85: ...side of the tape unit and carefully push the tape unit over the lock pushbuttons If the 9348 stops before it is completely in the rack press the lock pushbutton again and push the unit into the rack u...

Page 86: ...op into the enclosure as you close the cover Enclosure Cover Set the Power switch on the control panel to the On position After the battery is exchanged F999 may appear on the status display the first...

Page 87: ...run sequence test 99 See Running Diagnostic Tests on page A 5 For parameter B select SAVE Note Ensurethat the read write head is clean before you start the test see Cleaning Procedure on page 4 3 Run...

Page 88: ...and Installation Place the tape unit in the service position see Placing the 9348 in the Service Position on page 3 1 Remove the eight cable connec tors from the connector board cable Connectors 3 26...

Page 89: ...emovethe following cards see Card and Battery Removal on page 3 15 ReadMlrite card Controller card Buffer card Removethe four TORX T25 screws from the connector board Chapter 3 Service Procedures 3 27...

Page 90: ...singthe removal procedure Placethe tape unit inthe oper ating position starting with step 6 in Placingthe 9348 in the Oper ating Position on page 3 9 Insertthe CE test tape and run sequence test 2 see...

Page 91: ...new card when a controller card buffer card or an interface card is exchanged Note If a module needs to be exchanged because it was damaged when it was transferred from the old card to the new card or...

Page 92: ...to removethe control panel card door interlock microswitches or door solenoid Set the Power switch on the control panel to the Off position Set the ac power switch on the rear of the tape unit to the...

Page 93: ...ront of the rack Do not pull out morethan one unit at a time The rack can turn over if you pull out morethan one unit at a time Pull the release lever located under the front panel as shown Then pull...

Page 94: ...panel Display control cable Door solenoid cable Door interlock microswitch cable Power switch cable To removethe front panel pull the top edge forward first Note Two wires go from the sensor circuit...

Page 95: ...Removethe T O M Ti screws that holdthe top cover and front door interlock micro switches Removethe top cover and the front door interlock micro switches Torx Screws T9 Power Switch A Performthis step...

Page 96: ...Performthis step only to remove the control panel card Make a note of the wire locations on the three switches shown and remove the wires Removethe two TORX T9 screws that hold the right side of the c...

Page 97: ...nel card was removed install the control panel card Insert the card under the two clips on the left and then insert and tighten two TORX T9 screws on the right Ensure that the door interlock microswit...

Page 98: ...If the control panel card was exchanged install an overlay with the correct language on the new control panel card See Assembly 1 Labels and Slides on page 6 4 3 36 9348 Service Information...

Page 99: ...screw into the slot as shown Adjustment Adjust the solenoid in its mounting slot until there is approximately 1 5 mm of play betweenthe door and the front panel when the door closes Note Checkthat the...

Page 100: ...tch were removed install them Install the following cables Display control cable Door solenoid cable Door interlock microswitch cable Power switch cable Note Two wires go from the sensor circuit board...

Page 101: ...op cover microswitch may be damaged ifthe front panel is installed while the top cover is closed Place the front panel slide the bottom of panel on first on the front of the frame Fasten the front pan...

Page 102: ...e tape unit over the lock pushbuttons Ifthe 9348 stops before it is completely in the rack press the lock pushbuttonagain and push the unit into the rack until it fastens in place CAUTION Ensurethat y...

Page 103: ...position Set the Power switch on the control panelto the On position If the control panel was exchanged run tests 70 71 and 72 see Running Diagnostic Tests on page A 5 Insert the CE test tape and run...

Page 104: ...service position see Placing the 9348 in the Service Position on page 3 1 Remove the ribbon cable that attaches 52 on the motorlpower card to J41 on the connector card in the card enclosure Placethis...

Page 105: ...removing them Label the cables if they are not already labeled The cable with the blue and white wires comes from the dc power switch on the front panel and goes to connector J6 The cable with two bro...

Page 106: ...similar tool under the plastic insulating sheet located underthe card Lift the edge of the sheet up on to the edge of the frame Ifthis is not done the sheet will jam against the frame and prevent the...

Page 107: ...MotorlPower Card Installation Slide the motor power card into place and fasten it to the frame with the six TORX T25 screws Chapter3 Service Procedures 3 45...

Page 108: ...on the motor power card Note Connect the cable with the blue and white wires to connector J6 and connect the cable with the two brown wires to connector J7 o t o r o w e r Card Connectors RH3B076 0 3...

Page 109: ...ower card to J41 on the connector card Place the 9348 in the operating position see Placingthe 9348 in the Operating Position on page 3 9 Insert the CE test tape and run sequence test 2 see Running Di...

Page 110: ...Card Removal Placethe tape unit in the service position see Placing the 9348 in the Service Position on page 3 1 Disconnectthe cable that attaches the sensor to 521 on the connector board 3 48 9348 S...

Page 111: ...rew andto the front panel by the front door open sensor wires Disconnectthe wires that go from the sensor card to the micro switches on the front panel Note This cable has a self locking clip Pressthe...

Page 112: ...ting Holdthe card againstthe left side of the opening underthe supply reel motor Tightenthe screw Connect the wires that go from the sensor card to the microswitches on the front panel Put the two tap...

Page 113: ...J21 on the con nector card Place the 9348 in the operating position see Placingthe 9348 in the Operating Position on page 3 9 Insert the CE test tape and run sequence test 2 see Running DiagnosticTes...

Page 114: ...Place the tape unit in the service position see Placing the 9348 in the Service Position on page 3 1 Remove the speed encoder cable from the connector J71 labeled ENCODER on the connector card 3 52 93...

Page 115: ...Remove the three TORX T25 screws that hold the speed encoder base plateto the casting Pullthe speed encoder up through the casting from the top Chapter 3 Service Procedures 3 53...

Page 116: ...nsert the speed encoder through the casting so that the tape deflector is next to the tape path guide Insert and tighten the three TORX T25 screws that hold the speed encoder base plate to the casting...

Page 117: ...eled encoder on the connector card Place the 9348 in the operating position see Placingthe 9348 in the Operating Position on page 3 9 Insert the CE test tape and run sequencetest 2 see Running Diagnos...

Page 118: ...Warning Do not loosen or remove the screws on the head plate assembly These screws set the head skew adjustment This is a factory adjustment only Removethe two wires from the clips on the tape lifter...

Page 119: ...ad and the tape cleaner Insert and tighten the two TORX T25 screws that hold the tape lifter in place Attach the two wires to the clips on the solenoid Place the 9348 in the operating position see Pla...

Page 120: ...Insert the CE test tape and run sequence test 2 see Running DiagnosticTests on page A 5 3 58 9348 Service Information...

Page 121: ...Placethe tape unit in the service position see Placing the 9348 in the Service Position on page 3 1 Remove the motor drive ribbon cable from J41 on the connector card and from J2 on the motor power c...

Page 122: ...nector before attempting to remove it Remove the tension arm position sensor cable from the connector marked TENSION on the connector card J61 Removethe tension arm BOT EOT sensor cable from the conne...

Page 123: ...Disconnectthe spring from the tension arm Remove the three TORX T25 screws that hold the tension arm base plate to the casting Chapter3 Service Procedures 3 61...

Page 124: ...mbly is now setting on the tension arm assembly 8 Lift the BOTIEOT assembly away from the tension arm assembly Note You may have to movethe BOT EOT assembly a little and slightly rotate the tension ar...

Page 125: ...g the pin on the bottom of the sensor intothe hole on the tension arm base plate Align the screw hole on the sensor over the hole on the tension arm base plate Once aligned the sensor assembly should...

Page 126: ...the three TORX T25 screws that connect the tension arm base platetothe head plate Tightenthe screw indicated by the arrow first Put the spring backon the pin of the tension arm 3 64 9348 Service Infor...

Page 127: ...ion arm BOT EOT sensor cable to the connector marked BOT EOT on the connector card J51 Attach the tension arm sensor cable to the connector marked TENSION on the connector card J61 Chapter 3 Service P...

Page 128: ...card Note The connectors are made so that they can only be connected one way Placethe 9348 in the operating position see Placing the 9348 in the Operating Position on page 3 9 Insert the CE test tape...

Page 129: ...coder tape lifter cleaner block or head with plate assembly Set the Power switch on the control panel to the Off position Pull the release lever located under the front panel as shown Then pull the 93...

Page 130: ...ps to prevent static damage during repair Remove the card enclosure cover on the right side of the casting Note Each end of the cover is held by a spring loaded screw Use a flat blade screwdriver to l...

Page 131: ...write card from the card enclosure This makes it easier to pull the cable connectors backthrough the card enclosure Warning Ensurethat the read write head is covered during removal as the head can be...

Page 132: ...Removal on page 3 59 Then continue with step 8 Disconnect and move the cables shown Note Some cables have clips Press the release on the connector before attempting to remove it Disconnectthe two tape...

Page 133: ...he plastic cable clip that holdsthe write long cable to the side of the card enclosure 11 Remove the three TORX T25 screws that hold the head plate assembly to the casting Chapter 3 Service Procedures...

Page 134: ...Pull the head plate assembly out of the frame Carefully pull the read and write cables throughthe card enclosure as the head plate assembly comes through the frame 3 72 SW service Information...

Page 135: ...easily damaged Place the head plate assembly into its position in the casting Insertthe read and write cables into the card enclosure as the head plate assembly is put into position Note The read and...

Page 136: ...r wrist or heel straps to prevent static damage during repair Hold the read and write cable con nectors to the side Then insert the read write card intothe card enclosure Do not leave excess read and...

Page 137: ...Connectthe read cable and the write cable to the readlwrite card Fasten the plastic cable clip that holdsthe write long cable to the side of the card enclosure Chapter 3 Service Procedures 3 75...

Page 138: ...two tape lifter solenoid wires Connect the cables shown to the connector card Performthe procedure Tension Arm and BOT EOT Sensor Installation on page 3 63 Then continue with step 9 3 76 9348 Service...

Page 139: ...insertthe CE test tape reeI Run sequence test 99 see Running Diagnostic Tests on page A 5 Note For parameter B select SAVE Insertthe CE test tape and run sequence test 2 see Running Diagnostic Tests o...

Page 140: ...hubs If only a hub is being removed only do steps 3 and 4 Placethe tape unit in the service position see Placing the 9348 in the Service Position on page 3 1 Disconnectthe motor power cable from the...

Page 141: ...Loosen the TORX T25 screw in the center of the hub Note The screw does not have to be removed the screw can be lifted off with the hub...

Page 142: ...r possibledamage turn the supply hub over and inspectthe reel seat flags and the writeenable flag If the flags are broken or if they do not remain in place exchange the supply hub Reel Seat Flag write...

Page 143: ...the top loosen do not remove the four TORX T25 screws that hold the motor CAUTION If the motor isturned or the screws removed it may fall out the bottomof the tape unit Chapter 3 Service Procedures 3...

Page 144: ...When removing the supply motor it is possibleto damagethe sensor card with one of the motor screws Rotatethe motor until the screws enter the wide part of the slot in the casting 3 82 9348 Service in...

Page 145: ...Tighten the four motor mounting screws Chapter 3 Service Procedures 3 87...

Page 146: ...4 Slide the hubs on the motor shafts 3 88 9348 Service Information...

Page 147: ...con nectsto J1 The take up motor cable con nectsto J3 Placethe 9348 in the operating position see Placing the 9348 in the Operating Position on page 3 9 Insert the CE test tape and run sequence test...

Page 148: ...he service position see Placing the 9348 in the Service Position on page 3 1 Remove the motor drive cable from J2 on the motorlpower card Note It is not necessary to remove both ends of the cable for...

Page 149: ...Remove the connector from J5 on the motor power card Remove the take up motor power cable from J3 on the motor power card Chapter3 Service Procedures 3 91...

Page 150: ...Disconnectthe blower cable con nector Plastic C l i s Press backthe plastic clips on the air plenum that holdthe blower motor in place 3 92 9348 Service Information...

Page 151: ...7 Pull the assembly out of the frame Chapter 3 Service Procedures 3 93...

Page 152: ...lastic plenum until the clips hold it in place Connectthe blower power cable to the blower Plastic Clips Connectthe motor drive cable to 52 on the motorlpower card Note The cable is made so that it ca...

Page 153: ...Connect the cable that was removed from J5 Connect the take up motor power cable to J3 on the rnotor power card Chapter 3 Service Procedures 3 95...

Page 154: ...he 9348 in the operating position see Placingthe 9348 in the Operating Position on page 3 9 Load a tape to test the blower motor If the tape loads the blower motor is operating 3 96 9348 Service Infor...

Page 155: ...e position see Placing the 9348 in the Service Position on page 3 1 Removethe two solenoid power cables These power cables can be dis connected at a clip connection near the supply motor Removethe TOR...

Page 156: ...Performthis step only if the hub release lever must be exchanged Remove the screw that holdsthe hub release lever 3 98 9348 Service Information...

Page 157: ...ase Lever Installation Performthis step only if the hub release lever was removed Place the hub release lever in the position shown Then insert the screw intothe pivot point and tighten the screw Chap...

Page 158: ...Tighten the screw Connect the two solenoid power cables at the clip connection near the supply motor Placethe 9348 in the operating position see Placing the 9348 in the Operating Position on page 3 9...

Page 159: ...at you complete the following step An electricaloutlet that is not correctly wired could place hazardousvoltage on the metal partsof the systemor the products that attach to the system RSFTDOIB Set th...

Page 160: ...age to the cable carrier and removethe carrier bracket do the following Removethe cable carrier hinge screw from the cable bracket Pull the tape unit out the front of the rack Removethe two TORX T25 s...

Page 161: ...amage during repair Remove the terminating plug Remove the two TORX T25 panel screws Rotate the interface card away from the rear panel Note Three tabs at the bottom of the card panel slide out of the...

Page 162: ...Disconnect the power cable and the ribbon cable from the interface card i bbonCable Screws Remove the five screws indicated on the interface card 3 104 9348 Service Information...

Page 163: ...ou are exchangingthe interface card remove the module U51from the old card and plug it into the new card Usethe module extracting tool part number 9900764 or a similar tool Attach the card to the meta...

Page 164: ...you have removed the module U51 from the old card and put it in the new card Connect the t w ocables to the interface card RibbonCable RHSB028 0 2 Putthe tabs on the interface card panel into the slot...

Page 165: ...TORX T25 screwsthat hold the panel to the rear of the unit Install the terminating plug Insert and tighten the two TORX T25 mounting screwsthat attach the cable carrier bracketto the tape unit Chapter...

Page 166: ...Attach the cable carrier and insert the carrier hinge screw Connect the power cable and signal cable 3 108 9348 Service Information...

Page 167: ...r switch on the rear of the tape unit to the I on position Set the Power switch on the control panelto the On position Run sequence test 12 see Running DiagnosticTests on page A 5 Chapter 3 Service Pr...

Page 168: ...Fuse Removal and Installation Set the Power switch on the control panelto the Off position Set the ac power switch on the rear of the tape unit to the 0 off position 3 110 9348 Service Information...

Page 169: ...e from the rear of the tape unit Insertthe tip of a small screw driver or a similar tool intothe small slot on the edge of the fuse receptacle and loosen the fuse module Pull the module out Chapter 3...

Page 170: ...iangle and the 3 15 ampere fuse must be on the side nearestto the 240 V triangle Ensurethat the white arrow on the fuse module lines up with the desired voltage rating printed on the fuse module recep...

Page 171: ...e rear of the tape unit to the I on position Set the Power switch on the control panel to the On position Insert the CE test tape and run sequencetest 2 see Running Diagnostic Tests on page A 5 Chapte...

Page 172: ...k fan power wires from the side of the cooling fan along the large group of tied cables until you reach a connector The connector should be located near the side of the power transformer Disconnect th...

Page 173: ...25 screws that hold the fan to the rear panel of the tape unit Liff the fan up and out of the frame Note Part of the lower edge of the rear panel frame is cut away to permit the fan to slide out Chapt...

Page 174: ...ear panel The red and black fan power wires face toward the interface card The air flow arrow must point to the rear of the drive the air leaves through the rear panel Fasten the fan to the rear panel...

Page 175: ...e group of cables in front of the fan Tie the cables together as necessary Fan Wires Placethe 9348 in the operating position see Placing the 9348 in the Operating Position on page 3 9 6 Checkthat the...

Page 176: ...Insertthe CE test tape and run sequence test 2 see Running Diagnostic Tests on page A 5 3 118 9348 Service Information...

Page 177: ...t in the service position see Placing the 9348 in the Service Position on page 3 1 Label and record the position of the wires connectedto the ac power module Remove the wires Remove the three TORX T25...

Page 178: ...AC Power Module Installation Place the ac power module in positionand insert and tightenthe two bottomTORX T25 screws 3 120 9348 Service Information...

Page 179: ...round symbol on the module as shown Connect the four remaining wires that you labled in AC Power Module Removal on page 3 119 step 2 to the ac power module Place the 9348 in the operating position see...

Page 180: ...Insert the CE test tape and run sequencetest 2 see Running Diagnostic Tests on page A 5 3 122 9348 Service Information...

Page 181: ...val Note This procedure appliesto the table top unit only Set the Power switch on the control panel to the Off position Set the AC power switchon the rear of the tape unit to the 0 Off position Chapte...

Page 182: ...de by lifting on its right side One person can lift the tape unit in this manner CAUTION The table top unit weighs approxi mately 45 kg 98 Ib Do not try to lift it by yourself Ask other service repres...

Page 183: ...rews Left side RH3B137 0 6 EnclosureCover CAWION The table top unit weighs approxi mately45 kg 98 Ib Do nottryto lift it by yourself Ask other service representativesfor aid if you must pick up the un...

Page 184: ...re cover Ensure that the tab on the cover prop goes intothe tab slot in the enclosure While holding the enclosure cover open removethe TORX T25 prop mounting screw and then remove the prop Prop Mounti...

Page 185: ...e hole in the enclosure While holding the plunger down push the tape unit from the back until it clears the plunger Front Bezel RH3Bl384 Close the cover Push the tape unit from the back until it is ap...

Page 186: ...rails of the tape unit with the slots in the enclosure and then push the unit into the enclo sure until the plunger touchesthe front of the enclosure EnclosureCover Plunger Press the cover release lat...

Page 187: ...ver Push the plunger down until it is beneath the enclosure and then push the tape unit into the end sure until the front bezel touches the front of the enclosure Ensure that the plunger protrudes thr...

Page 188: ...the prop falls inside the enclosure the encl sure must be removedto retrieve the prop Installthe prop inthe enclosure slot and then fasten the prop to the enclosure cover by installing the TORX T25 m...

Page 189: ...then guide the prop intothe enclosure as you close the cover 6 Turn the tape unit on its left side CAUTION BottomCover The table top unit weighs approxi mately 45 kg 98 Ib Do nottry to lift it by your...

Page 190: ...Mounting Screws BottomCover Feet Left side RH3Bl37 0 8 Enclosure Cover CAUTION The table top unit weighs appmxi mately45 kg 98 Ib Do nottry to liftit by yourself Ask other service mpresentativesfor ai...

Page 191: ...Connect the signal and power cables to the rear of the tape unit Set the AC power switch on the rear of the tape unit to the I On position Chapter 3 Service Procedures 3 133...

Page 192: ...Set the AC power switch on the control panel to the On position 3 134 9348 Service Information...

Page 193: ...clean the tape path once after every eight hour work period However if any of the problems listed above develop or if the CHECK indicator starts to occur regularly in the status display the tape path...

Page 194: ...is difficult to control and often contains metal particles that damage the tape head Do not use soap and water on the tape path Soap leaves a thick film and water may damage electronic parts Discardth...

Page 195: ...t is not steady Before you pull the unit out of the rack ensure that a rackstabilizer is attached to the bottomfront of the rack Do not pull out morethan one unit at a time The rack can turn over if y...

Page 196: ...go to step 4 Press the cover release latch and then open the enclosure cover Ensurethat the tab on the cover prop goes intothe tab slot in the enclosure EnclosureCover Cover Release Latch Enclosure 4...

Page 197: ...e the cloth too damp and will make the cleaning fluid dirty Using slight pressure in one direc tion and a lint free cloth clean the tension arm movable roller 7 Using slight pressure in one direc tion...

Page 198: ...14 Close the top cover 4 8 9348 Service Information...

Page 199: ...e tape unit and push gently to slide over the lock buttons Ifthe 9348 stops before it is completely in the rack press the lock pushbuttonagain and push the unit into the rack until it fastens in place...

Page 200: ...e enclosure cover until the tab on the cover prop is out of the tab slot in the enclosure and then guide the prop into the enclosure as you close the cover EnclosureCover RH3B148 3 Set the Power switc...

Page 201: ...if the condition is dangerous For example the following conditions are not safe Electrical In the primary power area a frame that is not grounded Mechanical Missing or damaged covers Other A leaking c...

Page 202: ...ice memorandums SMs including engineering change announcements ECAs and service aids SAs for this machine type The 9348 manual Customer Information SA21 9567 Electrical Safety for IBM Customer Enginee...

Page 203: ...not pull out morethan one unit at a time The rack can turn over if you pull out more than one unit at a time Press the release lever located under the front panel as shown Then pull the tape unit out...

Page 204: ...Ensure that a slide stopping screw is in place on both slides 5 4 9348 Service Information...

Page 205: ...Do not pull out morethan one unit at a time The rack can turn over if you pull out morethan one unit at a time Pressthe release lever located under the front panel as shown Then pull the tape unit ou...

Page 206: ...Ensurethat there are two pivot locking screws in each slide 5 6 9348 Service Information...

Page 207: ...lowing labels Multiple Language bottom Information Backplate back Tip top rack mountedonly Weight top Exchange the labels ifthey are damaged not readable or missing See the Parts Catalog to order new...

Page 208: ...llow striped frame ground wire is connected betweenthe center connector of the ac filter and the ac filter screw Ensurethat a green and yellow striped wire is connected betweenan ac filter screw and t...

Page 209: ...and parts or assemblies This ground symbol is pressed into the bottom cover Power Cable Power on the tape unit and observe that the power comes on Power off the tape unit and observe that the power go...

Page 210: ...e for visible cracks wear or dama ge Check for 1 0 ohm or less of resist ance between the power cable ground and the power supply frame Connect the power cable to the back of the tape unit 5 10 9348 S...

Page 211: ...Chapter 6 Parts Catalog Copyright IBM Corp 1989 1992...

Page 212: ...cted in the Units column indicates that the part has a restricted availability INDENTURE The indenture is marked by a series of dots located before the parts description The indenture indicates the re...

Page 213: ...Assemblies Final Assembly 6 8 Front CoverAssembly 6 14 Labelsand Slides 6 4 Line Cord Chart for Table Top Units 6 20 Table Top Assembly 6 16 Table Top Assembly Cables 6 18 Chapter6 PartsCatalog 6 3...

Page 214: ...Assembly 1 Labels and Slides 6 4 9348 Service Information...

Page 215: ...Japanese Caution Label Danish Caution Label Dutch Caution Label Korean Caution Label Norwegian Caution Label Portuguese Caution Label French Caution Label Switzerland Caution Label Switzerland Caution...

Page 216: ...Assembly 1 continued 6 6 9348 Service Information...

Page 217: ...late 9348 002 and 012 Label AC Switch On Off Screw Hinge Screw Hex HD Slide Assembly Right Side Slide Assembly Left Side Cable Carrier Arm Shipping Bracket Bottom Cover Screw T25 Units 4 4 2 1 1 1 1 1...

Page 218: ...Assembly 2 Final Assembly SEEASSEMBLY 3 1 3 0 1 1 3 6 8 service Information...

Page 219: ...fer Card ProgramModuleKit Controller Card ReadIWrite Card Connector Card Screw 6 32 x 3 8 Binder HD Front Cover Assembly see Assembly 3 Supply Hub Screw Hub Take up Reel Units 2 8 1 2 1 6 1 1 1 1 1 1...

Page 220: ......

Page 221: ...002 Terminator Plug 9348 011and 012 Cable Carrier Bracket Screw T25 Blower Fan Duct Blower Fan Power Motor Drive Card Screw T25 Cooling Fan Screw T25 Motor Control Cable AC Switch and Power Module Scr...

Page 222: ...Assembly 2 continued 6 12 9348 Service Information...

Page 223: ...Sensor Assembly Screw T25 Tape Lifter Unit Screw T25 Readwrite Head Screw T25 Read Cable included in part 21F7933 Write Cable included in part 21F7933 Units 1 8 1 4 NP NP 1 1 1 3 1 2 1 3 1 1 Asm Inde...

Page 224: ...Assembly 3 Front Cover Assembly 6 14 5348 Service Information...

Page 225: ...8 21F7919 21F7987 21F7914 21F7988 Description Front Cover Assembly Door Flag Screw 4 40 x 518 Binder HD Washer Flat Front Door Assembly Rack Latch Handle Rack Latch Spring Screw 6 32 x 114 Binder HD W...

Page 226: ...Assembly 4 Table Top Assembly 6 16 934 service information...

Page 227: ......

Page 228: ...Assembly 5 Table Top Assembly Cables 6 18 9348 Service Information...

Page 229: ...F4222 xxxxxxx Description Terminator Plug 9348401 and 002 Terminator Plug 9348411 and 012 Terminator Plug RlSC 6000 only Systemto Unit Cable 4 meter 9348 001 and 002 Systemto Unit Cable 12 meter 9348...

Page 230: ...hillipines Taiwan Thailand Trinidad Tobago U S A except Chicago Venezuela Chile Italy 6952365 1Liechtenstein Switzerland 0 Bahrain Bermuda Brunei Channel Islands Cyprus Hong Kong India Ireland Kenya K...

Page 231: ...8 6 17 21F7993 4 9 6 17 21F7994 4 1 6 17 21F7995 4 4 6 17 21F7996 4 6 6 17 21F7997 4 10 6 17 21F7998 4 3 6 17 21F8012 3 7 6 15 21F8013 3 6 6 15 21F8017 1 14 6 7 21F8030 2 24 6 11 21F8032 2 28 6 11 21F...

Page 232: ...7 2 9348 service Information...

Page 233: ...d Not Load 8111 Reading E044 No ROT Marker I 8222 Wrlting E055 Reel Inverted I COO2 System Busy E066 Door Open F777 Check IJon ine Rewind Unload1 Cancel Diagnostic I Open Mode 1 1 Description The cont...

Page 234: ...arning Pressingthe Cancel button a second time causes all data in the storage area to be lost Service RepresentativeButtons Diagnostic Mode Pressing the Diagnostic Mode button puts the tape unit in th...

Page 235: ...oved from the supply reel to the take up reel loading or from the take up reel to the supply reel rewinding While the tape is loading the light on the extreme left will flash When the tape is loaded t...

Page 236: ...T 0 is displayed to show that the tape unit is in the TEST mode 3 The number displayed is the diagnostic test number Usethe Diagnostic Select buttonto select the test you want to run Press Enter to ru...

Page 237: ...stic mode button 12 Initialize the status registers by setting the tape unit Power switch to the Off and then On ID Option This option is usedto display the ID address Use the following procedure to v...

Page 238: ...t Diagnostictests 0 39 each test number will be displayed as it is running Some tests run too fast for you to see the test number 14 See Figure A I to determine if the test is interactive If the test...

Page 239: ......

Page 240: ......

Page 241: ...Figure A 1 Page 4 of 4 Diagnostic Test Conditions DiagnosticTest Tape Needed InteractiveTest SequenceTed Yes Yes No No Appendix A Control PanelOperations A 9...

Page 242: ...A 10 9348 Service Information...

Page 243: ...ced in control to start a test sequence which completes the diagnostic power up procedure 1 Controller card Kernel tests Tape unit specific tests Front panel lights 2 Buffer card Kernel tests Buffer t...

Page 244: ...50 density tape rewind and read the tape rewind write the tape in 1600density rewind and read the 1600density tape then rewind Duringthe write process the Enter key causesthe write to end early so tha...

Page 245: ...re shown inthe total error rate logs using the INFOoption and values of 3 4 and 5 Error rate results are collected until Sequence 3 is used to initializethe log Test 4 is similar to Test 2 WellnessTes...

Page 246: ...loop back check number param eter A of zero and will run all loop back checks The sequence DiagnosticTest 13 Drive Controller Power On Test Sequence This sequence is started by the drive controller a...

Page 247: ...ksthe operation of the servo and motor drive circuits These sequence tests are not interactive The sequence DiagnosticTest 18 ServoIMotor DriveCheckout Sequence A scratch tape is needed for this test...

Page 248: ...fined Sequence This test runs the user defined sequence The following is an example of a user defined sequence Select the CONF option and press Enter Selectthe CONF 38 value and press Enter When ONCE...

Page 249: ...or 6 The direct access storage that is not battery powered is tested checking for accept able data and saved data The test ensures that writing to one location has no affect on other locations This te...

Page 250: ...R to be checked out from the other side The test performs a walking ones and zeros test in a way that does not destroy data All of the storage may be checked with the exception of the main interrupt l...

Page 251: ...ooped through the formatting section of the readlwrite card using the multiprocessor loop back command ParameterA indi cates the extent of the test Parameter Loop Back Check A 0 Run all loop backcheck...

Page 252: ...Y are combinations of two tracks to disable Tracks may be specified as 1through 9 with 0 indicating no tracks DiagnosticTest 64 Tape Unit InitiatedAnalog Loop Back Parameter A loop back block type Th...

Page 253: ...ont Panel Message Check This is an interactive test This test displays all the front panel messages The front panel buttons are defined as follows for the test DiagnosticSelect Switch Selects the next...

Page 254: ...n Counter Test The tape must be unloaded for this test CHAN A and CHAN B bits are set on and off on the Quadrature Decode Circuit A check is made for correct counts DiagnosticTest 84 TensionShutdownCh...

Page 255: ...this test This test engages the supply hub clamps DiagnosticTest 92 Hub Unlock Check This is an interactive test This test retracts the supply hub clamps DiagnosticTest 93 Blower Check This is an int...

Page 256: ...e gain display The gain profiles are generated by Test 99 Values range from 158to 205 Typical good values are between 170 and 195 If the range of values displayed is greater than 10 clean the read wri...

Page 257: ...rection to the beginning of tape marker with the read electronics turned on and the density selected DiagnosticTest 104 Head Crosstalk Exerciser Parameter A density A scratch tape is needed for this t...

Page 258: ...storage is tested for the ability to receive and hold data This test destroys data in the data buffer DiagnosticTest 128 This test is not used DiagnosticTest 129 This test is not used Interface Card T...

Page 259: ...cord is read from the tape verifying the data but without the results being placed in the data buffer The blank tape control parameter sets the maximum amount of blank tape the tape unit will move whi...

Page 260: ...mpt the operation again if a failure occurs DiagnosticTest 170 Write Tape Markto Buffer A tape mark entry is generated in the buffer without writing it to tape DiagnosticTest 171 CreateRecord in Buffe...

Page 261: ...e error and error rate logs and can be displayed using INFO Parameter Description A 0 Remove stream error normal 1 Hold stream 1 error normal 2 Remove single error normal 3 Hold 1single 1error normal...

Page 262: ...Data Buffer All entries inthe data buffer are removed DiagnosticTest 175 InitializeTotal Log The phase encoded PE and group coded recording GCR total logs are cleared DiagnosticTest 176 Buffer Write...

Page 263: ...6 To leave diagnostic mode press the Cancel button or the Option button Error Log Information INFO 0 Viewing the Error Log The error log saves the last 30 errors and exception conditions Because this...

Page 264: ...was OC8 A zero must be added to the left to get OOC8 This reference code and the repair action can be found in the reference code tables The lower number is a time stamp There are no FRUs 1E07 OC81 Ex...

Page 265: ...imal errors not corrected WS HHHH Soft write errors in hexadecimal corrected errors RS HHHH Soft read errors in hexadecimal corrected errors WD DeDD Amount of data written in bytes RD DeDD Amount of d...

Page 266: ...nit logs usethis clock Time is displayed in hours minutes and seconds of operation IH DDDDDl hours IM DDI minutes I S DDI seconds Example IH 1941 hours IM 271 minutes IS 041 seconds 13 Power Cycles IN...

Page 267: ...eding another attempt LADDDDD Total number of load operations attempted 24 Unit Type Number INFO24 displays the unit type number 9348 25 Program Module Kit Revision Number INFO 25 displays licensed in...

Page 268: ...C 6 9348 Service Intormation...

Page 269: ...s the Enter button to select the configuration parameter you want to change Note If ILLEGALis displayed refer to Changing Locked Configuration Values 7 Pressthe Diagnostic Select buttonto see the valu...

Page 270: ...that the tape unit is in the diagnostic mode 4 Pressthe Diagnostic Select button until CONF is displayed 5 When CONF is displayed press the Enter button to select the CONF option CONF 0 is displayed t...

Page 271: ...arameter of the tape unit 26 Press the Enter button The current ID address is displayed 27 Press the Diagnostic select switch until the ID value you need is displayed and then press the Enter button 2...

Page 272: ...D 4 9348 Service Information...

Page 273: ...inning of tape BOT marker at the start point with respectto the head MB A unit of measurementfor storage also called megabyte One megabyte is equal to 1 048 576 bytes approximatelyone million Microswi...

Page 274: ...6 2 9348 Service Information...

Page 275: ...tests 6 11 cooling fan installation 3 116 cooling fan removal 3 114 covers safety inspection 5 2 D danger notices list of iii description control panel A 1 description continued lights A 2 operator bu...

Page 276: ...ver 2 3 carrier arm bracket 2 3 cleaner block 2 3 connector card 2 4 locations continued control panel 2 1 2 2 cooling fan 2 4 cover prop 2 6 cover releaselatch 2 6 enclosurecover 2 6 front 2 2 2 6 fr...

Page 277: ...front panel 5 2 safety continued fuse 5 2 grounds 5 8 labels 5 7 pivot locking screws 5 5 referenceinformation 5 2 slide stopping screws 5 3 top cover 5 2 safety educationcourse electrical 5 1 safety...

Page 278: ...W who should use this manual v X 4 9348 Service Information...

Page 279: ...to ask questions or make comments about the functions of IBM products or systems you should talk to your IBM representative or to your IBM authorized remarketer This form is provided for comments abou...

Page 280: ...RY IF MAILED IN THE UNITED STATES BUSINESS REPLY MAlL FIRST CLASS MAIL PERMIT NO 40 ARMONK NEW YORK POSTAGE WILL BE PAID BY ADDRESSEE ATTN DEPT 245 IBM CORPORATION 3605 HWY 52 N ROCHESTER MN 55901 789...

Page 281: ...o ask questions or make comments about the functions of IBM products or systems you should talk to your IBM representative or to your ISM authorized remarketer This form is provided for comments about...

Page 282: ...AGE NECESSARY IF MAILED IN THE UNITED STATES BUSINESS REPLY MAlL FIRST CLASS MAIL PERMIT NO 40 ARMONK NEW YORK POSTAGEWILL BE PAID BY ADDRESSEE ATTN DEPT 245 IBM CORPORATION 3605 HWY 52 N ROCHESTER MN...

Reviews: