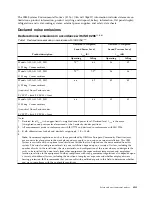
Table 5. Appliance location considerations (continued)
Factor
Comments
Heat, electricity, and EMI
Avoid areas where heat, electrical noise, and electromagnetic fields are generated.
Prepare the rack
1.
Ensure that the leveling jacks on the bottom of the rack are fully extended to the floor with the full
weight of the rack on them.
v
In single rack installations, attach stabilizers to the rack.
v
In multiple rack installations, couple the racks together.
2.
Check that the rack is stable before extending an appliance from the rack.
3.
Extend only one appliance at a time. Extending two or more simultaneously can destabilize the rack.
4.
Determine the placement of each appliance in the rack before you install the rails.
5.
Install the heaviest appliances (usually the Slicestor
®
appliances) on the bottom of the rack first, and
then work upward.
Unpack and inspect the box and its contents
1.
Inspect outside of box for damage.
2.
Note if the box was damaged in any way.
3.
Open the top of the box and inspect for damage.
4.
Remove all of the components from the packaging and inspect for damage.
5.
Arrange for assistance lifting or installing the appliance in a rack. Use a forklift or lift table to prevent
possible injury.
CAUTION:
To prevent personal injury and equipment damage, have someone assist you during the equipment
installation. If necessary, reduce the weight of the enclosure by removing the hard disk drives and
power supply units during installation.
When using the lifting straps, keep them even and at the same level always. Otherwise, the system
can slide to one side, and possibly out of the straps completely. Make sure that the rubberized
sides of the lifting straps are against the chassis metal.
6.
If the appliance itself shows damage, file a damage claim with the carrier who delivered it.
In addition to the appliance, the box includes:
v
Rail kits
v
Cables
v
Manual
Remove packing materials on and in the appliance
1.
Remove the tape warning on the top of the chassis that says: "Remove tape and foam before racking
system."
2.
Loosen the thumbscrews to either side of the faceplate for the appliance.
3.
Open the faceplate.
4.
Remove the packing foam from the inside of the faceplate.
5.
Close the faceplate.
6.
Tighten the thumbscrews.
6
IBM Cloud Object Storage System: Accesser F5100 Appliance Manual 3401-A02/3403-A02
Summary of Contents for Accesser F5100 3401-A02
Page 4: ...iv IBM Cloud Object Storage System Accesser F5100 Appliance Manual 3401 A02 3403 A02...
Page 6: ...vi IBM Cloud Object Storage System Accesser F5100 Appliance Manual 3401 A02 3403 A02...
Page 8: ...viii IBM Cloud Object Storage System Accesser F5100 Appliance Manual 3401 A02 3403 A02...
Page 14: ...xiv IBM Cloud Object Storage System Accesser F5100 Appliance Manual 3401 A02 3403 A02...
Page 16: ...xvi IBM Cloud Object Storage System Accesser F5100 Appliance Manual 3401 A02 3403 A02...
Page 28: ...12 IBM Cloud Object Storage System Accesser F5100 Appliance Manual 3401 A02 3403 A02...
Page 40: ...24 IBM Cloud Object Storage System Accesser F5100 Appliance Manual 3401 A02 3403 A02...
Page 41: ......
Page 42: ...IBM Printed in USA...


