


Power-On Password, CMOS Reset
A power-on password denies access to the system by an unauthorized user
when the system is powered on. When a power-on password is active, the
password prompt appears on the screen each time the system is powered
on. The system unit starts after the proper password is entered.
In some cases, you might be required to service a system with an active and
unknown power-on password. To clear a password from the system, first
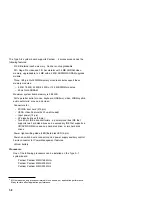
identify the system CMOS jumper by referring to “System Board
Layout—Type A-1” on page 5-2 and “System Board Layout—Type A-2” on
page 5-5, then follow these steps.
1. Power-off the system unit.
2. Unplug the power cable from the electrical outlet.
Attention: Do not attempt these steps with the power cord plugged into
the electrical outlet. The power supply maintains
+
5 V dc of auxiliary
power when the power switch is powered off. System damage might
result if the power cord is not unplugged during testing.
3. Locate the power on password jumper on the system board.
4. Move the jumper from pins 1-2 to pins 2-3 to erase the password. See
“System Board Layout—Type A-1” on page 5-2 and “System Board
Layout—Type A-2” on page 5-5.
5. The system detects the change and the password, time, and date are
erased from memory. Power Management settings are also deleted.
(See “Power Management” on page 1-21.)
6. Move the jumper from pins 2-3 to pins 1-2 for normal operation.
7. Plug the power cable into the electrical outlet and power-on the system
unit.
8. Run the Setup Utility to restore the configuration settings. Press Esc to
save with the password disabled.
9. When you are finished servicing the machine, run the Setup Utility to
restore the configuration settings. (You must reset the time, date, and
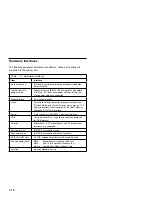
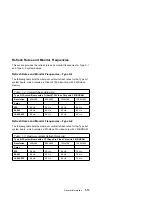
System Board Type
Jumper
System Board Type A-1
Password Jumper JP6
System Board Type A-2
Password Jumper JP3
1-14
Summary of Contents for Aptiva 2140
Page 2: ......
Page 8: ...vi...
Page 24: ...xxii...
Page 26: ...xxiv...
Page 128: ...3 14...
Page 132: ...2010 Cover Do not lift the cover too high as the tabs might break 4 4...
Page 134: ...Figure 4 2 3 5 In Cage 4 6...
Page 136: ...JP7 JP6 JP4 J2 J1 Figure 4 4 Console cable removal 4 8...
Page 138: ...Figure 4 7 Removing the console 4 10...
Page 139: ...Figure 4 8 Removing the console bottom plate Figure 4 9 Console spring Repair Information 4 11...
Page 170: ...6 2...
Page 174: ...Assembly 2 Machine Type 2140 System Unit Interior SL A 1 3 4 5 6 2 7 4...
Page 178: ...Assembly 4 Machine Type 2142 System Unit Interior SL A 1 3 4 5 7 6 2 7 8...
Page 181: ...Assembly 5 Diskette Hard Disk Drives and Zip Drive 3 1 4 4 4 2 Parts Catalog 7 11...
Page 185: ...Assembly 7 CD DVD ROM Drive Modem and TV Cards 3 5 1 2 4 6 Parts Catalog 7 15...
Page 196: ...8 4...
Page 206: ...B 8...
Page 211: ......


