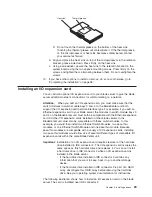
5. Locate the battery on the system board.
Battery
6. Remove the battery:
a. Use your finger to press down on one side of the battery; then, slide the
battery out from its socket. The spring mechanism will push the battery out
toward you as you slide it from the socket.
Note:
You might need to lift the battery clip slightly with your fingernail to
make it easier to slide the battery.
b. Use your thumb and index finger to pull the battery from under the battery
clip.
Note:
After you remove the battery, ensure that the battery clip is touching
the base of the battery socket by pressing gently on the clip.
7. Insert the new battery:
a. Tilt the battery so that you can insert it into the socket, under the battery
clip.
b. As you slide it under the battery clip, press the battery down into the
socket.
8. Close the blade server cover (see “Closing the blade server cover” on
page 40).
Chapter 3. Installing options
37
Summary of Contents for BladeCanter HS20
Page 3: ...BladeCenter HS20 Type 8832 Installation and User s Guide ERserver...
Page 7: ...Japanese Voluntary Control Council for Interference VCCI statement 83 Index 85 Contents v...
Page 8: ...vi BladeCenter HS20 Type 8832 Installation and User s Guide...
Page 14: ...xii BladeCenter HS20 Type 8832 Installation and User s Guide...
Page 26: ...12 BladeCenter HS20 Type 8832 Installation and User s Guide...
Page 32: ...18 BladeCenter HS20 Type 8832 Installation and User s Guide...
Page 58: ...44 BladeCenter HS20 Type 8832 Installation and User s Guide...
Page 66: ...52 BladeCenter HS20 Type 8832 Installation and User s Guide...
Page 68: ...54 BladeCenter HS20 Type 8832 Installation and User s Guide...
Page 98: ...84 BladeCenter HS20 Type 8832 Installation and User s Guide...
Page 102: ...88 BladeCenter HS20 Type 8832 Installation and User s Guide...
Page 103: ......
Page 104: ...Part Number 59P6556 Printed in U S A 1P P N 59P6556...


