Configuring management ports on I/O modules
Under
I/O Module Tasks
, click
Management
; then, click the bay number that
corresponds to the I/O module that you are configuring.
v
In the
New Static IP address
fields, specify the IP address to use for this
interface. The new static IP address must be on the same subnet as the internal
network interface (eth1).
v
Click
Advanced Management ” Advanced setup
. Enable the external ports.
v
Click
Advanced Management ” Advanced setup
. (Optional) Enable external
management.
Saving and restoring the configuration file
After you have configured the management module, you can save the
configuration file to a drive attached to the system running the
management-module Web interface. Then, if the configuration in the management
module becomes damaged or if the management module is replaced, you can
restore the saved configuration file to the management module. Use the
management-module web interface to save and restore the configuration file (
MM
Control > Configuration File
).
Configuring an I/O module
To connect any of the blade servers to the network, you must have an Ethernet
switch module installed in I/O-module bay 1 or 2, or a pass-thru module in
I/O-module bay 1 or 2 connected to an external Ethernet switch. If you have an
I/O expansion option installed on one or more blade servers, you must have
compatible I/O modules (switch modules or other compatible modules) in I/O
module bays 3 or 4. See “Removing and installing I/O modules” on page 56 for
information about the location and purpose of each I/O module.
What to configure
You must configure switch-module IP addresses and subnet masks through the
management-module web interface to communicate with the management module
and remote management station. This is in addition to the IP addresses that are
configured on the management module. You might also have to use the user
interface on the switch module to configure the switch external ports to operate in
the correct link aggregation (trunking) mode, or to configure any VLANs or other
special conditions.
To allow blade servers to communicate with the network, make sure that the
External ports configuration item in the management module is set to
Enabled
. In
the management-module web interface, under
I/O Module Tasks
, click
Management ” Bay
n
” Advanced Management ” Advanced Setup
and enable the
item (where
n
is the number of the I/O bay).
To access the user interface using external ports on the switch module, make sure
that the
External management over all ports
configuration item is set to enabled.
See your network administrator before enabling this feature.
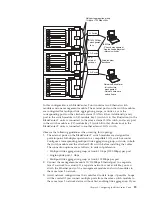
Because all blade servers in the BladeCenter T unit share access to the external
LAN through the switch ports, you can configure the ports on a switch module to
26
BladeCenter T Type 8267: Hardware Maintenance Manual and Troubleshooting Guide
Summary of Contents for BladeCenter T
Page 1: ...BladeCenter T Type 8267 Hardware Maintenance Manual and Troubleshooting Guide ...
Page 2: ......
Page 3: ...BladeCenter T Type 8267 Hardware Maintenance Manual and Troubleshooting Guide ...
Page 16: ...xiv BladeCenter T Type 8267 Hardware Maintenance Manual and Troubleshooting Guide ...
Page 20: ...xviii BladeCenter T Type 8267 Hardware Maintenance Manual and Troubleshooting Guide ...
Page 52: ...32 BladeCenter T Type 8267 Hardware Maintenance Manual and Troubleshooting Guide ...
Page 102: ...82 BladeCenter T Type 8267 Hardware Maintenance Manual and Troubleshooting Guide ...
Page 126: ...106 BladeCenter T Type 8267 Hardware Maintenance Manual and Troubleshooting Guide ...
Page 138: ...118 BladeCenter T Type 8267 Hardware Maintenance Manual and Troubleshooting Guide ...
Page 139: ......
Page 140: ... Part Number 94Y7061 Printed in USA 1P P N 94Y7061 ...


