
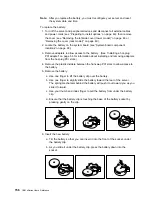


7. Reinstall any adapters you removed. (See “Installing a hot-plug PCI adapter”
on page 56 for information about installing and removing adapters from the
hot-plug PCI slots.)
8. Reinstall any plastic dividers that you removed.
9. Reinstall the top cover and complete the installation (see “Completing the
installation” on page 85).
Note: You will have to wait approximately 20 seconds after you plug the
power cord of your server into an electrical outlet for the Power Control
button to become active.
10. Start the Configuration/Setup Utility program and set configuration parameters
as needed.
To set the system date and time, go to “Date and Time” on page 23.
To set the power-on password, go to “Using the power-on password menu”
on page 24.
To reconfigure your server, follow the instructions given in “The
Configuration/Setup Utility program” on page 20 (all models).
Chapter 6. Solving problems
159
Summary of Contents for eServer 240 xSeries
Page 1: ...User s Reference xSeries 240...
Page 26: ...16 IBM xSeries User s Reference...
Page 50: ...40 IBM xSeries User s Reference...
Page 116: ...106 IBM xSeries User s Reference...
Page 170: ...160 IBM xSeries User s Reference...
Page 180: ...170 IBM xSeries User s Reference...
Page 219: ...IBM Part Number 21P9014 Printed in the United States of America 21P9 14...


