


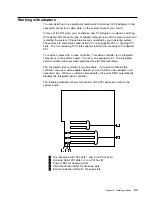

Chapter 4. Installing options
This section provides instructions to help you add options to your server. Some
option-removal instructions are provided, in case you need to remove one option to
install another.
Note: The illustrations in this document might differ slightly from your hardware.
Before you begin
Before you begin to install options in your server, read the following information:
Become familiar with the safety and handling guidelines specified under “Safety
information statements” on page v, “Electrical safety” on page 42 and
“Handling static-sensitive devices” on page 44. These guidelines will help you
work safely while working with your server or options.
You do not need to turn off the server to install or replace hot-swap power
supplies, hot-swap drives, hot-swap fans, or hot-plug PCI adapters.
The orange color on components and labels in your server indicates hot-swap
or hot-plug components. This means that you can install or remove the
component while the system is running, provided that your system is configured
to support this function. For complete details about installing or removing a
hot-swap or hot-plug component, see the information provided in this chapter.
The blue color on components and labels indicates touch points where a
component can be gripped, a latch moved, and so on.
Make sure that you have an adequate number of properly grounded electrical
outlets for your server, monitor, and any other options that you intend to install.
Place your server in a location that is dry. Rain or spilled liquids might damage
your server.
Be sure to leave space around the server to allow the server cooling system to
work properly.
– On a tower model, leave about 127 mm (5 in.) of space around the front
and rear of the server.
– On a rack model, refer to the documentation that comes with the rack.
Leave about 50 mm (2 in.) of ventilated space on the right and left sides of the
server to allow the server cooling system to work properly. Leave 100 mm
(4 in.) of clearance at the rear of the server for cables.
Have a supply of 1 MB and 2 MB, 3.5-inch diskettes available.
Back up all important data before you make changes to disk drives.
Have a small, flat-blade screwdriver available.
For a list of supported options for your server, refer to
http://www.ibm.com/pc/us/compat on the World Wide Web.
Copyright IBM Corp. 2000
41
Summary of Contents for eServer 240 xSeries
Page 1: ...User s Reference xSeries 240...
Page 26: ...16 IBM xSeries User s Reference...
Page 50: ...40 IBM xSeries User s Reference...
Page 116: ...106 IBM xSeries User s Reference...
Page 170: ...160 IBM xSeries User s Reference...
Page 180: ...170 IBM xSeries User s Reference...
Page 219: ...IBM Part Number 21P9014 Printed in the United States of America 21P9 14...


