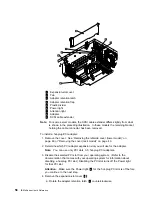

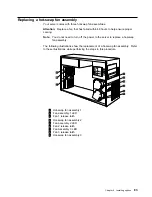

To install a non-hot-swap drive in one of the non-hot-swap bays:
1. Turn off the server and peripheral devices (see “Preparing to install options” on
page 46) and then remove the cover. See “Removing the left-side cover
(tower model)” on page 48 or “Removing the cover (rack model)” on page 49.
2. Remove the trim bezel. (See “Removing the trim bezel” on page 51.)
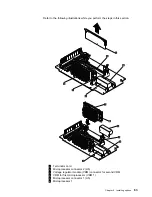
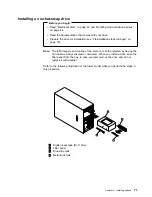
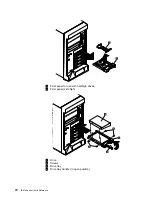
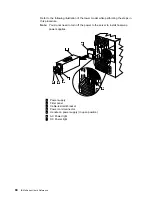
3. Remove the filler panel
2
from the bay opening by pulling the filler panel
away from the server. You do not need the filler panel when you have a drive
installed in the bay.
4. Touch the static-protective bag containing the drive to any unpainted metal
surface on the server; then, remove the drive from the bag and place it on a
static-protective surface.
5. Set any jumpers or switches on the drive according to the documentation that
comes with the drive.
6. Install rails on the drive.
If you are installing a standard-size drive:
a. Pull the blue slide rails
3
off the back of the filler panel.
b. Clip the rails onto the sides of the drive.
If you are installing a digital linear tape (DLT) backup drive
1
, the slide
rails
4
and screws are included in the box with your server
documentation.
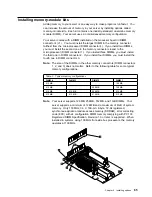
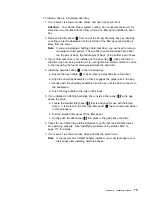
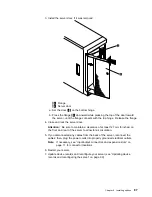
7. Place the drive so that the slide rails engage in the bay guide rails. Push the
drive into the bay until it clicks into place.
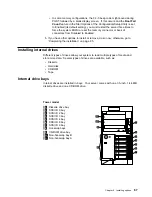
8. If you have not already done so, install an optional SCSI adapter. (See to
“Working with adapters” on page 53 for information about installing an
adapter.) See “SCSI drives” on page 69 for information about optional SCSI
adapters, installation of drives in the non-hot-swap bays, and the 16-bit 2-drop
SCSI cable that is provided for use with optional SCSI adapters.
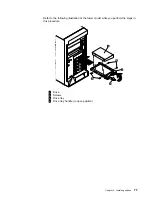
9. Connect one of the connectors on the SCSI cable for the non-hot-swap drive
bays to the back of the drive
1
.
10. Connect a power cable to the back of the drive. Power cables for
non-hot-swap drives come installed in your server. The connectors are keyed
and can be inserted only one way.
11. If you are installing another non-hot-swap drive, do so at this time. Otherwise,
continue with the next step.
12. If you have other options to install or remove, do so now; otherwise, go to
“Completing the installation” on page 85.
72
IBM xSeries User's Reference
Summary of Contents for eServer 240 xSeries
Page 1: ...User s Reference xSeries 240...
Page 26: ...16 IBM xSeries User s Reference...
Page 50: ...40 IBM xSeries User s Reference...
Page 116: ...106 IBM xSeries User s Reference...
Page 170: ...160 IBM xSeries User s Reference...
Page 180: ...170 IBM xSeries User s Reference...
Page 219: ...IBM Part Number 21P9014 Printed in the United States of America 21P9 14...


