76
IBM® xSeries 250: User’s Reference
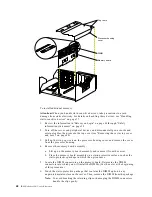
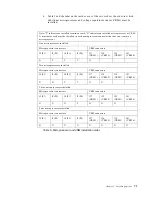
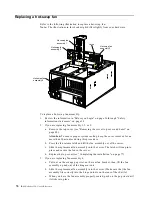
Replacing a hot-swap fan
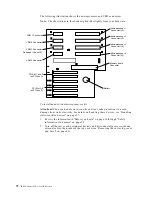
Refer to the following illustration to replace a hot-swap fan.
Note:
The illustrations in this book might differ slightly from your hardware.
To replace a hot-swap fan assembly:
1.
Review the information in“Before you begin” on page 36 through “Safety
information statements” on page 38.
2.
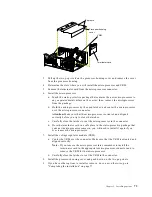
If you are replacing fan assembly 1, 2, or 3:
a.
Remove the top cover (see “Removing the server top cover and bezel” on
page 40).
Attention:
To ensure proper system cooling, keep the cover removed for no
more than 30 minutes during this procedure.
b. Press the fan release latch and lift the fan assembly out of the server.
c.
Slide the replacement fan assembly into the server. The latch will snap into
place and secure the fan in the server.
d. Replace the top cover (see “Completing the installation” on page 77).
3.
If you are replacing fan assembly 4:
a.
Pull out on the orange pop rivet on the rear fan bracket; then, lift the fan
assembly up and out of the hinge cutouts.
b. Slide the replacement fan assembly into the server. (Make sure that the fan
assembly fits correctly into the hinge cutouts on the rear of the shuttle.)
c.
When you have the fan assembly properly seated, push on the pop rivet until
it clicks into place.
Hot-swap fan
assembly 3
Hot-swap fan
assembly 4
Hot-swap fan
assembly 1
Hot-swap fan
assembly 2
Latch
Summary of Contents for eServer 250 xSeries
Page 1: ...User s Reference xSeries 250...
Page 2: ......
Page 3: ...IBM IBM xSeries 250 User s Reference SC21 P902 00...
Page 8: ...vi IBM xSeries 250 User s Reference...
Page 14: ...xii IBM xSeries 250 User s Reference...
Page 24: ...10 IBM xSeries 250 User s Reference...
Page 36: ...22 IBM xSeries 250 User s Reference...
Page 108: ...94 IBM xSeries 250 User s Reference...
Page 185: ......
Page 186: ...IBM Part Number 21P9020 Printed in the United States of America 21P9 2...


