background image


Chapter 3.  Server power, controls, and indicators

 43

Information LED panel

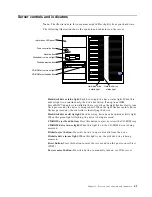
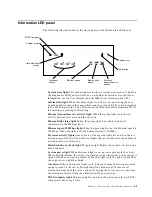
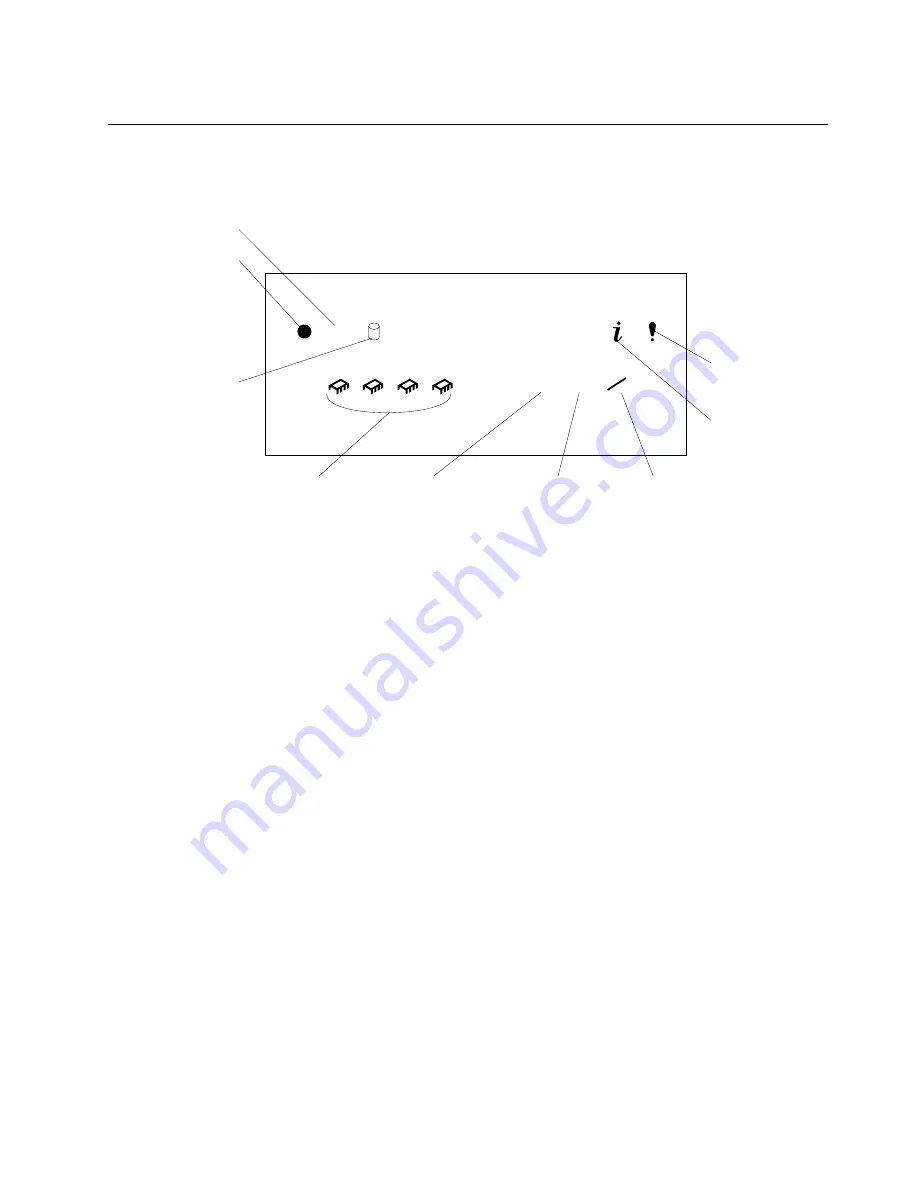
The following illustration shows the status lights on the Information LED panel.

System error light:

 This amber light is on when a system error occurs. A light on 

the diagnostics LED panel will also be on to further isolate the error. (For more 
information, see the User’s Reference on the IBM xSeries Documentation CD.)

Information light:

 When this amber light is on, the server power supplies are 

nonredundant or some other noncritical event has occurred. The event is recorded 
in the Event log. See the User’s Reference on the IBM xSeries Documentation CD for 
instructions on viewing the Event log.

Ethernet transmit/receive activity light:

 When this green light is on, there is 

activity between the server and the network.

Ethernet-link status light:

 When this green light is on, there is an active 

connection on the Ethernet port.

Ethernet speed 100 Mbps light:

 When this green light is on, the Ethernet speed is 

100 Mbps. When the light is off, the Ethernet speed is 10 Mbps.

Processor activity lights:

 One or more of these green lights are on when there is 

microprocessor activity. The number of lights that are on indicates the number of 
microprocessors with activity.

Hard-disk drive activity light:

 This green light flickers when there is activity on a 

hard disk drive.

System power light:

 When this green light is on, power is present in the server. 

When this light flashes, the server is in standby mode (the system power supply is 
turned off and ac current is present). When this light is off, the power subsystem, 
the ac power, or a light has failed. 

Attention: 

If the system power light is off, it does not mean there is no electrical 

current present in the server. The light might be burned out. To remove all 
electrical current from the server, you must unplug the server power cords from 
the electrical outlets or from the uninterruptible power device.

POST-complete light:

 This green light is on when the power-on self-test (POST) 

completes without any errors.

100

MB

LINK

OK

TX

RX

OK

1

2

3

4

POST-complete

System power

Hard disk drive

activity

Processor
activity

Ethernet speed

Ethernet-link
status

Ethernet
transmit/receive
activity

Information

System error

Summary of Contents for eServer 250 xSeries

Page 1: ...r and options Start the server Install the server in the rack if required Did the server start correctly Yes No Use ServerGuide to set up and configure hardware Did configuration complete Use ServerGuide to install operating system Use ServerGuide to install applications such as IBM systems management software and IBM ServeRAID programs System is ready to use Go to the Server Support flow chart to...

Page 2: ...ubleshooting information provided with your server to determine the cause of the problem and the action to take Flash the latest levels of BIOS service processor diagnostics and RAID code You can download this code at http www ibm com pc support No No Yes Yes Yes Check all cables for loose connections and verify that all optional devices you installed are on the ServerProven list You can view the ...

Page 3: ...IBM IBM xSeries 250 Installation Guide SC21 P901 90 ...

Page 4: ...formation in Appendix A Product warranties and notices on page 55 First Edition March 2001 1 0 Copyright International Business Machines Corporation 2001 All rights reserved US Government Users Restricted Rights Use duplication or disclosure restricted by GSA ADP Schedule Contract with IBM Corp ...

Page 5: ...r 37 Reconfiguring the server 37 Cabling the server 38 Chapter 3 Server power controls and indicators 39 Turning on the server 39 Turning off the server 40 Server controls and indicators 41 Information LED panel 43 Chapter 4 Configuring your server 45 Using the ServerGuide CDs 45 Chapter 5 Solving problems 47 POST beep code descriptions 47 POST error messages 48 ServerGuide startup problems 50 Tro...

Page 6: ...iv IBM xSeries 250 Installation Guide ...

Page 7: ...rjanen ennen kuin asennat tämän tuotteen Avant de procéder à l installation de ce produit lisez le manuel Safety Information Vor Beginn der Installation die Broschüre mit Sicherheitshinweisen lesen Prima di installare questo prodotto leggere l opuscolo contenente le informazioni sulla sicurezza Pred instalací tohoto produktu si prectete prírucku bezpecnostních instrukcí Przed zainstalowaniem tego ...

Page 8: ...o Informações sobre Segurança Antes de instalar este producto lea la Información de Seguridad Läs säkerhetsinformationen innan du installerar den här produkten Перед установкой продукта прочтите брошюру по технике безопасности Safety Information Pred inštaláciou tohto produktu si pre ítajte Informa nú brožúrku o bezpe nosti Preden namestite ta izdelek preberite knjižico Varnostne informacije Insta...

Page 9: ...any equipment when there is evidence of fire water or structural damage Disconnect the attached power cords telecommunications systems networks and modems before you open the device covers unless instructed otherwise in the installation and configuration procedures Connect and disconnect cables as described in the following table when installing moving or opening covers on this product or attached...

Page 10: ...required by local ordinances or regulations Statement 3 CAUTION When laser products such as CD ROMs DVD drives fiber optic devices or transmitters are installed note the following Do not remove the covers Removing the covers of the laser product could result in exposure to hazardous laser radiation There are no serviceable parts inside the device Use of controls or adjustments or performance of pr...

Page 11: ...ION The power control button on the device and the power switch on the power supply do not turn off the electrical current supplied to the device The device also might have more than one power cord To remove all electrical current from the device ensure that all power cords are disconnected from the power source 1 2 3 ...

Page 12: ...x IBM xSeries 250 Installation Guide ...

Page 13: ...led information about this server Your server comes with a three year limited warranty and IBM Server Start Up Support If you have access to the World Wide Web you can obtain up to date information about your server model and other IBM server products at the following World Wide Web address http www ibm com pc us eserver xseries Refer to the Rack Installation Instructions for complete details on r...

Page 14: ...ing upon configuration Integrated functions Advanced System Management processor Dual Ultra2 LVD SCSI controller one external port one internal port One 10BASE T 100BASE TX AMD Ethernet controller Two serial ports One parallel port Two Universal Serial Bus ports Keyboard port Mouse port Video port One management port Two Advanced System Management Interconnect ports Acoustical noise emissions Soun...

Page 15: ...or advice that might help you avoid inconvenient or problem situations Attention These notices indicate possible damage to programs devices or data An attention notice is placed just before the instruction or situation in which damage could occur Caution These notices indicate situations that can be potentially hazardous to you A caution notice is placed just before the description of a potentiall...

Page 16: ...rovided that your system is configured to support this function For complete information about installing or removing a hot swap or hot plug component see the information provided in the procedures in this document The blue color on components and labels indicates touch points where a component can be gripped a latch moved and so on Power supply Fan assembly 1 Filler Panel Removable media drive Ho...

Page 17: ...Chapter 1 Introduction 5 Microprocessor Terminator card Memory module Shuttle I O board Memory board Shuttle cover VRM Fan assembly 3 Fan assembly 2 Fan assembly 4 ...

Page 18: ...6 IBM xSeries 250 Installation Guide ...

Page 19: ...the system is running provided that your system is configured to support this function The blue color on components and labels identifies touch points where you can grip a component move a latch and so on Make sure that you have an adequate number of properly grounded electrical outlets for your server monitor and any other options that you intend to install Back up all important data before you m...

Page 20: ...ep static sensitive devices in their static protective package until you are ready to install them To reduce the possibility of electrostatic discharge observe the following precautions Limit your movement Movement can cause static electricity to build up around you Handle the device carefully holding it by its edges or its frame Do not touch solder joints pins or exposed printed circuitry Do not ...

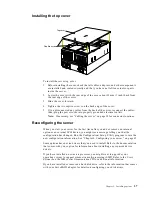
Page 21: ...ur hardware To remove the server top cover 1 Loosen the two screws on the back edge of the top cover 2 Slide the top cover slightly toward the rear of the server Lift the cover off the server and set the cover aside Attention For proper cooling and airflow replace the top cover after installing or removing an option Operating the server for extended periods of time over 30 minutes with the top cov...

Page 22: ...he media bay bezel 1 Release the two tabs at the bottom edge of the media bay bezel and pull the bottom of the bezel slightly away from the server 2 Pull the media bay bezel down to release the two tabs at the top edge of the bezel Store the bezel in a safe place Media bay bezel ...

Page 23: ...n The system scans PCI slots 1 through 6 to assign system resources then the system starts boots the PCI devices in the following order processor and I O board devices slots 1 and 2 and then slots 3 through 6 You can install hot plug PCI adapters in PCI slots 3 through 6 You can also install non hot plug PCI adapters in these slots Note The illustrations in this document might differ slightly from...

Page 24: ...ces see Handling static sensitive devices on page 8 1 Review the information in Before you begin on page 7 through Handling static sensitive devices on page 8 2 Remove the top cover see Removing the server top cover and bezel on page 9 3 Determine which expansion slot you will use for the adapter Note You can install hot plug PCI adapters in PCI slots 3 through 6 only 4 Disable the selected PCI sl...

Page 25: ...ace the adapter component side up on a flat static protective surface 8 Install the adapter a Carefully grasp the adapter by its top edge or upper corners and align it with the expansion slot on the processor board b Press the adapter firmly into the expansion slot Attention When you install an adapter in the server be sure that it is completely and correctly seated in the expansion slot Incomplet...

Page 26: ... 3 Remove the top cover see Removing the server top cover and bezel on page 9 4 Determine which expansion slot you will use for the adapter Note PCI slots 1 and 2 support non hot plug PCI adapters only 5 Remove the expansion slot cover a Rotate the adapter retention latch counterclockwise b Lift the tab covering the top of the expansion slot cover and then remove the expansion slot cover from the ...

Page 27: ...board b Press the adapter firmly into the expansion slot Attention When you install an adapter in the server be sure that it is completely and correctly seated in the expansion slot Incomplete insertion might cause damage to the processor board or the adapter c Lower the tab over the top corner of the adapter Rotate the adapter retention latch clockwise until it snaps into place d Lower the rear a...

Page 28: ...k drive cables are labeled HDD To cable the ServeRAID adapter 1 Determine the number of SCSI channels that you want to use on the ServeRAID adapter If you are connecting to more than two SCSI channels you might need to purchase additional SCSI cables Consult your IBM marketing representative or reseller for additional information on the number and types of cables that your server configuration req...

Page 29: ...e retaining levers back to the unlocked position c Slide the shuttle toward the rear of the server until it stops Note It is not necessary to remove the shuttle from the server 7 Disconnect the SCSI cable from the SCSI connector on the power backplane Retaining lever unlocked position SCSI connector on power backplane ...

Page 30: ...8 Route one end of the SCSI cable through the cable retaining clips on the SCSI backplane Backplane Retention clips Retention clips Power cable connector Cable retaining clips Handle SCSI channel A connector SCSI channel B connector Guides ...

Page 31: ...CSI backplane Attention When you route the SCSI cable do the following Do not block the ventilated space in front of the fan assembly Do not place the SCSI cable fold on top of the fan assembly Do not route the SCSI cable over the memory board assembly The following illustration shows how to route one SCSI cable to the ServeRAID adapter SCSI cable ServeRAID adapter SCSI connector on hard disk driv...

Page 32: ...g to two SCSI channels repeat step 8 on page 18 and step 9 on page 19 for the second channel on the SCSI backplane The following illustration shows how to route two SCSI cables to the ServeRAID adapter 2 3 SCSI connectors on ServeRAID adapter Cable retaining clip ...

Page 33: ...taining levers from the notches on the chassis b Move the retaining levers toward the front of the server and secure the retaining levers in the horizontal locked position 12 If you have other options to install or remove do so now otherwise go to Completing the installation on page 36 Retaining lever locked position Retaining lever unlocked position Pin Pin ...

Page 34: ...he memory that is usable by the network operating system This amount of memory might differ from the amount of memory that you have installed Installing or removing DIMMs changes the configuration information in the server Therefore after installing or removing a DIMM you must save the new configuration information using the Configuration Setup Utility program See the User s Reference on the IBM x...

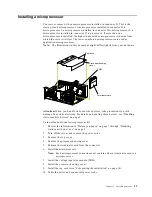
Page 35: ...in Before you begin on page 7 through Handling static sensitive devices on page 8 2 Turn off the server and remove the power cords 3 Remove the top cover 4 Remove the processor housing cover and remove the memory board assembly from the server 5 Select the connectors in which to install the DIMMs 6 Install the DIMMs in the connectors 7 Replace the memory board assembly in the server and replace th...

Page 36: ...ckplane are attached to channel B through a second optional SCSI cable One end of this second SCSI cable comes attached to the SCSI channel B connector on the backplane The other end of this cable is folded and restrained with a clamp When you are installing hot swap hard disk drives in the standard backplane configuration attach the first five to channel A then attach the remainder to channel B R...

Page 37: ...ll of your internal hot swap hard disk drives to the same SCSI channel The following illustration shows the rear connectors on the optional SCSI repeater card as viewed from the rear of the server Backplane Retention clips Retention clips Power cable connector Cable retaining clips Handle SCSI channel A connector SCSI channel B connector Guides SCSI cable connector SCSI repeater card cable connect...

Page 38: ...D adapter on page 16 4 Disconnect the shuttle a Disengage the retaining levers by pressing inward b Move the retaining levers back to the unlocked position c Slide the shuttle toward the rear of the server until it stops Note It is not necessary to remove the shuttle from the server 5 Remove fan assembly 1 from the server 6 Disconnect the hot swap hard disk drives from the corresponding SCSI backp...

Page 39: ...9 Connect the repeater card option to the SCSI backplane a Align the corresponding connectors on the repeater card and the SCSI backplane The corresponding screw holes on the repeater card and the SCSI backplane will automatically align b Use a small flat blade screwdriver to connect the repeater card to the SCSI backplane with the two screws from the repeater card option kit c Secure the repeater...

Page 40: ...Connect one end of this cable to the repeater card b Connect the other end of the cable to the SCSI channel B connector on the SCSI backplane c Secure both cable ends with the retention clips on the SCSI connectors SCSI cable to power backplane SCSI backplane SCSI repeater card SCSI repeater card cable ...

Page 41: ...backplane guides with the corresponding slots on the server c Slide the SCSI backplane into the server d Connect one end of the SCSI cable to the repeater card e Make sure that the other end of the SCSI cable is attached to the power backplane located on the rear of the shuttle SCSI backplane SCSI repeater card SCSI connector on power backplane ...

Page 42: ...tation CD for additional information 13 Reinstall fan assembly 1 in the server 14 Reconnect the shuttle a Align the two shuttle pins with the holes on each side of the rear of the chassis and disengage the retaining levers from the notches on the chassis b Move the retaining levers toward the front of the server and secure the retaining levers in the horizontal locked position 15 If you disconnect...

Page 43: ...ou cannot install a drive in the gap Some gap fillers also come attached to a slim filler panel The gap filler is removable from the slim filler panel when available Note The illustrations in this book might differ slightly from your hardware Attention When you handle static sensitive devices take precautions to avoid damage from static electricity For details on handling these devices see Handlin...

Page 44: ...ign the drive assembly with the guide rails in the bay d Gently push the drive assembly into the bay until the drive stops e Push the tray handle to the closed locked position f Check the hard disk drive status indicators to verify that the hard disk drive is operating properly If the amber hard disk status light for a drive is lit continuously that individual drive is faulty and needs to be repla...

Page 45: ...andle static sensitive devices take precautions to avoid damage from static electricity For details on handling these devices see Handling static sensitive devices on page 8 To install an additional microprocessor kit 1 Review the information in Before you begin on page 7 through Handling static sensitive devices on page 8 2 Turn off the server and remove the power cords 3 Remove the top cover 4 R...

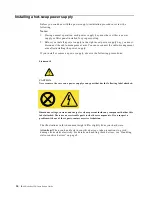
Page 46: ...ou install or remove a power supply observe the following precautions The illustrations in this document might differ slightly from your hardware Attention When you handle static sensitive devices take precautions to avoid damage from static electricity For details on handling these devices see Handling static sensitive devices on page 8 Statement 8 CAUTION Never remove the cover on a power supply...

Page 47: ...d of the power cord into the corresponding outlet on the rear of the server then plug the other end of the power cord into a properly grounded electrical outlet 6 Verify that the DC Power light and the AC Power light on the power supply are lit indicating that the power supply is operating properly Statement 6 CAUTION If you install a strain relief bracket option over the end of the power cord tha...

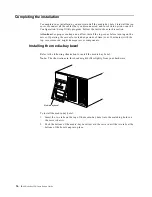
Page 48: ...rning on the server Operating the server for extended periods of time over 30 minutes with the top cover removed might damage server components Installing the media bay bezel Refer to the following illustration to install the media bay bezel Note The illustrations in this book might differ slightly from your hardware To install the media bay bezel 1 Insert the two tabs on the top of the media bay ...

Page 49: ... server When you start your server for the first time after you add or remove an internal option or an external SCSI device you might see a message telling you that the configuration has changed Run the Configuration Setup Utility program to save the new configuration information See Chapter 4 Configuring your server on page 45 Some options have device drivers that you need to install Refer to the...

Page 50: ... might differ slightly from your hardware Refer to the following illustration for an example of proper cable routing Note Refer to the Rack Installation Instructions for rack installation instructions Ethernet USB1 USB2 Video Mouse Keyboard Ultra2 SCSI ASM Interconnect port B ASM Interconnect port A Serial A Serial B System management Parallel Advanced Systems Management Interconnect knockout ...

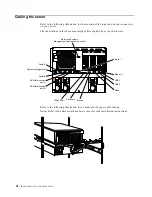
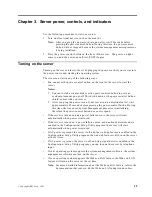
Page 51: ...rver into an electrical outlet wait approximately 20 seconds before pressing the power control button During this time the Advanced System Management processor is initializing therefore the power control button does not respond If the server is turned on and a power failure occurs the server will start automatically when power is restored If the server is turned on a power failure occurs and unatt...

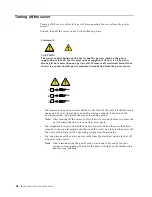
Page 52: ...ower control button for more than four seconds to cause an immediate shutdown of the server and to force the power off You can use this feature if the operating system stops functioning You can disconnect the server power cords from the electrical outlets to shut off all power to the server Note After disconnecting the power cords wait about 15 seconds for your system to stop running Watch for the...

Page 53: ...vity light Each hot swap drive has a hard disk activity light When this green light is flashing the drive is being accessed CD ROM eject load button Press this button to eject or retract the CD ROM tray CD ROM drive in use light When this light is on the CD ROM drive is being accessed Diskette eject button Press this button to eject a diskette from the drive Diskette drive in use light When this l...

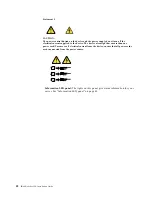
Page 54: ...on LED panel on page 43 Statement 5 CAUTION The power control button on the device and the power supply do not turn off the electrical current supplied to the device The device also might have more than one power cord To remove all electrical current from the device ensure that all power cords are disconnected from the power source 1 2 3 ...

Page 55: ... the Ethernet speed is 10 Mbps Processor activity lights One or more of these green lights are on when there is microprocessor activity The number of lights that are on indicates the number of microprocessors with activity Hard disk drive activity light This green light flickers when there is activity on a hard disk drive System power light When this green light is on power is present in the serve...

Page 56: ...44 IBM xSeries 250 Installation Guide ...

Page 57: ...his program to change default values resolve configuration conflicts and perform a low level format on a SCSI hard disk drive ServeRAID programs If you have a ServeRAID adapter installed in your server you must use the ServeRAID configuration program to define and configure your disk array subsystem before you install your operating system Note Refer to the User s Reference on the IBM xSeries Docu...

Page 58: ...46 IBM xSeries 250 Installation Guide ...

Page 59: ...ear on the screen Three short POST detected a system memory error Verify that the memory is installed correctly If it is replace the failing memory module Repeating short The system board might contain a failing component 1 Verify that the keyboard and pointing devices are connected properly 2 Ensure that nothing is resting on the keyboard 3 Disconnect the pointing device then restart the server I...

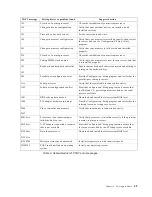
Page 60: ...ssages The following table provides an abbreviated list of the error messages that might appear during POST Note See the Solving problems section of the User s Reference on the IBM xSeries Documentation CD for more information about the POST beep codes ...

Page 61: ... the parallel port setting is correct 11xx Serial port error Verify that the serial cable is connected correctly 1162 Serial port configuration conflict Start the Configuration Setup program and ensure that the IRQ and I O port assignments needed by the serial port are available 1601 BIOS code update needed Download and install the latest system BIOS level 1800 PCI adapter hardware interrupt Start...

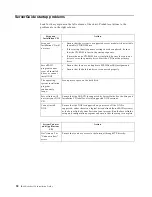
Page 62: ...es or cannot install NOS Ensure that there are no duplicate SCSI IDs or IRQ assignments Ensure that the hard disk drive is connected properly The operating system installation program continuously loops Free up more space on the hard disk ServerGuide will not start your NOS CD Ensure that the NOS CD is supported by ServerGuide See the Setup and Installation CD label for a list of supported NOS ver...

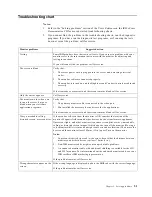
Page 63: ...rams Verify that 1 The primary monitor cable is connected to the video port 2 You installed the necessary device drivers for the applications If the items above are correct and the screen remains blank call for service Wavy unreadable rolling distorted screen or screen jitter If the monitor self tests show the monitor is OK consider the location of the monitor Magnetic fields around other devices ...

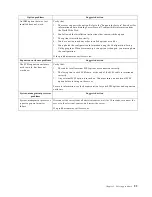
Page 64: ... microprocessor is seated properly If it is replace the startup microprocessor If the problem remains call for service Memory problems Suggested action The amount of memory displayed is less than the amount of memory installed Verify that 1 The memory modules are seated properly 2 You have installed the correct type of memory 3 If you changed the memory you updated the memory configuration using t...

Page 65: ...figuration If the problem remains call for service Expansion enclosure problems Suggested action The SCSI expansion enclosure used to work but does not work now Verify that 1 The cables for all external SCSI options are connected correctly 2 The last option in each SCSI chain or the end of the SCSI cable is terminated correctly 3 Any external SCSI option is turned on You must turn on an external S...

Page 66: ...54 IBM xSeries 250 Installation Guide ...

Page 67: ...y affects any statutory rights of consumers that cannot be waived or limited by contract If you have any questions contact IBM or your reseller The IBM Warranty for Machines IBM warrants that each Machine 1 is free from defects in materials and workmanship and 2 conforms to IBM s Official Published Specifications Specifications The warranty period for a Machine is a specified fixed period commenci...

Page 68: ...ce with their Specifications IBM or your reseller will inform you of the available types of service for a Machine based on its country of installation At its discretion IBM or your reseller will 1 either repair or exchange the failing Machine and 2 provide the service either at your location or a service center IBM or your reseller will also manage and install selected engineering changes that app...

Page 69: ...ct or tort claim except for any liability that cannot be waived or limited by applicable laws IBM is liable for no more than 1 damages for bodily injury including death and damage to real property and tangible personal property and 2 the amount of any other actual direct damages up to the charges if recurring 12 months charges apply for the Machine that is subject of the claim For purposes of this...

Page 70: ...s or the supply of equivalent goods Where that condition or warranty relates to right to sell quiet possession or clear title or the goods are of a kind ordinarily acquired for personal domestic or household use or consumption then none of the limitations in this paragraph apply Governing Law The following replaces laws of the country in which you acquired the Machine in the first sentence laws of...

Page 71: ...id by you for the individual Machine that is the subject of the claim JAPAN Governing Law The following sentence is added to this Section Any doubts concerning this Agreement will be initially resolved between us in good faith and in accordance with the principle of mutual trust NEW ZEALAND The IBM Warranty for Machines The following paragraph is added to this Section The warranties specified in t...

Page 72: ...can country you may obtain warranty service for that Machine from the IBM entity within the country of purchase if that IBM entity provides warranty service in that country or from an IBM reseller approved by IBM to perform warranty service on that Machine in that country Warranty service in Africa is available within 50 kilometers of an IBM authorized service provider You are responsible for tran...

Page 73: ...e warranty period transportation for delivery of the failing Machine to IBM will be at IBM s expense Limitation of Liability The following paragraph is added to this Section The limitations and exclusions specified in the Statement of Limited Warranty will not apply to damages caused by IBM with fraud or gross negligence and for express warranty The following sentence is added to the end of item 2...

Page 74: ...raph of this Section Unless otherwise provided by mandatory law IBM and your reseller are not liable for any of the following items 1 and 2 unchanged 3 indirect damages even if IBM or your reseller is informed of their possibility SOUTH AFRICA NAMIBIA BOTSWANA LESOTHO AND SWAZILAND Limitation of Liability The following is added to this Section IBM s entire liability to you for actual damages arisi...

Page 75: ...IS WITHOUT WARRANTY OF ANY KIND EITHER EXPRESS OR IMPLIED INCLUDING BUT NOT LIMITED TO THE IMPLIED WARRANTIES OF NON INFRINGEMENT MERCHANTABILITY OR FITNESS FOR A PARTICULAR PURPOSE Some states do not allow disclaimer of express or implied warranties in certain transactions therefore this statement may not apply to you This information could include technical inaccuracies or typographical errors C...

Page 76: ... exchange data with do not process date data correctly The foregoing is a Year 2000 Readiness Disclosure Trademarks The following terms are trademarks of the IBM Corporation in the United States other countries or both Intel MMX LANDesk Pentium Pentium II Xeon and Pentium III Xeon are trademarks or registered trademarks of Intel Corporation in the United States other countries or both Microsoft Wi...

Page 77: ...nications Operation of this equipment in a residential area is likely to cause harmful interference in which case the user will be required to correct the interference at his own expense Properly shielded and grounded cables and connectors must be used in order to meet FCC emission limits IBM is not responsible for any radio or television interference caused by using other than recommended cables ...

Page 78: ...to satisfy the protection requirements resulting from a nonrecommended modification of the product including the fitting of non IBM option cards This product has been tested and found to comply with the limits for Class A Information Technology Equipment according to CISPR 22 European Standard EN 55022 The Limits for Class A equipment were derived for commercial and industrial environments to prov...

Page 79: ...te safety approvals for the country in which the equipment will be installed IBM power cords for a specific country or region are usually available only in that country or region IBM power cord part number Used in these countries and regions 13F9940 Argentina Australia China PRC New Zealand Papua New Guinea Paraguay Uruguay Western Samoa 13F9979 Afghanistan Algeria Andorra Angola Austria Belgium B...

Page 80: ...ta Rica Dominican Republic Ecuador El Salvador Guatemala Guyana Haiti Honduras Jamaica Japan Korea South Liberia Mexico Netherlands Antilles Nicaragua Panama Peru Philippines Saudi Arabia Suriname Taiwan Trinidad West Indies United States of America Venezuela IBM power cord part number Used in these countries and regions ...

Page 81: ... speed 100 Mbps light 43 Ethernet transmit receive activity light 43 Ethernet link status light 43 F FCC Class A notice 65 features LVD SCSI backplane 24 server 2 filler panel hot swap drive 31 power supply 34 H hard disk drive activity light 41 43 hard disk drive status light 41 heat output 2 hot swap and hot plug devices adapters 12 color 4 7 hard disk drives 31 power supplies 35 hot swap drive ...

Page 82: ...ling 25 29 removing 26 using 24 cable repeater card 29 ServeRAID adapter 19 IDs assigning 32 repeater card connectors 25 installing 25 SCSISelect Utility program 45 ServeRAID adapter 16 ServeRAID Configuration program 45 ServerGuide CDs 45 error symptoms 50 shield power control button 39 shutting down the server 40 shuttle connecting 30 disconnecting 26 size 2 solving problems 47 specifications 2 ...

Page 83: ......

Page 84: ...IBM Part Number 21P9019 Printed in the United States of America 21P9 19 ...

Reviews: