


Complete the following steps to install an additional microprocessor:
1. Review Appendix B, “Safety information,” on page 97 and “Installation
guidelines” on page 27.
2. Shut down the operating system, turn off the blade server, and remove the
blade server from the BladeCenter unit (see “Removing the blade server from
the BladeCenter unit” on page 29).
3. Carefully lay the blade server on a flat, static-protective surface.
4. Open the blade server cover (see “Opening the blade server cover” on page
34).
5. Remove the bezel assembly (see “Removing the blade server bezel assembly”
on page 36).
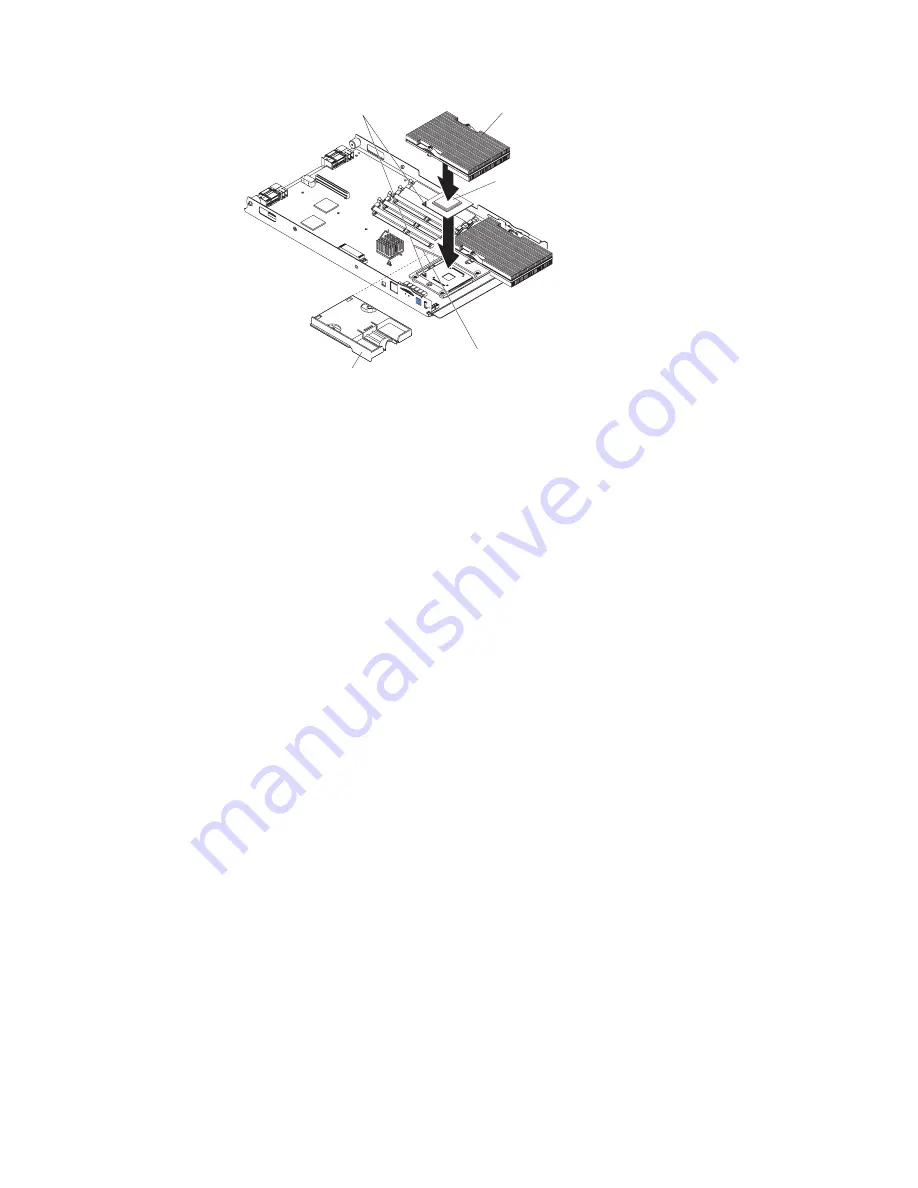
6. Locate microprocessor socket 2 on the system board (see Figure 29 on page
60).
7. Remove the heat-sink filler.
8. Install the microprocessor:
a. Remove the protective cover, tape, or label from the surface of the
microprocessor socket, if one is present.
b. Touch the static-protective package containing the new microprocessor to
any
unpainted
metal surface on the BladeCenter chassis or any
unpainted
surface on any other grounded rack component for at least two seconds;
then, remove the microprocessor from the package.
Attention:
Do not use any tools or sharp objects to lift the locking lever
on the microprocessor socket. Doing so might result in permanent damage
to the system board.
c. Rotate the locking lever on the microprocessor socket from its closed and
locked position (Figure 21 on page 43) until it stops or clicks in the fully
open position (approximately a 135° angle), as shown in Figure 22 on page
43.
Attention:
You must ensure that the locking lever on the microprocessor
socket is in the fully open position before you insert the microprocessor in
the socket. Failure to do so might result in permanent damage to the
microprocessor, microprocessor socket, and system board.
Heat sink
Microprocessor
Microprocessor
locking lever
Heat sink filler
Alignment marks
Figure 20. Installing a second microprocessor
42
BladeCenter HS20 Type 8832: Hardware Maintenance Manual and Troubleshooting Guide
Summary of Contents for eServer BladeCenter HS20 Type 8832
Page 1: ...BladeCenter HS20 Type 8832 Hardware Maintenance Manual and Troubleshooting Guide ...
Page 2: ......
Page 3: ...BladeCenter HS20 Type 8832 Hardware Maintenance Manual and Troubleshooting Guide ...
Page 6: ...iv BladeCenter HS20 Type 8832 Hardware Maintenance Manual and Troubleshooting Guide ...
Page 10: ...viii BladeCenter HS20 Type 8832 Hardware Maintenance Manual and Troubleshooting Guide ...
Page 18: ...8 BladeCenter HS20 Type 8832 Hardware Maintenance Manual and Troubleshooting Guide ...
Page 64: ...54 BladeCenter HS20 Type 8832 Hardware Maintenance Manual and Troubleshooting Guide ...
Page 66: ...56 BladeCenter HS20 Type 8832 Hardware Maintenance Manual and Troubleshooting Guide ...
Page 118: ...108 BladeCenter HS20 Type 8832 Hardware Maintenance Manual and Troubleshooting Guide ...
Page 119: ...Appendix B Safety information 109 ...
Page 120: ...110 BladeCenter HS20 Type 8832 Hardware Maintenance Manual and Troubleshooting Guide ...
Page 121: ...Appendix B Safety information 111 ...
Page 122: ...112 BladeCenter HS20 Type 8832 Hardware Maintenance Manual and Troubleshooting Guide ...
Page 123: ...Appendix B Safety information 113 ...
Page 124: ...114 BladeCenter HS20 Type 8832 Hardware Maintenance Manual and Troubleshooting Guide ...
Page 136: ...126 BladeCenter HS20 Type 8832 Hardware Maintenance Manual and Troubleshooting Guide ...
Page 137: ...Appendix B Safety information 127 ...
Page 138: ...128 BladeCenter HS20 Type 8832 Hardware Maintenance Manual and Troubleshooting Guide ...
Page 139: ...Appendix B Safety information 129 ...
Page 140: ...130 BladeCenter HS20 Type 8832 Hardware Maintenance Manual and Troubleshooting Guide ...
Page 141: ...Appendix B Safety information 131 ...
Page 146: ...136 BladeCenter HS20 Type 8832 Hardware Maintenance Manual and Troubleshooting Guide ...
Page 152: ...142 BladeCenter HS20 Type 8832 Hardware Maintenance Manual and Troubleshooting Guide ...
Page 156: ...146 BladeCenter HS20 Type 8832 Hardware Maintenance Manual and Troubleshooting Guide ...
Page 157: ......
Page 158: ... Part Number 49Y0165 Printed in USA 1P P N 49Y0165 ...


